Transform Analytics data to generate Power BI reports
Azure DevOps Services | Azure DevOps Server 2022 - Azure DevOps Server 2019
Once you've imported your Analytics data into Power BI, you may need to transform select column data prior to creating a report. This article shows you how to perform some of these basic tasks, such as:
- Expand columns, such as Area, AssignedTo, and Iteration
- Expand descendant columns when querying linked work items
- Pivot columns to generate counts for select category states
- Transform the column data type from decimal to whole numbers
- Replace null values in column data
- Create a custom field
- Rename fields.
Expand columns
The query returns several columns that you need to expand before you can use them in Power BI. Any entity pulled in using an OData $expand statement returns a record with potentially several fields. You need to expand the record to flatten the entity into its fields. Examples of such entities are: AssignedTo, Iteration, and Area.
After closing the Advanced Editor and while remaining in the Power Query Editor, select the expand button on the entities you need to flatten.
For example, choose the expand button for Area, select the properties you want to expand, and choose OK. Here, we choose
AreaNameandAreaPathto flatten. TheAreaNameproperty is similar to the Node Name field.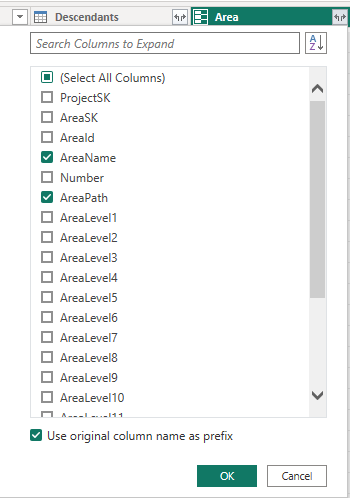
Note
The available properties to select depends on the properties requested to return in the query. If you don't specify any properties, then all properties are available. To learn more about these properties, see the following metadata references: Areas, Iterations, and Users.
The table now contains entity field(s).

Repeat steps 1 through 3 for all fields representing entities that need expanding. These appear with Record listed in the table column when unexpanded.
Expand Descendants column
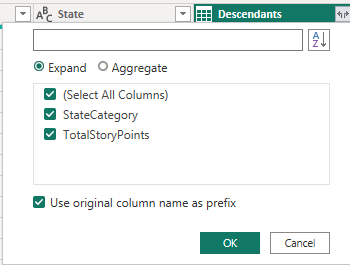
The Descendants column contains a table with two fields: State and TotalStoryPoints. Expand it.
Choose the Expand button, and select the columns to report on:

Check all the columns and choose OK.
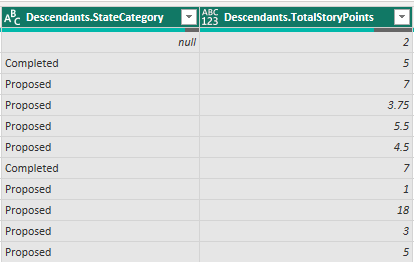
The Descendants entity is flattened to the selected columns:
Pivot Descendants.StateCategory column
Select the 1Descendants.StateCategory1 column header to select it.
Select Transform menu and then Pivot Column.
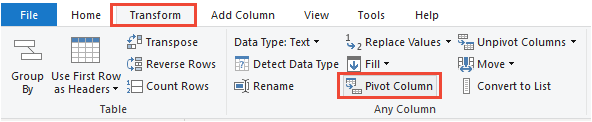
In the Pivot Column dialog, for Values select
Descendants.TotalStoryPoints, and then press OK. Power BI creates a column for every StateCategory value.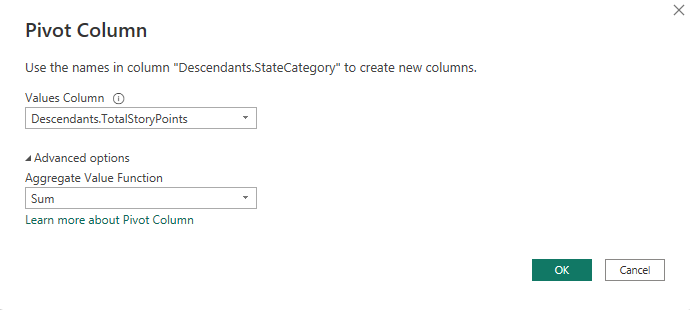
Expand the Links column
Select the expand button on the
Linkscolumn.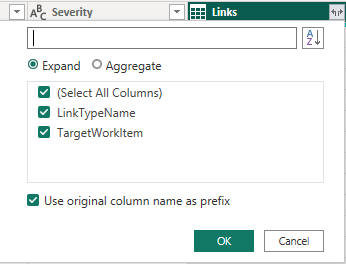
Select all the fields to flatten.
Select the expand button on the
Links.TargetWorkItemcolumn and select the properties to flatten.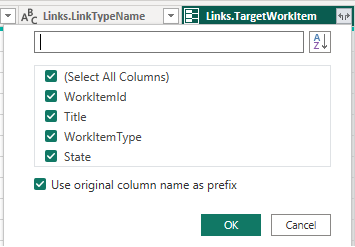
Note
If the link represents a one-to-many or many-to-many relationship, then multiple links will expand to multiple rows, one for each link.
For example, if Work Item #1 is linked to Work Item's #2 and #3, then when you expand the Links record, you will have 2 rows for Work Item #1. One that represents its link to Work Item #2, and another that represents its link to Work Item #3.
Transform a column data type
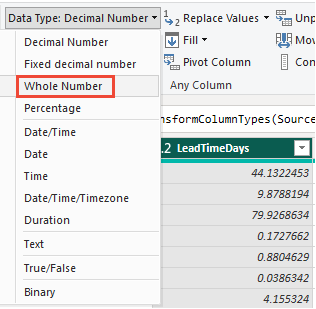
Transform LeadTimeDays and CycleTimeDays to whole numbers
The LeadTimeDays and CycleTimeDays are decimal fields. For example if Lead Time is 10 and 1/2 days, the value is 10.5. Since most Lead/Cycle Time reports assume that it's rounded to the nearest day, we need to convert these fields to an Integer. Making this conversion converts all values less than 1 to 0.
From the Power Query Editor, select the ribbon Transform menu.
Select the
LeadTimeDayscolumn by selecting the column header.Select Data Type and change to Whole Numbers.
Repeat for
CycleTimeDays.
Change CompletedDateSK to a Date field
The CompletedDateSK column data corresponds to an integer rendering of the Completed Date field in the format YYYYMMDD. For example, the integer value of 2022-July-01 is 20220701. For easier reporting, we change it to a Date field.
From the Power Query Editor, select the ribbon Transform menu.
Select the
CompletedDateSKcolumn header.Select Data Type and change to Text. When the Change Column Type dialog appears, select Add new step (rather than Replace current step). This two-step process is the easiest way to change it to a proper Date field in Power BI.
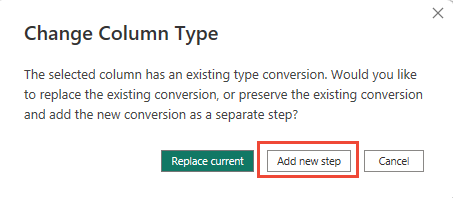
Next, select Date Type again and choose Date. In the Change Column Type dialog, select Add new step.
Replace values
Sometimes one or more records may contain null values. For example, a value may not have been entered for Story Points or Remaining Work.
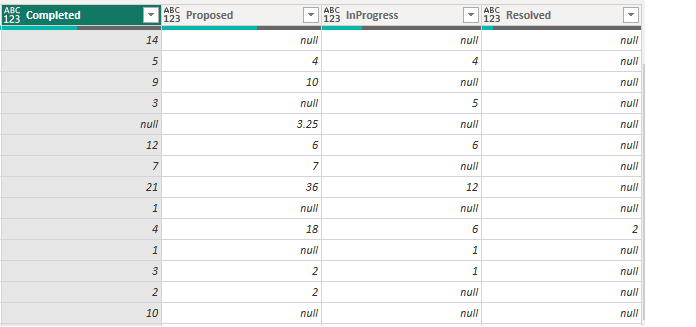
For easier reporting, replace nulls with zero by following these steps.
- Select the column by clicking the column header.
- Select the Transform menu.
- Select Replace Values. In the Replace Values dialog:
- Enter "null" in Value to Find.
- Enter "0" in Replace With.
- Choose OK.
Create a custom column
Create a percentage complete computed column
Prior to adding the percentage complete column, make sure that you replace all null values in the pivoted state columns.
Select Add Column menu.
Select Custom Column.
Enter PercentComplete for New column name.
Enter the following in Custom column formula.
= [Completed]/([Proposed]+[InProgress]+[Resolved]+[Completed])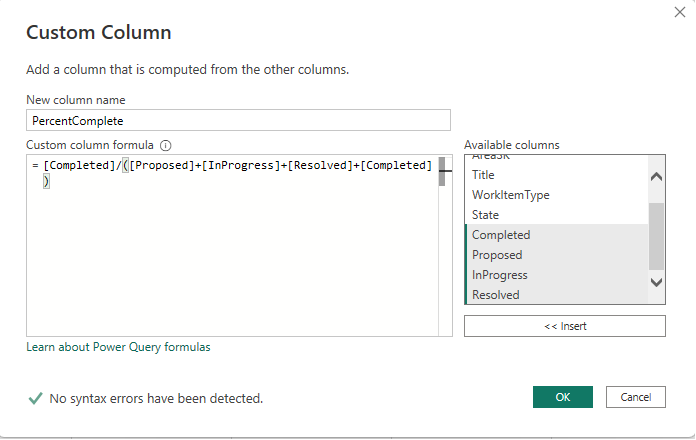
Note
It's possible that you won't have a Resolved column, if the work items don't have States mapped to the Resolved workflow state category. If so, omit "[Resolved]" in the above formula.
Press OK.
Select Transform menu.
Select Data Type and select Percentage.
Rename column fields
When finished with your expansion, you may choose to rename one or more columns.
Right-click a column header and select Rename...
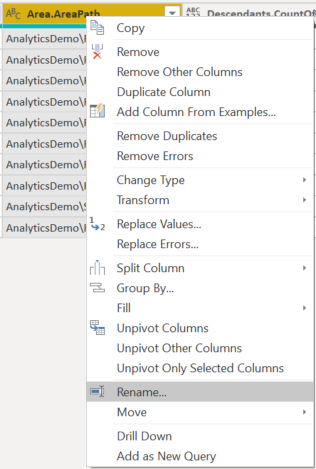
Enter a new label for the column field and then press Enter.
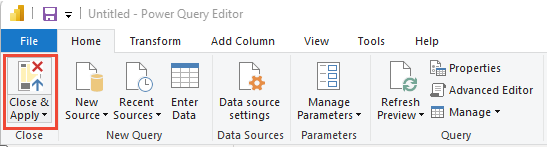
Close the query and apply your changes
Once you've completed all your data transformations, choose Close & Apply from the Home menu to save the query and return to the Report tab in Power BI.
Related articles
Feedback
Coming soon: Throughout 2024 we will be phasing out GitHub Issues as the feedback mechanism for content and replacing it with a new feedback system. For more information see: https://aka.ms/ContentUserFeedback.
Submit and view feedback for