Team Foundation Server 2018 Release Notes
Developer Community | System Requirements and Compatibility | License Terms | TFS DevOps Blog | SHA-1 Hashes | Latest Visual Studio 2019 Releases Notes
Note
If you are accessing this page from a non-English language version, and want to see the most up-to-date content, please visit this Release Notes page in English. You can change the language of this page by clicking the globe icon in the page footer and selecting your desired language.
In this article, you will find information regarding Team Foundation Server 2018. Click the button to download.

To learn more about Team Foundation Server 2018, see the Team Foundation Server Requirements and Compatibility page. Visit the visualstudio.com/downloads page to download other TFS 2018 products.
Please see the TFS Install page for more information.
 Release Date: November 15, 2017
Summary of What's New in TFS 2018
We have added a lot of new value to Team Foundation Server 2018. Some of the highlights include:
- We have improved the Project Creation Wizard and Process Template Manager on the web.
- You can now customize the work item form header.
- We optimized the mobile work item form.
- We added support for Git forks.
- You can manage massive Git repositories with GVFS.
- You can view, filter, delete, and set the security of Git tags.
- We added file minimap, bracket matching, and toggle white space to web code editing.
- We made many improvements to pull requests.
- You have a new improved Wiki experience.
- We have added support for Maven packages.
- You can import and export, and pause build definitions.
- The new Release Definition Editor has opt-in by default.
- You can deploy with virtual machine deployments.
- We improved exploratory testing traceability.
- We added test batching.
- You can now view a chart widget for test plans and test suites.
What's New in TFS 2018 video
XAML Build
We had originally listed XAML build as removed from TFS 2018 RTW and Update 1. However, that resulted in too many customers being unable to upgrade or having to contact support to re-enable it after the upgrade completed. In TFS 2018 Update 2, XAML build is enabled but has been deprecated. This means there is no further investment in XAML Build, and Microsoft Test Manager (MTM) no longer supports using XAML builds. We highly recommend converting to one of the newer build definition formats. You may continue to connect your XAML controllers and run XAML builds with TFS 2018 Update 2. More info
Features Removed in TFS 2018 RTW
- Support for Lab Center and automated testing flows in Microsoft Test Manager has been removed.
- We discontinued TFS Extension for SharePoint.
- We removed the Team Room feature.
Details of What's New in TFS 2018
Work Item Tracking
Project Creation Wizard on the web
We have improved the experience for creating a Team Project from web access. It now includes most of the features available when you create a Team Project in the Visual Studio client. The benefit of using the web interface is that you do not need a matching Visual Studio version. The difference of using Visual Studio or the web version is that the web version does not provision your reports in SSRS. If you used the web version of the Team Project creation, you can run the tfsconfig command on the Application Tier to provision or update the SSRS reports.
Process Template Manager on the web
With TFS 2018, you can use web access to upload your process templates. The web interface is a much easier experience because you do not have to install the correct version of Visual Studio to interact with your process templates. Visual Studio 2017 Update 4 and earlier will still show the Process Template Manager dialog, although we recommend using the web interface. Visual Studio 2017 Update 5 and later will redirect you to the web automatically.
Customize the work item form header
You can now customize the work item form header area by replacing the existing controls, or hiding controls, that are not relevant to your process. This will enable replacing Area path with a custom Team field, hiding Iteration if your teams are more Kanban focused, and replacing Reason with a custom field. The State field cannot be hidden or replaced.
Tip
See the documentation for WebLayout and Control elements for more information.
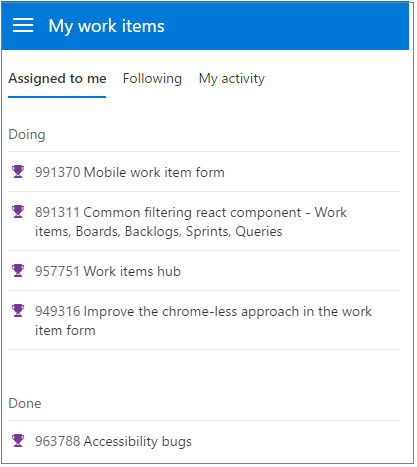
Mobile work item form
We have a full end-to-end experience that includes an optimized look and feel for work items (Figure 1). It provides an easy way to interact with items that are assigned to you, are following, have visited, or edited recently from your phone.
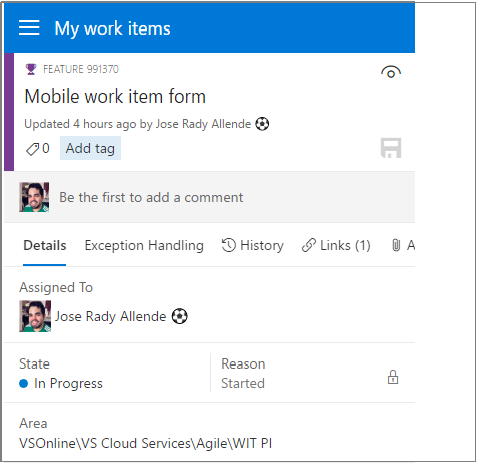
Along with the good looks, this experience supports optimized controls for all field types (Figure 2).
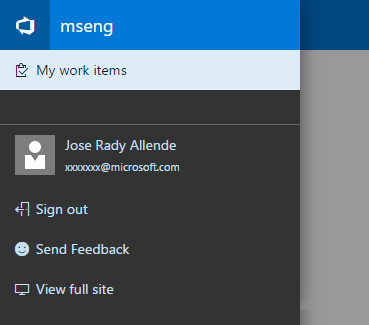
With the new mobile navigation (Figure 3), users can reach any other mobile-ready parts of TFS and get back to the full desktop site in case they need to interact with other hubs.
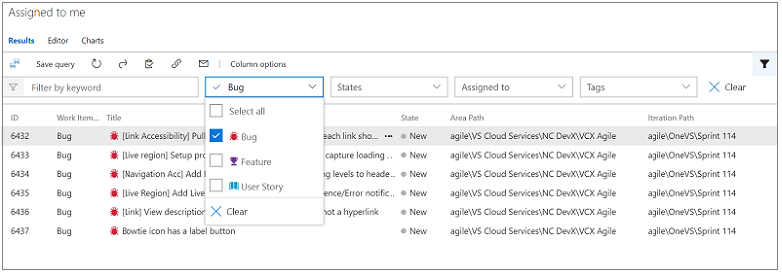
Filtering on backlogs, Kanban boards, sprints, and queries
All of our work item tracking grid experiences (queries, backlogs, Kanban boards, sprints backlogs, and test case management) now make use of our common, consistent filtering component (Figure 4). Beyond applying a keyword filter across displayed columns and selecting tags, you can also filter on work item types, states, and assigned to, in order to quickly get to the work items you are looking for.
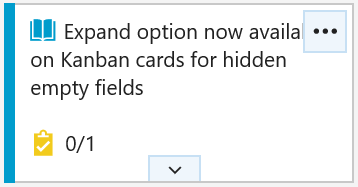
Expand to show empty fields on a Kanban card
Today, you have the option to add additional fields to a card and then hide empty fields (Figure 5) in board settings to remove unnecessary clutter from the board. The drawback to this feature was that once an empty field was hidden, the only way to update the field was to open the work item form. With the newly available expand option on Kanban cards, you can now benefit from hiding empty fields across the board, but still have single click access to update a particular field on a card. Simply hover over the card and look for the down chevron at the bottom of the card to update the hidden field.
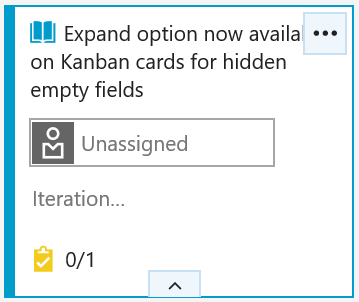
Click the down chevron at the bottom of the card to update the field (Figure 6).
Extensions block work item save
Work item form custom controls, groups, and pages can now block work item save to validate data and ensure the user fills out any required information before saving the work item form.
Inline add on Delivery Plans
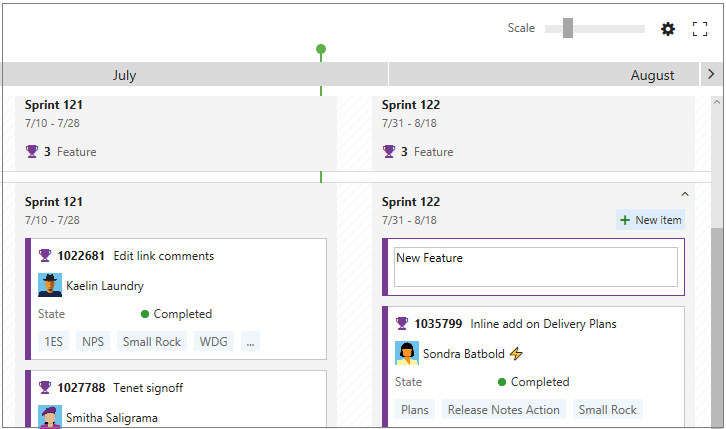
New feature ideas can arrive at any moment, so we have made it easier to add new features directly to your Delivery Plans (Figure 7). Simply click the New item button available on hover, enter a name, and hit enter. A new feature is created with the area path and iteration path you would expect.
Version Control
Forks
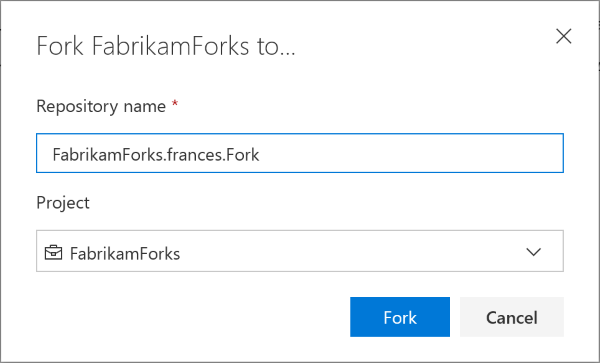
TFS 2018 adds support for Git forks (Figure 8). A fork is a server-side copy of a repository. Using forks, you can allow a broad range of people to contribute to your repository without giving them direct commit access. Instead, they commit their work to their own fork of the repository. This gives you the opportunity to review their changes in a pull request before accepting those changes into the central repository.
GVFS
Git Virtual File System (GVFS) is now supported. GVFS allows Git repositories to scale to millions of files by virtualizing and optimizing how Git operates on the filesystem.
Create a folder in a repository using web
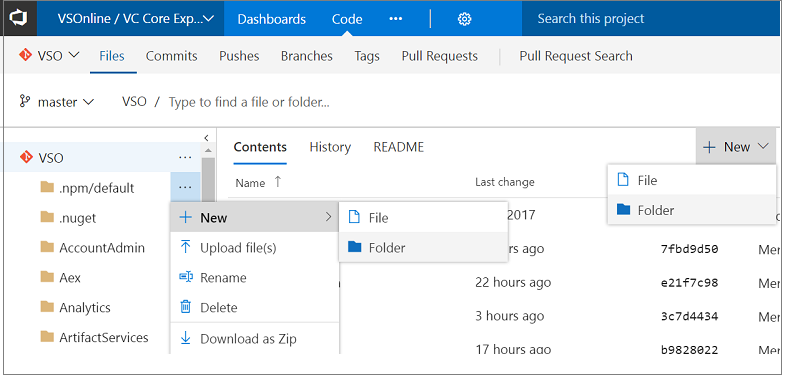
You can now create folders through the web in your Git and TFVC repositories (Figure 9). This replaces the Folder Management extension, which will now undergo the process of deprecation.
To create a folder, click New > Folder in either the command bar or context menu:
For TFVC, you will specify a folder name and then check it in. For Git, because empty folders are not permitted, you will also have to specify a file name, optionally edit the file, then commit it.
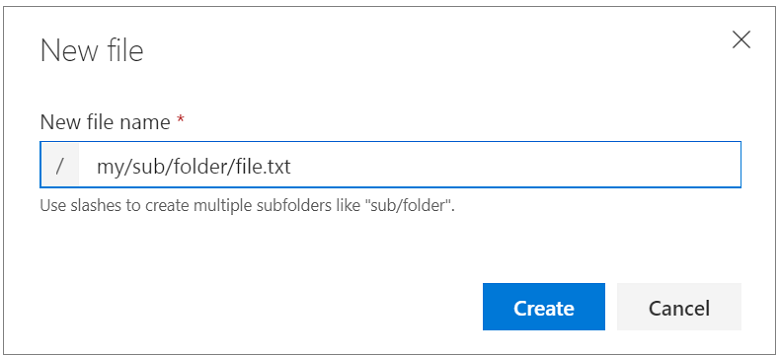
Additionally, for Git, The New file dialog (Figure 10) has been enhanced to accept slashes to create subfolders.
File minimap
You can now view a minimap of a file as you view or edit to give you a quick overview of the code (Figure 11). To turn on the minimap, open the Command Palette (F1 or right-click) and select Toggle Minimap.

Bracket matching
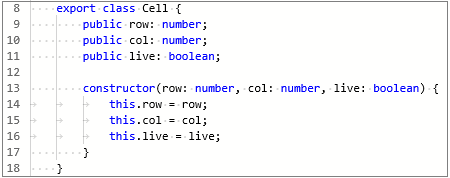
When editing or viewing a file, there are now guidelines on the left side to make it easy to match your brackets (Figure 12).

Toggle white space
You can now toggle white space on and off when viewing or editing a file. We are still developing a feature that will allow you to toggle white space when diff'ing. To view white space (Figure 13), open the Command Palette (F1 or right-click) and select Toggle White Space, which allows you to differentiate between spaces and tabs.
Setting to turn off web editing for TFVC repos
Teams that use TFVC often use check-in policies in Visual Studio to ensure code quality. However, because check-in policies are enforced on the client, code that is edited on the web is not subjected to the same policies.
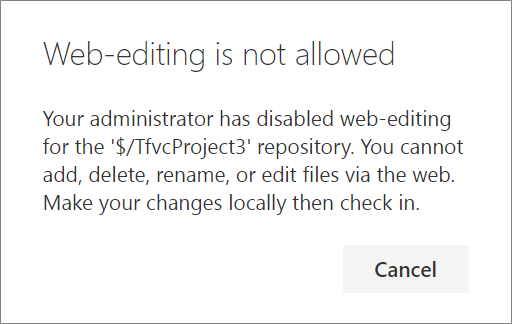
Several people have asked for a way to disable web-editing to protect against changes that bypass check-in policies. We have enabled a way for you to turn off web-editing (adding, deleting, renaming, and editing) for TFVC on a project/repository basis.
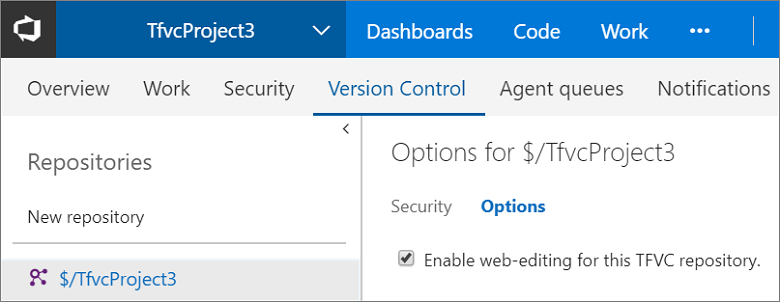
To disallow web-editing from the Files page, go to Settings then Version Control (Figure 14). Click on the TFVC repo in the tree, navigate to the Options pivot, and uncheck Enable web-editing for this TFVC repository. By default, web-editing is enabled.
Note
Editing the README from the Project Overview page is unaffected.
If you attempt a web-edit in a project with web-editing disabled, you are notified that web-editing is not allowed (Figure 15).
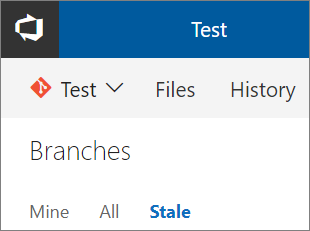
Identify stale branches
Keeping your repository clean by deleting branches you no longer need enables teams to find branches they care about and set favorites at the right granularity. However, if you have lots of branches in your repo, it can be hard to figure out which are inactive and can be deleted. We have now made it easier to identify "stale" branches (branches that point to commits older than 3 months). To see your stale branches, go to the Stale pivot on the Branches page (Figure 16).
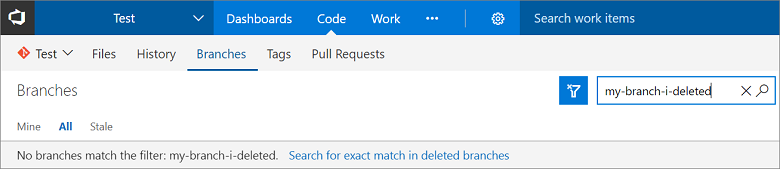
Search for a deleted branch and re-create it
When you accidentally delete a branch from the server, it can be difficult to figure out what happened to it. Now you can search for a deleted branch, see who deleted it and when, and re-create it if you wish.
To search for a deleted branch, enter the full branch name into the branch search box. It will return any existing branches that match that text. You will also see an option to search for an exact match in the list of deleted branches. Click the link to search deleted branches (Figure 17).
If a match is found, you will see who deleted it and when. You can also restore the branch (Figure 18).

Restoring the branch will re-create it at the commit to which is last pointed. However, it will not restore policies and permissions.
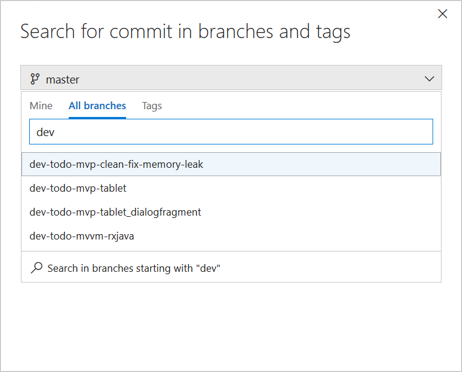
Search for a commit in branches starting with a prefix
If you have branch structure in a hierarchical format where all branches are prefixed with a text, then this feature will help you to find a commit in all the branches starting with that prefix text. For example, if you want to see whether a commit made its way to all branches that are prefixed with "dev" then simply type "dev" in the search box and select Search in branches starting with "dev" (Figure 19).
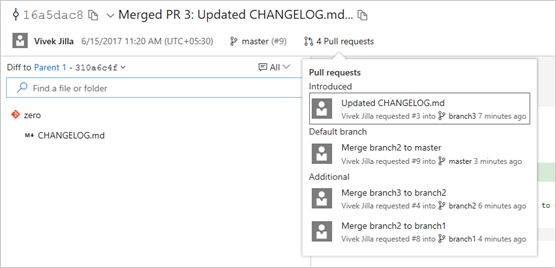
Richer pull request callout on commit details page
The pull request callout on the commit details page shows more relevant information to better diagnose (Figure 20). Now we also show the first pull request that introduced the commit to any branch and the pull request associated with the default branch in the callout.
Filter tree view in Code
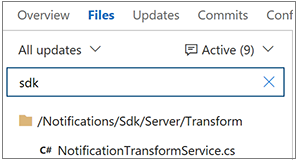
Now you do not need to scroll through all the files that a commit may have modified to just get to your files. The tree view on commit details, pull requests, shelveset details, and changeset details page now supports file and folder filtering. This is a smart filter that shows child files of a folder when you filter by folder name and shows a collapsed tree view of a file to display the file hierarchy when you filter by file name.
Find a file or folder filter on commit tree (Figure 21) and (Figure 22):
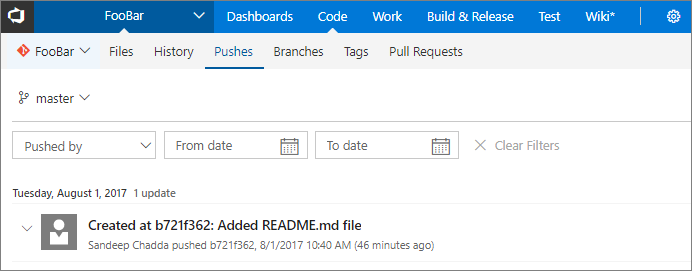
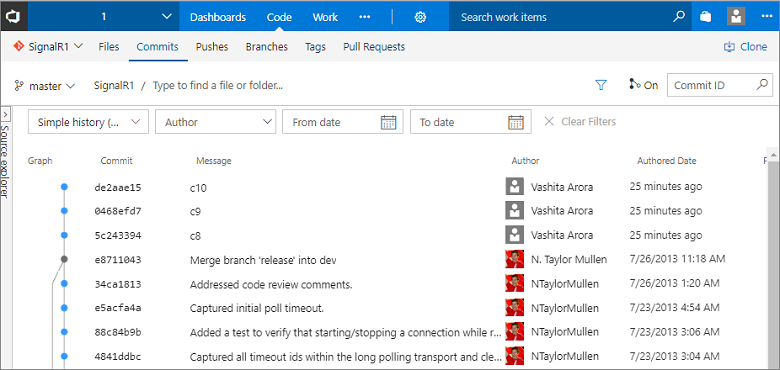
Branch updates page is now Pushes
The Branch Updates page has tremendous value. However, it was hidden as a pivot under the History hub. Now the branch updates page are visible as a hub called Pushes (Figure 23) under Code, alongside Commits, Branches, Tags, and Pull Requests. The new URL for the pushes page is: \<tfsserverurl\>/\<projectname\>/_git/\<reponame\>/pushes. The old URLs will continue to function.
At the same time, the History hub is now renamed to Commits (Figure 24) since the hub only shows commits. We received feedback that people were finding it difficult to troubleshoot commit related issues because the commit list view only showed detailed time on-hover. Now the commit list view across your instance will show date and time in dd/mm/yy hh:mm format. The new URL for commits page is: \<tfsserverurl\>/\<projectname\>/_git/\<reponame\>/commits. The old URLs will continue to function.
Retain filename when moving from Files to Commits
We heard feedback from people that when they filter the directory to a particular file in the Files pivot of the Code hub and later flip to the History pivot, the filename does not persist if the commit changed more than 1,000 files. This resulted in people needing to load more files and filter content to find the file, which impacted productivity. Developers normally work in the same directory and want to persist to the directories they work in as they trace changes. Now, we persist the filename as you move between Code hub pivots regardless of the number of files changed in a commit. This means that you do not have to click on Load More to find the file you want.
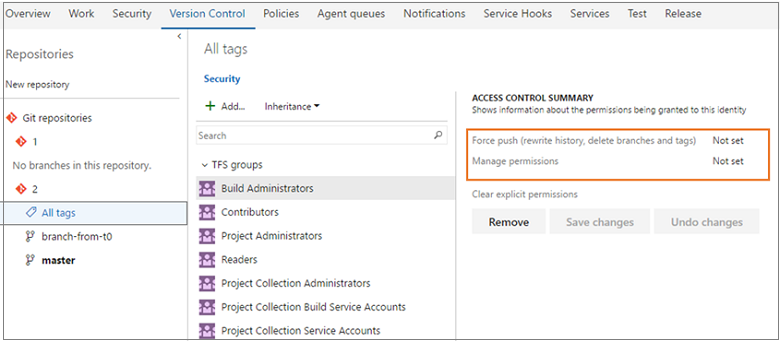
View Git tags
You can view all the tags in your repository on the Tags page (Figure 25). If you manage all your tags as releases, then a user can visit the tags page to get a bird's-eye view of all the product releases.
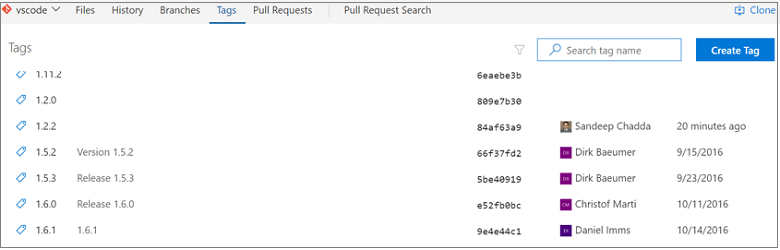
You can easily differentiate between a lightweight and an annotated tag. Annotated tags show the tagger and the creation date alongside the associated commit, while lightweight tags only show the commit information.
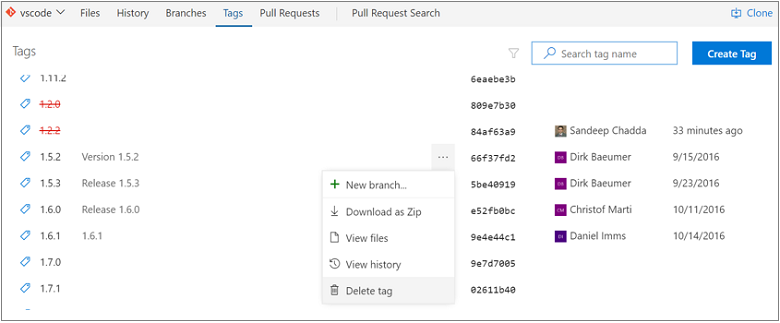
Delete Git tags
There can be times when you want to delete a tag from your remote repo. It could be due to a typo in the tag name, or you might have tagged the wrong commit. You can easily delete tags from the web UI by clicking the context menu of a tag on the Tags page and selecting Delete tag (Figure 26).
Warning
Deleting tags on remote repos should be exercised with caution.
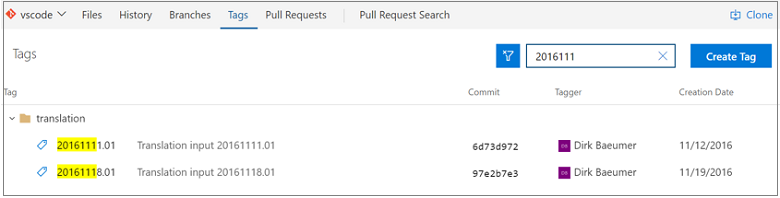
Filtering Git tags
For old repositories, the number of tags can grow significantly with time; there can also be repositories that have tags created in hierarchies, which can make finding tags difficult.
If you are unable to find the tag that you were looking for on the Tags page, then you can simply search for the tag name using the filter on top of the Tags page (Figure 27).
Git tags security
Now you can grant granular permissions to users of the repo to manage tags. You can give users the permission to delete tags or manage tags from this interface (Figure 28).
Tip
Read more about Git tags at the Microsoft DevOps blog.
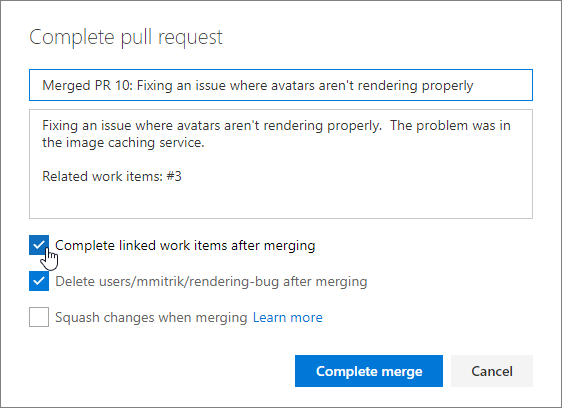
Automatically complete work items when completing pull requests
If you are linking work items to your pull requests, keeping everything up to date just got simpler. Now, when you complete a PR, you will have the option to automatically complete the linked work items after the PR has been merged successfully (Figure 29). If you are using policies and set pull requests to auto-complete, you will see the same option. No more remembering to revisit work items to update the state once the pull request has completed. This is done for you automatically.
Reset votes on push/new iteration
Teams opting for a more strict approval workflow in PRs can now opt-in to reset votes when new changes are pushed (Figure 30). The new setting is an option under the policy to Require a minimum number of reviewers.
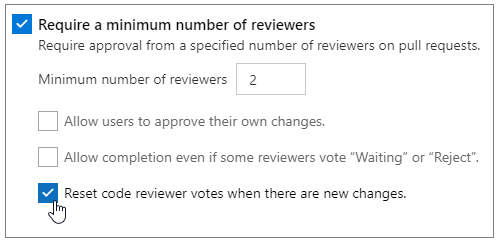
When set, this option will cause all votes from all reviewers to be reset any time the source branch of the PR is updated. The PR timeline will record an entry any time the votes are reset as a result of this option (Figure 31).

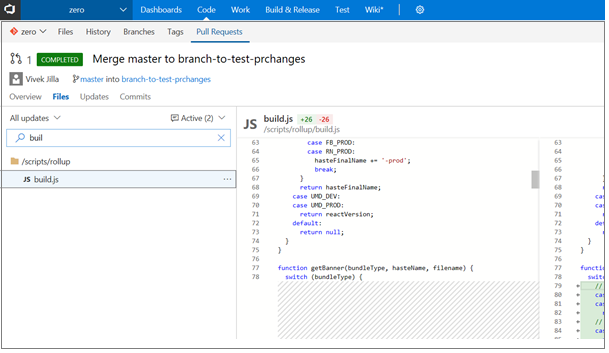
Filter pull request tree by file name
Finding a specific file in a pull request is easier than ever. The new filter box in the Files view lets users filter down the list of files in the tree view (Figure 32).
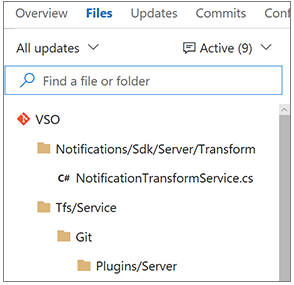
The filter matches any part of the path of the files in the pull request, so you can search by folder names, partial paths, file names, or extensions (Figure 33).
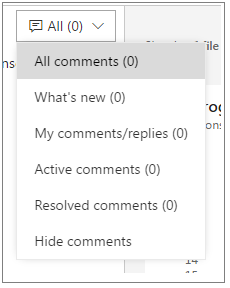
More pull request comments filtering options
Comments in both the pull request overview and the files view now have the same options (Figure 34). You can also filter to see only the discussions you participated in.
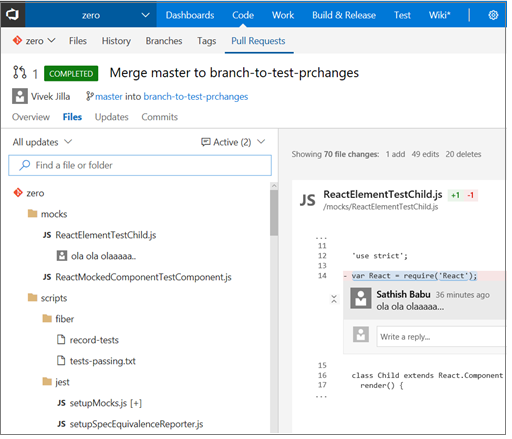
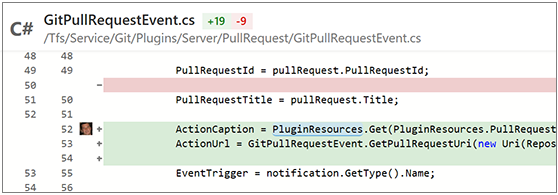
View original diff for code comments in pull request details
Sometimes, it is hard to make sense out of a PR comment after the code it is referencing has changed (many times, when a requested change has been made) (Figure 35).
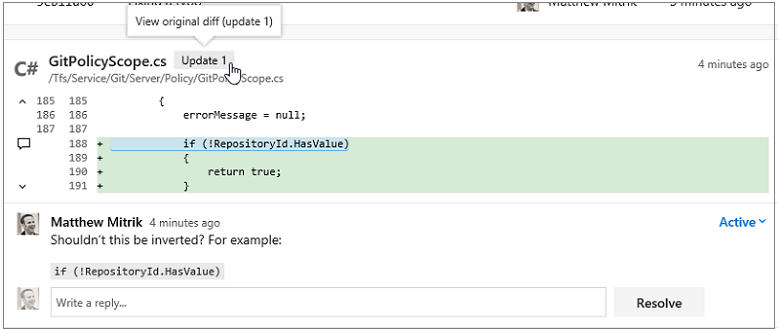
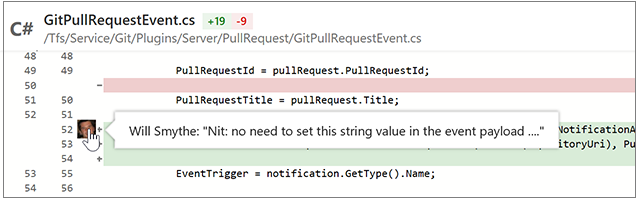
When this happens, you will now see a badge with an update number that you can click to see what the code looked like at the time the comment was originally created (Figure 36).
Collapsible pull request comments
Reviewing code is a critical part of the pull request experience, so we have added new features to make it easier for reviewers to focus on the code. Code reviewers can easily hide comments to get them out of the way when reviewing new code for the first time (Figure 37).
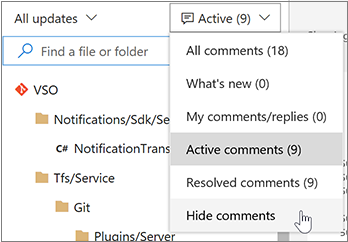
Hiding comments (Figure 38) hides them from the tree view and collapses the comment threads in the file view:
When comments are collapsed, they can be expanded easily by clicking the icon in the margin, and then collapsed again with another click. Tooltips (Figure 39) make it easy to peek at a comment without seeing the entire thread.
Task lists in pull request descriptions and comments
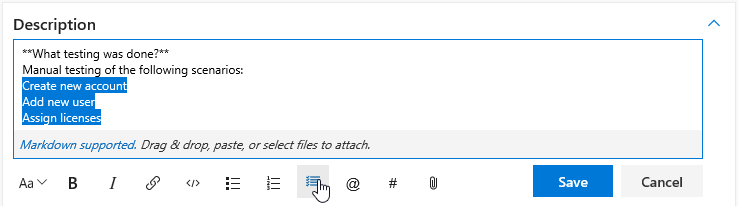
When preparing a PR or commenting you sometimes have a short list of things that you want to track but then end up editing the text or adding multiple comments. Lightweight task lists are a great way to track progress on a list of to-dos as either a PR creator or reviewer in the description or a single, consolidated comment. Click on the Markdown toolbar to get started or apply the format to selected text (Figure 40).
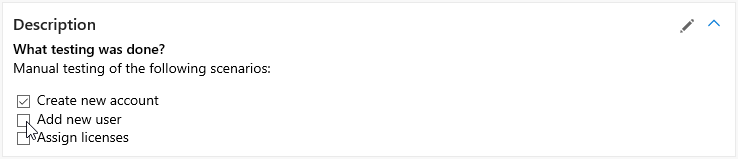
Once you have added a task list (Figure 41), you can simply check the boxes to mark items as completed. These are expressed and stored within the comment as [ ] and [x] in Markdown. See Markdown guidance for more information.
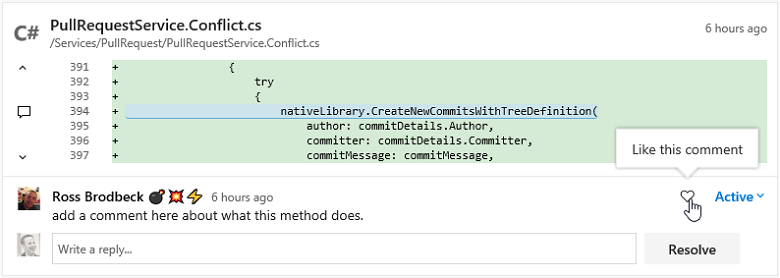
Ability to "Like" comments in pull requests
Show your support for a PR comment with a single click on the like button (Figure 42). You can see the list of all people that liked the comment by hovering over the button.
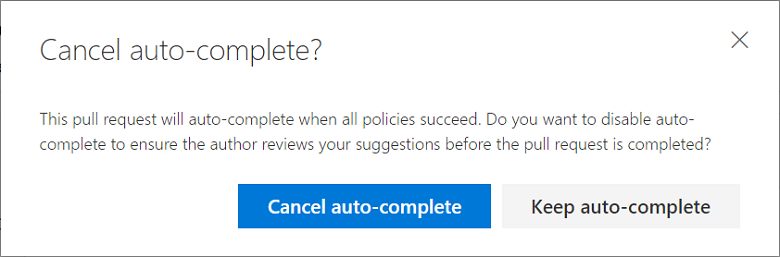
Improved workflow when approving with suggestions
Using the auto-complete option (Figure 43) with pull requests is a great way to improve your productivity, but it should not cut short any active discussions with code reviewers. To better facilitate those discussions, the Approve with suggestions vote will now prompt when a pull request is set to complete automatically. The user will have the option to cancel the auto-complete so that their feedback can be read, or keep the auto-complete set and allow the pull request to be completed automatically when all policies are fulfilled.
Path filtering support for Git notifications
Instead of getting notifications for all folders in a repo, you can now choose to get notified when team members create pull requests or push code in only the folders that you care about. When creating custom Git push or Git pull requests email notification subscriptions, you will see a new option to filter these notifications by folder path (Figure 44).

Updated email templates for pull request workflows
Pull request email alerts have been refreshed to make them clear, concise, and actionable (Figure 45). The subject line now begins with the PR title and secondary information, like the repo name, and ID is deferred to the end. The name of the author has been added to the subject to make it simpler to apply rules and filters based on the person that created the PR.
The body of the alert emails has a refreshed template that first summarizes why the alert was sent, followed by the critical metadata (title, branch names, and description), and a main call-to-action button. Additional details like the reviewers, files, and commits are included further down the email.
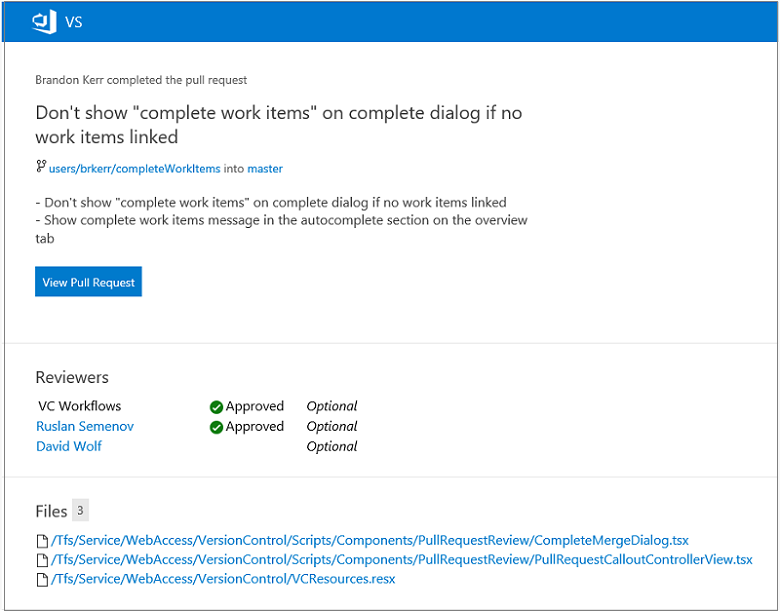
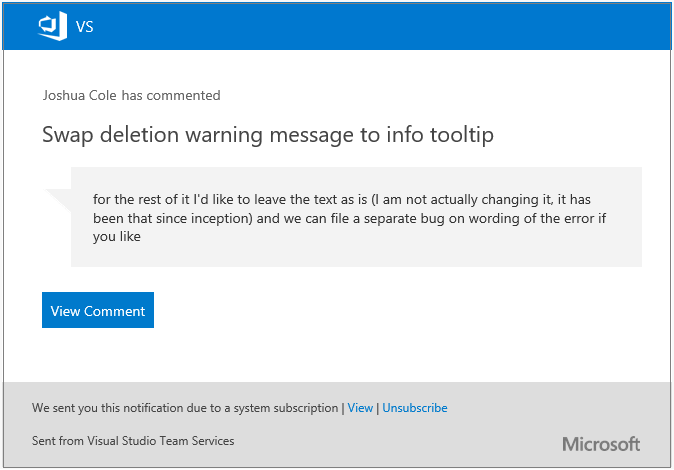
For most alerts, the call-to-action (Figure 46) is to view the pull request in the web. However, when you are notified about a specific comment, the call-to-action will link directly to that comment so you can easily find the code and prior conversation for context.
Updated email templates for push notifications
Push notifications have been updated to match the new email templates that are optimized to be clear, concise, and actionable (Figure 47). The subject line helps you clearly distinguish push emails, identify the branch, repo, and author, and summarize the number of commits included in the push. These changes also make it easier to create rules and filters to help manage these email notifications.
The email body is consistent with other emails, emphasizing why the email was sent, who initiated the action, and exactly what happened. Specific to push alerts, the details about the repo, branch, files, and commits are all included to help inform the recipients about the scope of the changes. The main call-to-action for push alerts is View Push, which will open the pushes view for the specific push that generated the alert.

Wiki
Each project now supports its own Wiki (Figure 48). Now you can conveniently write pages that help your team members understand, use, and contribute to your project.
Some of the key features of the new Wiki include:
- Simplified editing experience using markdown syntax.
- The new page allows you to specify a title and add content. (Figure 49)

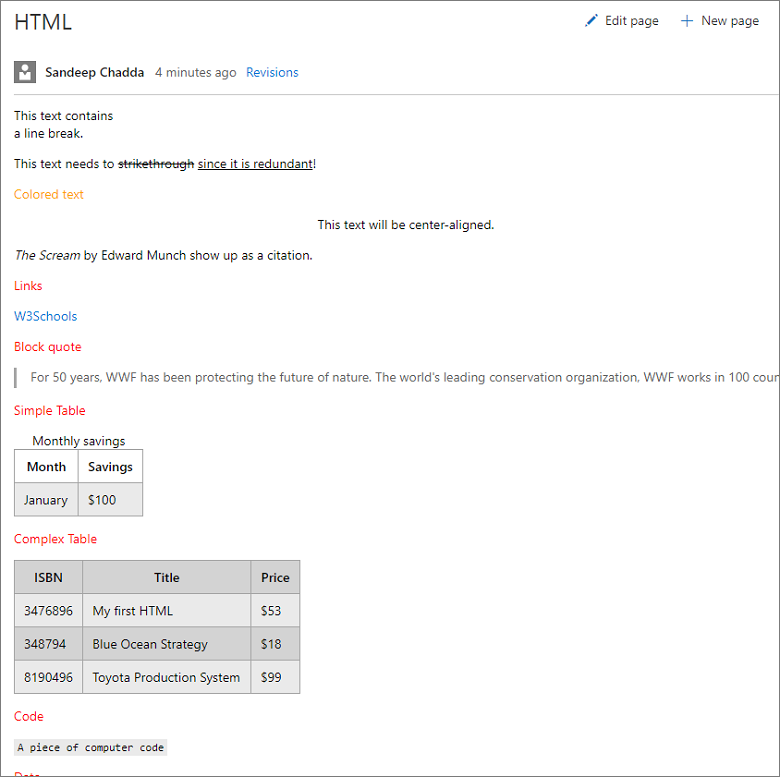
- Support for HTML tags in markdown (Figure 50).
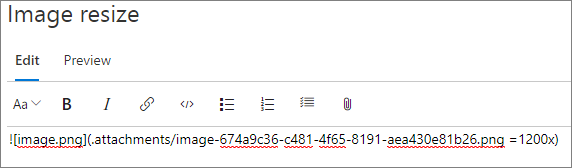
- Conveniently resize images in the markdown folder (Figure 51).
- Powerful page management pane that allows you to reorder, re-parent, and manage pages.
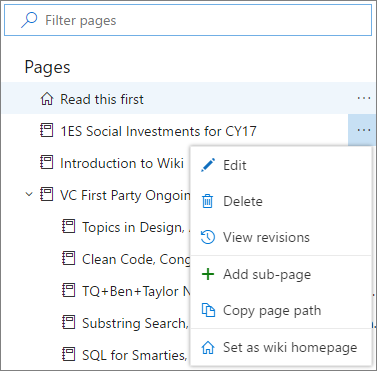
- Ability to filter pages by title for large Wikis (Figure 52).
- Offline updates of Wiki for power users.
Tip
Learn more about getting started with Wiki.
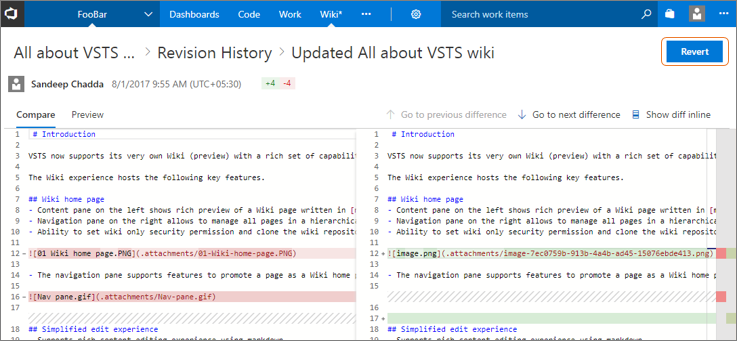
As you use Wiki more, there is a chance you will save unintended changes. Now you can revert a revision to a Wiki page by going to the revision details and clicking on the Revert button (Figure 53).
Create a Wiki page from a broken link
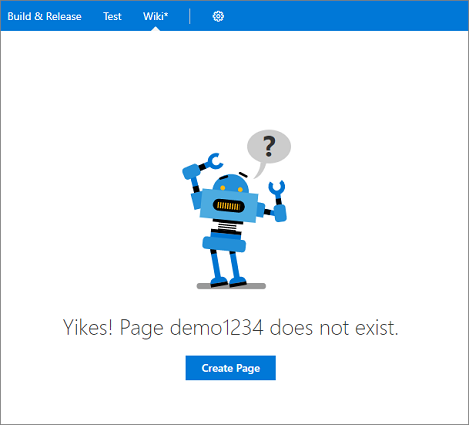
We observed a pattern during Wiki creation where a table of contents on a Wiki page included non-existent links (Figure 54). Users would click on these links in an attempt to create an actual page. We previously handled this scenario by giving a warning suggesting that the link was broken, or that the page did not exist. Now, we are handling this as a mainstream scenario for Wiki, by allowing you to create pages instead.
Wiki page deep linking
Wiki now supports deep linking sections within a page and across pages, which is extremely useful for creating a table of contents. You can reference a heading in the same page or another page by using the following syntax:
- Same page:
[text to display](#section-name) - Another page:
[text to display](/page-name#section-name)
The Wiki extension on the Marketplace is now deprecated. If you are an existing Wiki extension user, then you can migrate your Wiki pages to the new Wiki using this migration tool. Learn more about how to migrate your existing Wiki pages to the new Wiki.
Package Management
Package Management experience updates
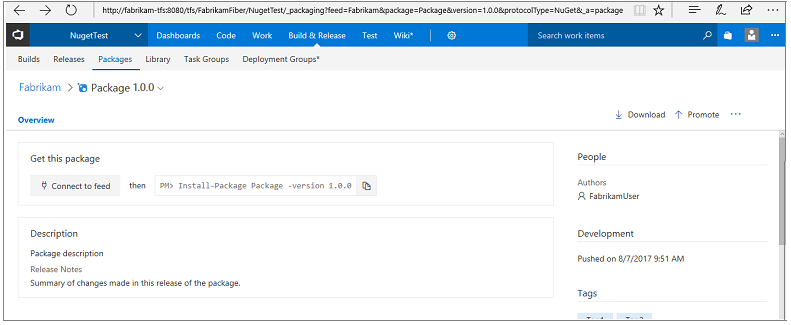
Package URLs now work with the package name and version, rather than using GUIDs. This makes it easier to hand-craft package URLs (Figure 55). The format is: \<tfsserverurl\>/\<project|team\>/_packaging?feed=\<feed\>&package=\<package\>&version=\<version\>&protocolType=\<NuGet|Npm|Maven\>&_a=package.
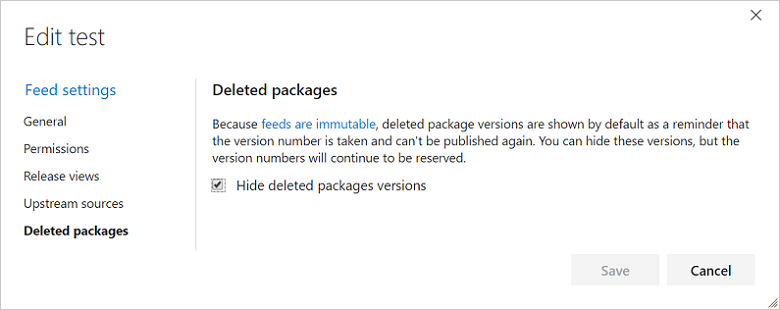
You can now hide deleted package versions (Figure 56) from all feed users (no more strikethrough packages!).
Any action that you could perform on the package details page can now be performed from the context menu in the list of packages.
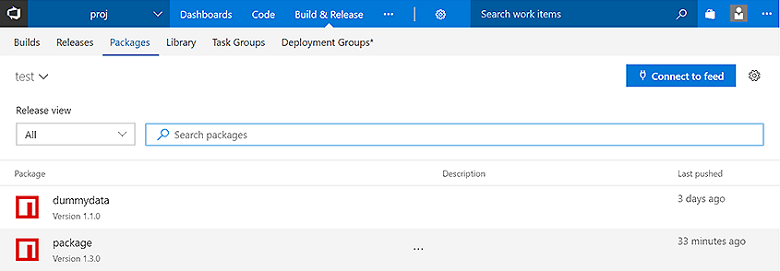
The package list contains a new Last pushed column (Figure 57) with humanized dates so you can easily find recently-updated packages.
Maven packages
We have launched support for hosting Maven artifacts in TFS 2018 (Figure 58). Maven artifacts enable Java developers to share code and components seamlessly. Check out our getting started guide for how to share Maven artifacts using Package Management.
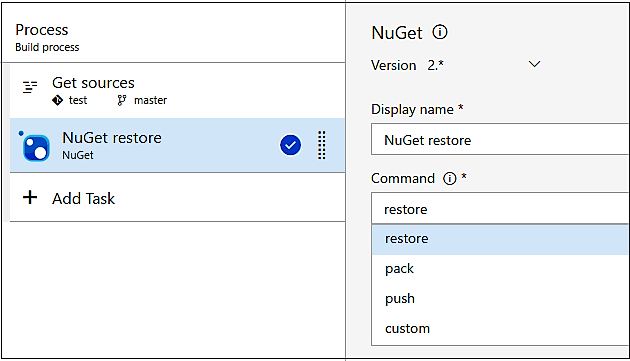
New unified NuGet task
We have combined the NuGet Restore, NuGet Packager, and NuGet Publisher task into a unified NuGet build task to align better with the rest of the build task library; the new task uses NuGet 4.0.0 by default. Accordingly, we have deprecated the old tasks, and we recommend moving to the new NuGet task as you have time. This change coincides with a wave of improvements outlined below that you will only be able to access by using the combined task.
As part of this work, we have also released a new NuGet Tool Installer task that controls the version of NuGet available on the PATH and used by the new NuGet task. So, to use a newer version of NuGet, just add a NuGet Tool Installer task at the beginning of your build (Figure 59).
Tip
Read more about using the latest NuGet in your build on Microsoft DevOps Blog.
NuGet "Allow duplicates to be skipped" option
We heard from many NuGet customers that they generate a set of packages, only some of which may have updates (and therefore updated version numbers). The NuGet build task has a new Allow duplicates to be skipped option that enables the task to continue if it tries to push packages to a VSTS/TFS feed where the version is already in use.
npm build task updates
Whether you are building your npm project on Windows, Linux, or Mac, the new NPM build task works seamlessly. We have also reorganized the task to make both npm install and npm publish easier. For install and publish, we have simplified credential acquisition so that credentials for registries listed in your project's .npmrc file are safely stored in a service endpoint. Alternatively, if you are using a VSTS/TFS feed, we have a picker that allows you select a feed, and then generates a .npmrc with requisite credentials that are used by the build agent.
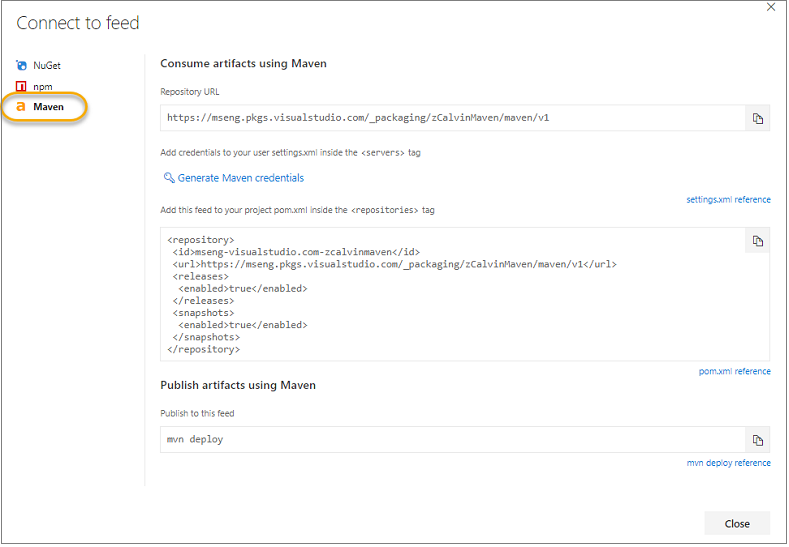
Maven now supports authenticated feeds
Unlike NuGet and npm, the Maven build task did not previously work with authenticated feeds. We have updated the Maven task so you can work easily with VSTS/TFS feeds (Figure 60).
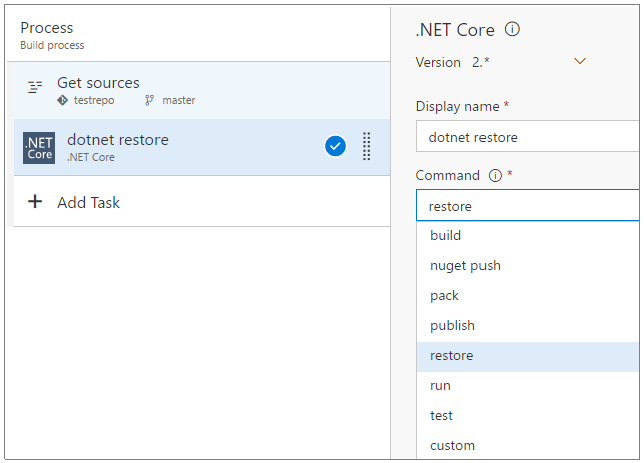
dotnet task supports authenticated feeds, web projects
The next major version of the dotnet task (2.x) addresses many of your feedback requests and fixes a set of bugs we have tracked for a while. This includes the following:
- First, dotnet now supports authenticated package sources like Package Management, so you do not need to use the NuGet task anymore to restore packages from private package sources.
- The behavior of Path to project(s) field has changed in the 2.0 version of the task. In previous versions of the task, if the project file(s) matching the specified pattern were not found, the task used to log a warning and then succeed. In such scenarios it can sometimes be challenging to understand why the build succeeded but dependencies were not restored. Now the task fails if the project file(s) matching the specified pattern are not found. This is in line with the behavior of other tasks and is easy to understand and use.
- In previous versions of the task's publish command, the task modified the output path by putting all the files in a folder that was named after the project file name, even when you passed an explicit output path. This makes it hard to chain commands together. Now you have control over the output path file.
We have also released a new dotnet Tool Installer task that controls the version of dotnet available on the PATH and used by the new dotnet task. So, to use a newer version of dotnet, just add a dotnet Tool Installer task at the beginning of your build.
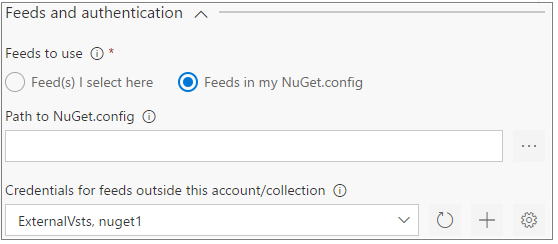
Working outside your account/collection
It is now easier to work with feeds (Figure 61) outside your TFS server or VSTS account, whether they are Package Management feeds in another VSTS account or TFS server or non-Package Management feeds like NuGet.org/npmjs.com, Artifactory, or MyGet (Figure 60). Dedicated Service Endpoint types for NuGet and npm make it easy to enter the correct credentials and enable the build tasks to work seamlessly across package download and package push operations.
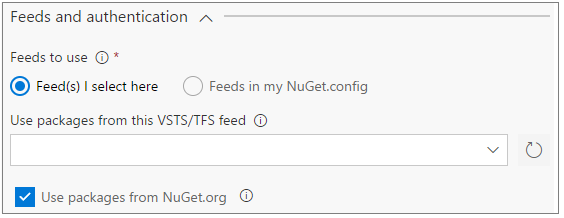
Feed picker for VSTS/TFS feeds
We always recommend checking in a configuration file (e.g. NuGet.Config, .npmrc, etc.) so that your source repository has a record of where your packages came from. However, we have heard a set of scenarios where this isn't ideal, so we have added a new Use packages from this VSTS/TFS feed option that allows you to select a feed and automatically generate a configuration file that is used for that build step (Figure 62).
Build and Release
XAML Builds
In TFS 2015, we introduced a web-based, cross-platform build system. XAML builds are not supported in TFS 2018 RTW or Update 1, but we have re-enabled XAML builds in TFS 2018 Update 2. We encourage you to migrate your XAML builds. If you are not ready to migrate and need to continue using XAML builds, please upgrade to TFS 2018 Update 2.
When you upgrade to TFS 2018 RTW or Update 1:
If you have any XAML build data in your team project collection, you will get a warning about the removal of XAML build features.
You can view completed XAML builds, but you will not be able to queue new ones.
There's no new version of the XAML build controller or agent in TFS 2018.
When you upgrade to TFS 2018 Update 2:
If you have any XAML build data in your team project collection, you will receive a warning about the deprecation of XAML build features.
You need to use Visual Studio or Team Explorer 2017 to edit XAML build definitions or to queue new XAML builds.
If you need to create new XAML build agents, you need to install them using the TFS 2015 build agent installer.
Tip
For an explanation of our XAML build deprecation plan, see the Evolving TFS/Team Services build automation capabilities blog post.
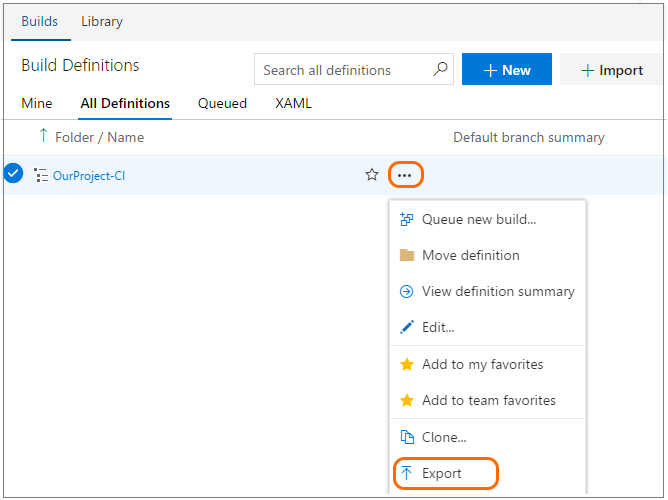
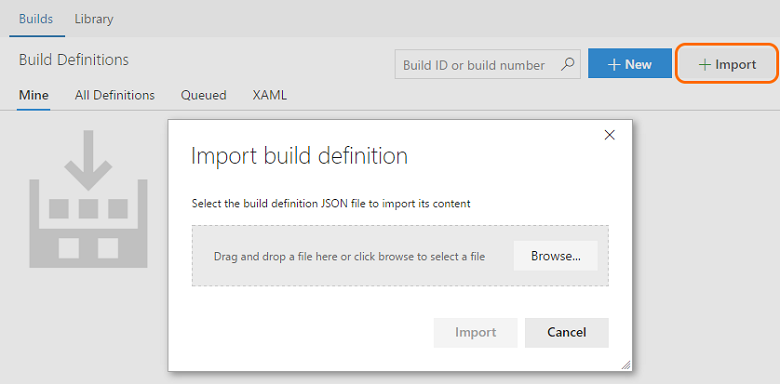
Export and import build definitions
Build definitions are implemented internally as .json files, so you can see details on changes in the file's history. You can already clone and make templates from your build definitions, but many users have wanted to take a copy of their CI build logic and reuse it in another team project. This was a top-ten request on UserVoice.
We are pleased to announce that this is now possible (Figure 63) and (Figure 64)!
Extensions with build templates
Build templates let you create a baseline for users to get started with defining their build process. We ship a number of them in the box today and while you could upload new ones to your account, it was never possible for extension authors to include new templates as part of an extension. You can now include build templates in your extensions. For example:
{  "id": "Template1",
   "type": "ms.vss-build.template",
   "targets": [ "ms.vss-build.templates" ],
   "properties": { "name": "Template1" } }
For the full example, see https://github.com/Microsoft/vsts-extension-samples/tree/master/fabrikam-build-extension.
Tip
You can use this capability to offer and share the same custom template across all your team projects.
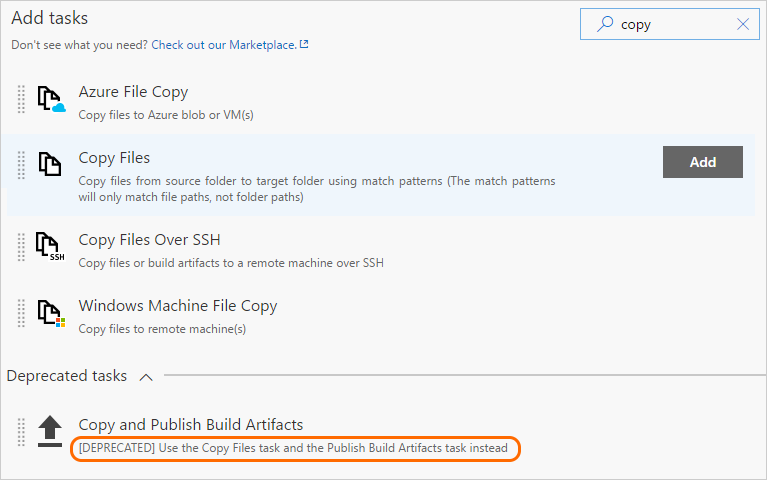
Deprecate a task in an extension
You can now deprecate a task in your extension. To make it work, you must add the following variable to the latest version of your task:
"deprecated": true
When the user searches for deprecated tasks (Figure 65), we push these tasks to the end and group them under a collapsible section that is collapsed by default. If a definition is already using a deprecated task, we show a deprecated task badge to encourage users to switch to the replacement.
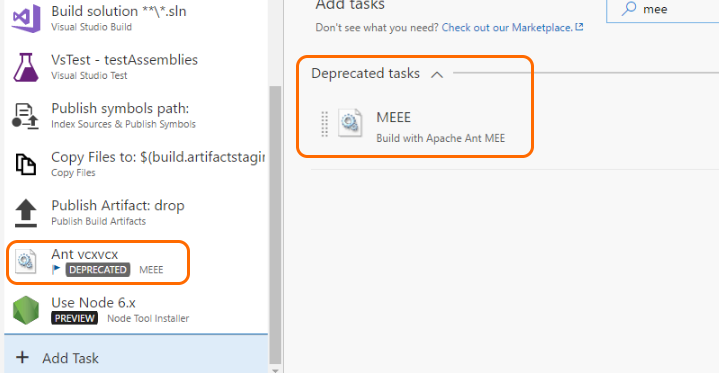
You can help your users learn about the replacement task by mentioning it in the task description (Figure 66). The description then points users using the task in the right direction from both the task catalog and the existing build/release definitions.
Let contributed build sections control section visibility
Previously, if you were using an extension that had build tasks and build summary sections, you would see the build summary section even if you were not using the build task in that build. Now, you can choose to hide or show that section in the build summary page by adding the following line in your extension code and setting the value to true or false:
VSS.getConfiguration().setSectionVisibility("$(publisherId).$(extensionId).$(sectionId)", false);
View the sample included in the Microsoft vsts-extension-samples repository.
Variable group support
Variable groups have been available to use in release definitions, and now they are ready to be used in build definitions, too. Learn more about creating a variable group. This has been developed and prioritized based on related suggestions for project-level build/release variables and variable groups in build definitions.
Work with secure files such as Apple certificates
We have added a general-purpose secure files library (Figure 67).
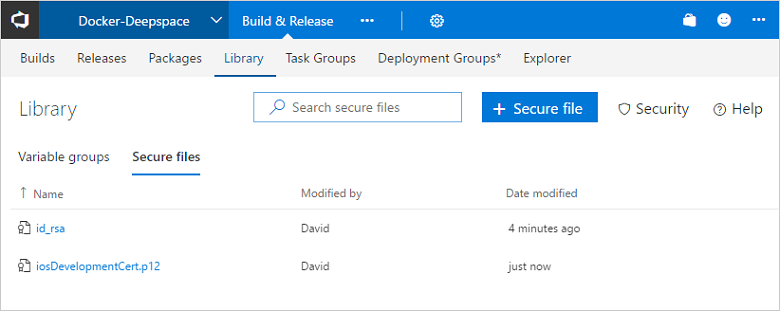
Use the secure files library to store files such as signing certificates, Apple Provisioning Profiles, Android Keystore files, and SSH keys on the server without needing to commit them to your source repository.
The contents of secure files are encrypted and can only be used during build or release processes by referencing them from a task. Secure files are available across multiple build and release definitions in the team project based on security settings. Secure files follow the Library security model.
We have also added some Apple tasks that leverage this new feature:
Pause build definitions
You can now pause or disable build definitions. If you plan to make changes to your build definition and you want to avoid queuing any new builds until you are done, simply disable the build definition. Similarly, if you plan to upgrade agent machines, you can choose to pause a build definition, which enables VSTS to still accept new build requests but hold them in queue without running until you resume the definition.
Task input validations support
Typing the parameters in build definition tasks can sometimes be error prone. With task input validation, task authors can ensure appropriate values are specified. Validation expressions follow the familiar expression syntax used for task conditions and can use any of the supported functions besides the general functions supported by task conditions, including URL, IPV4, email, number range, sha1, length, or match.
Tip
Read more about the goals and usage on the vsts-tasks repo page.
New Release Definition Editor
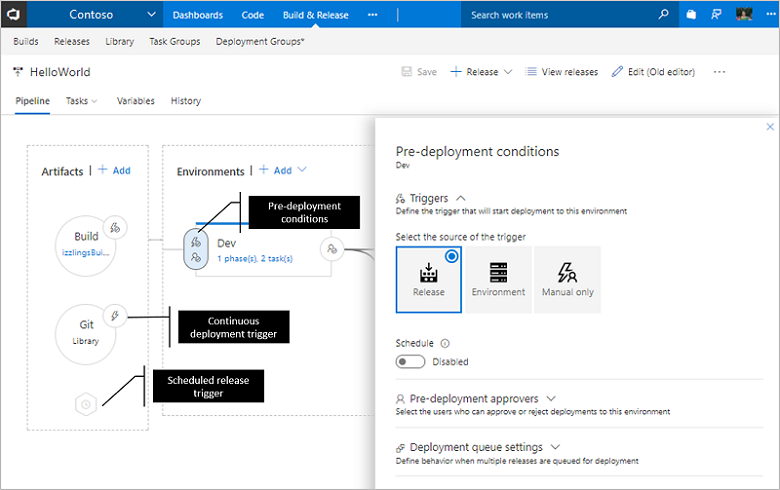
Continuing on our journey of refreshing the Build and Release experiences, we have re-imagined the release definition editor to provide a more intuitive experience, fix some pain points, and add new capabilities. One of the most powerful features of the new editor is its ability to help you visualize how deployments to your environments would progress. In addition to this, approvals, environment properties, and deployment settings are now in-context and easily configurable.
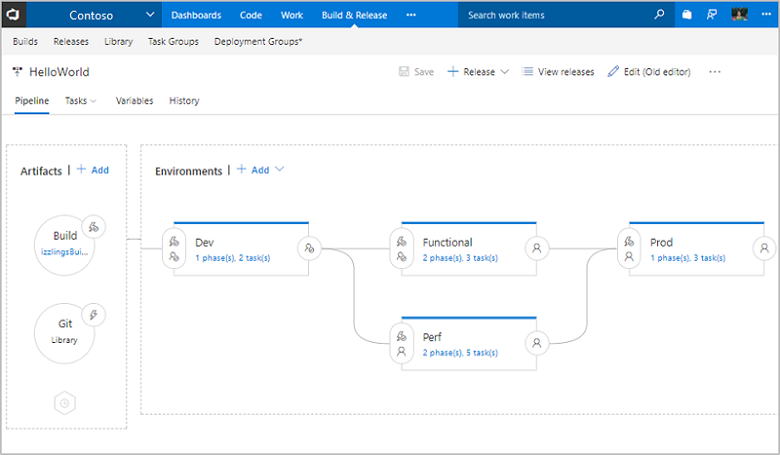
Visualization of the pipeline
The pipeline (Figure 68) in the editor provides a graphical view of how deployments progress in a release. The artifacts are consumed by the release and deployed to the environments. The layout and linking of the environments reflects the trigger settings defined for each environment.
In context configuration UI
Artifacts, release triggers, pre-deployment and post-deployment approvals, environment properties, and deployment settings are now in-context and easily configurable (Figure 69).
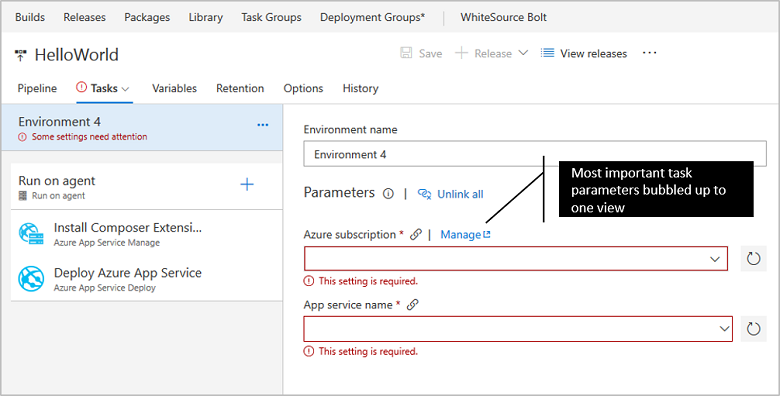
Getting started with deployment templates
All in-built deployment templates are equipped with process parameters that simplifies the process for users to get started by specifying the most important parameters without needing to go deep into the tasks (Figure 70).
Simplified management of release and environment variables
Use the List view to quickly add release or environment variables and the Grid view to compare and edit variables across scopes side-by-side (Figure 71). Additionally, you can use the filter and keyword search to manage the set of variables to work with in both the views.

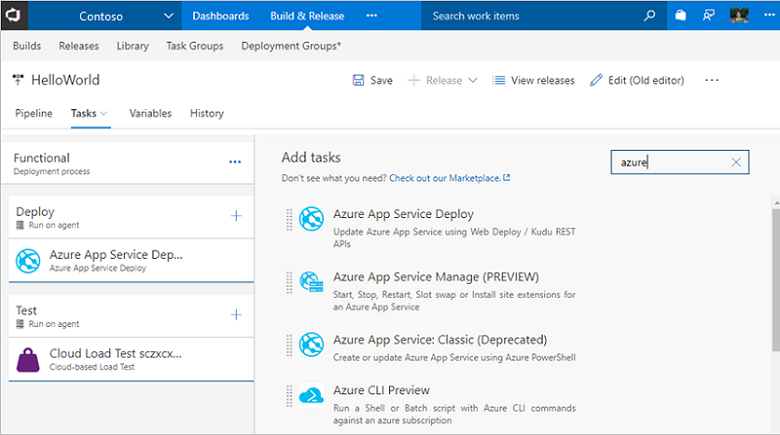
Improved task and phase editor
All the enhancements in the new build definition editor are now available in the release definition editor, as well (Figure 72). You can search for tasks and add them by either using the Add button or by using drag/drop. You can reorder or clone tasks using drag/drop.
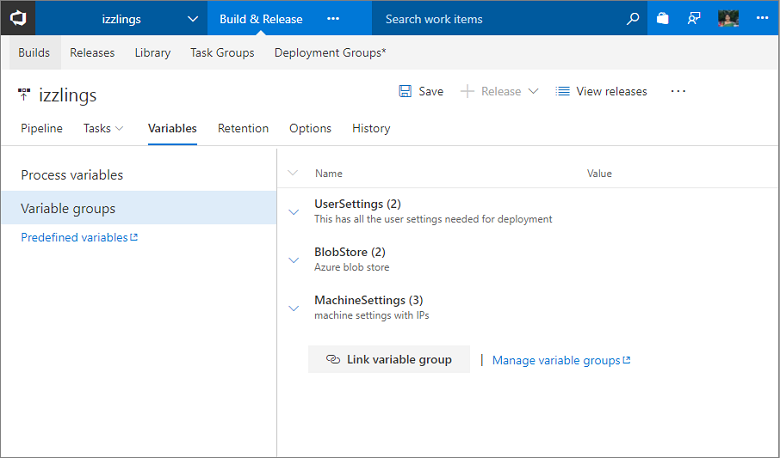
Variable groups, Retention, and Options tabs
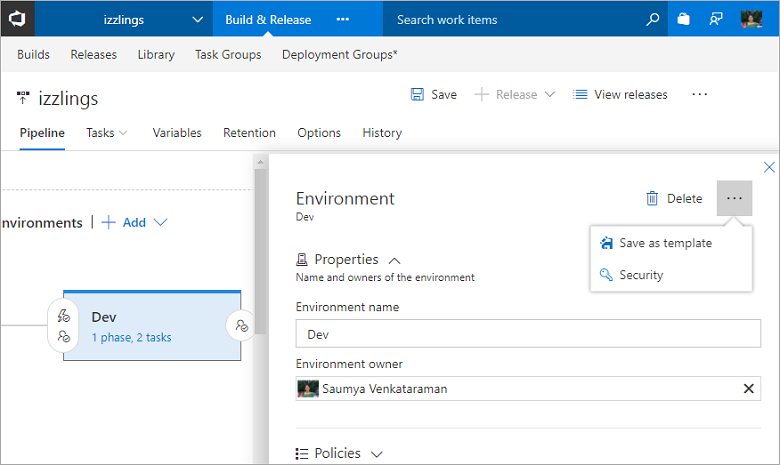
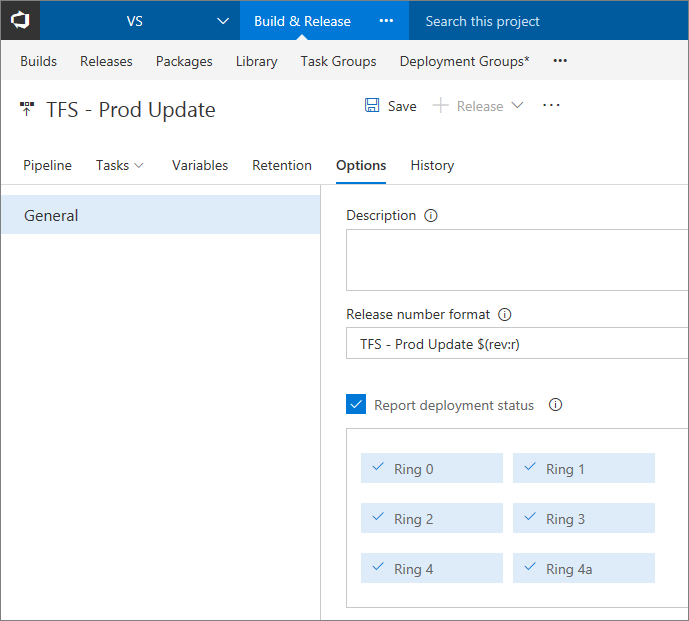
You can now link/unlink to variable groups (Figure 73), set retention policy for individual environments, and modify release definition-level settings such as release number format from the Options tab. You can also save an environment as a deployment template, set environment level permissions, and re-order phases within the Tasks tab.
Use environment level operations to save as template and set security (Figure 74).
Virtual Machine Deployment using Deployment Groups
Release Management now supports robust out-of-the-box multi-machine deployment. You can now orchestrate deployments across multiple machines and perform rolling updates while ensuring high availability of the application throughout.
Agent-based deployment capability relies on the same build and deployment agents. However, unlike the current approach where you install the build and deployment agents on a set of proxy servers in an agent pool and drive deployments to remote target servers, you install the agent on each of your target servers directly and drive rolling deployments to those servers. You can use the full task catalog on your target machines.
A deployment group (Figure 75) is a logical group of targets (machines) with agents installed on each of them. Deployment groups represent your physical environments, such as single-box Dev, multi-machine QA, and a farm of machines for UAT/Prod. They also specify the security context for your physical environments.
You can use this against any virtual machine that you register our agent with. We have also made it very easy to register with Azure with support for an Azure virtual machine extension that auto-installs the agent when the virtual machine spins up. Tags are automatically inherit on the Azure virtual machine when it is registered.
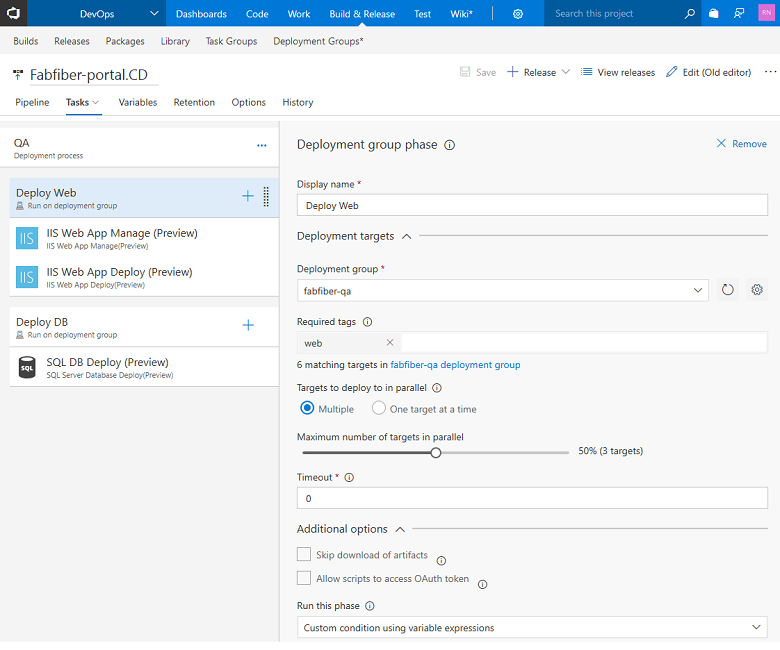
Once you have a deployment group, you simply configure what you want us to execute on that deployment group (Figure 76). You can control what gets run on which machines using tags and control how fast or slow the rollout happens.
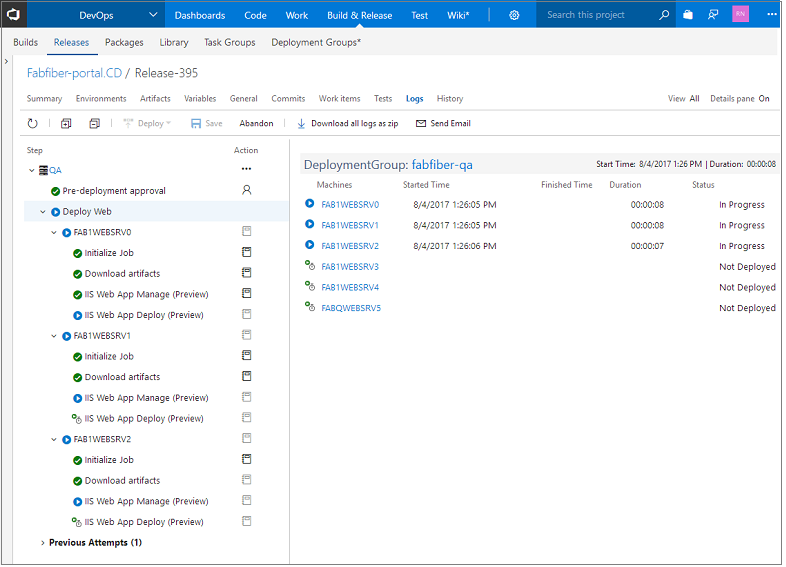
When the deployment is run, the logs show the progression across the entire group of machines you are targeting (Figure 77).
This feature is now an integrated part of Release Management. No additional licenses are required.
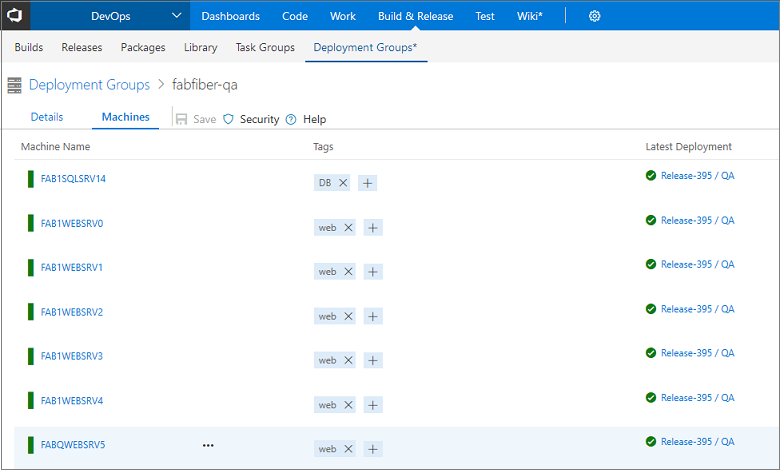
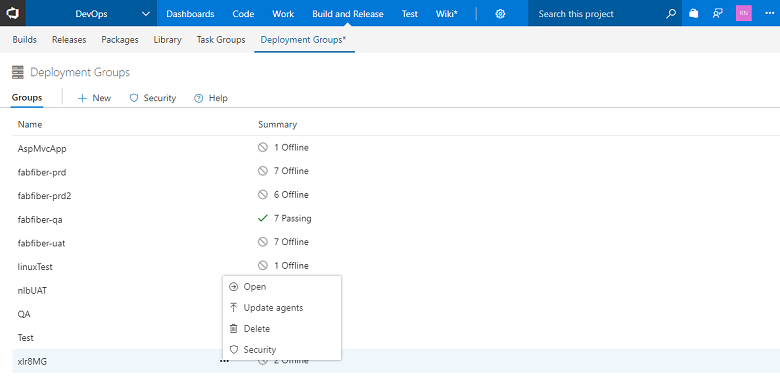
Improved Deployment Groups UI
Continuing our journey of refreshing the Build and Release experiences, we have now re-imagined our deployment groups pages to make it a more clean and intuitive experience (Figure 78). From the landing page, you can view the health of the targets in the deployment group. You can also manage security for an individual deployment group, or set default permissions across deployment groups.
For a target within a deployment group, you can view a summary, recent deployments, and the target's capabilities (Figure 79). You can set tags on the target, and control what is run on each target. We are adding filter support for deployment groups in upcoming releases.

Task group references
Task groups let you define a set of tasks that you can add to your build or release definitions (Figure 80). This is handy if you need to use the same grouping of tasks in multiple builds or releases. To help you track the consumers of a task group, you now have a view into the build definitions, release definitions, and task groups that reference your task group (Figure 79).
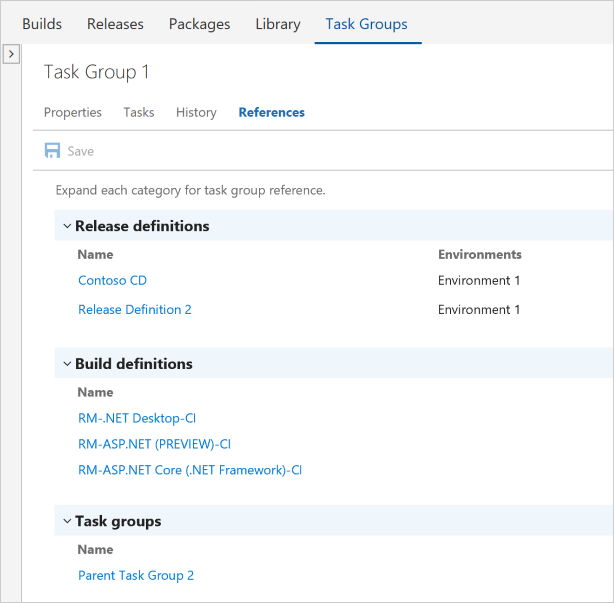
When you try to delete a task group that is still referenced, we warn you and give you a link to this page.
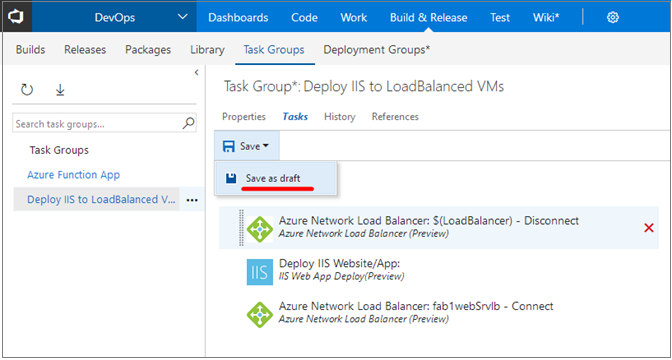
Task group versioning
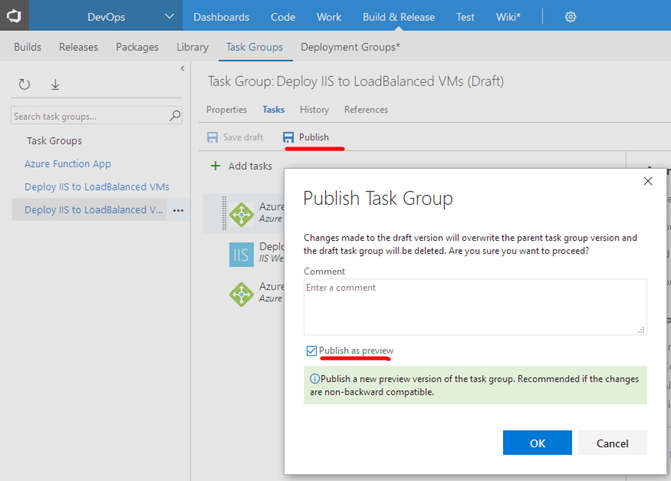
When making changes to task groups, it can feel risky because the change is effective to all definitions that use the task group. With task group versioning, now you can draft and preview task group versions while still offering stable versions to your most important definitions until you are ready to switch. After some drafting and iteration, you can publish a stable version and, while publishing, if the changes are breaking in nature, you can choose to publish the task group as preview (a new major version). Alternatively, you can publish it directly as an updated stable version (Figure 81).
When a new major (or preview) version of the task group is available, the definition editor will advise you that there is a new version. If that major version is preview, you even see a "try it out" message. When the task group comes out of preview, definitions using it are auto-updated, sliding along that major channel (Figure 82).
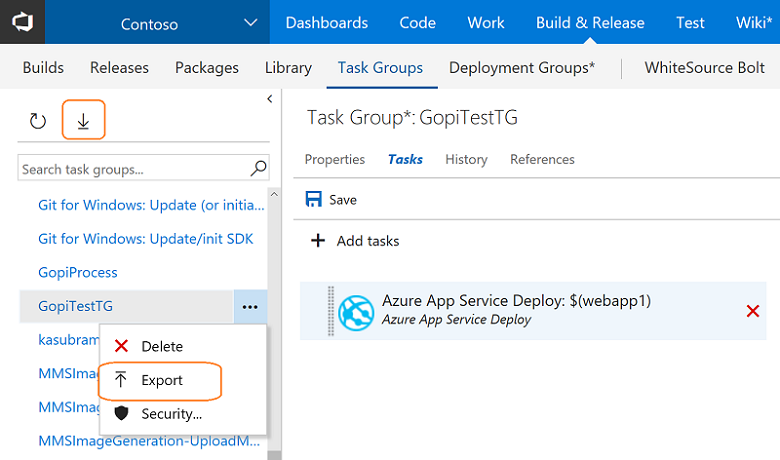
Task group import and export
Although task groups have enabled reuse within a project, we know that recreating a task group across projects and accounts can be painful. With task group import/export (Figure 83), as we have done for release definitions, now you can export as a JSON file and import where you want it. We have also enabled nested task groups, which first expand when they are exported.
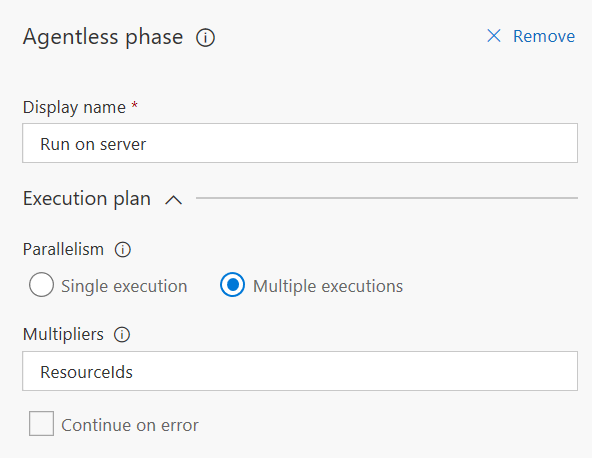
Multi Configuration support in Server Side (Agentless) tasks
By specifying variable multipliers for server side (agentless) tasks (Figure 84), you can now run the same set of tasks in a phase on multiple configurations, which run in parallel.
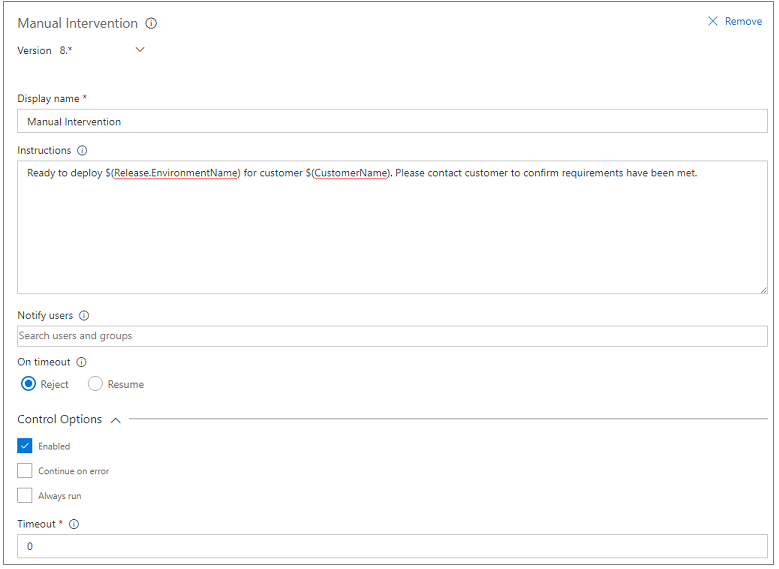
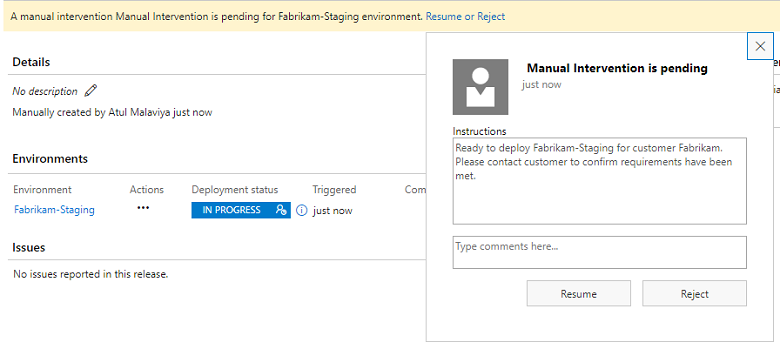
Variables Support in Manual Intervention task
The Manual Intervention task (Figure 85) now supports the use of variables within the instruction text shown to users when the task runs, at the point where the user can resume execution of the release process or reject it. Any variables defined and available in the release can be included, and the values are used in the notifications as well as in the email sent to users (Figure 86).
Control releases to an environment based on the source branch
A release definition can be configured to trigger a deployment automatically when a new release is created, typically after a build of the source succeeds. However, you may want to deploy only builds from specific branches of the source, rather than when any build succeeds.
For example, you may want all builds to be deployed to Dev and Test environments, but only specific builds deployed to Production. Previously you were required to maintain two release pipelines for this purpose, one for the Dev and Test environments and another for the Production environment.
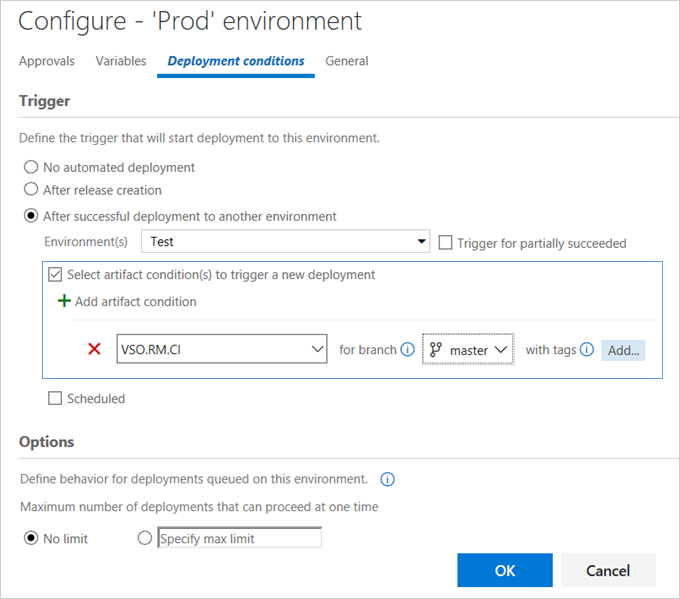
Release Management now supports the use of artifact filters for each environment. This means you can specify the releases that are deployed to each environment when the deployment trigger conditions (such as a build succeeding and creating a new release) are met. In the Trigger section of the environment Deployment conditions dialog (Figure 87), select the artifact conditions such as the source branch and tags for builds that will trigger a new deployment to that environment.
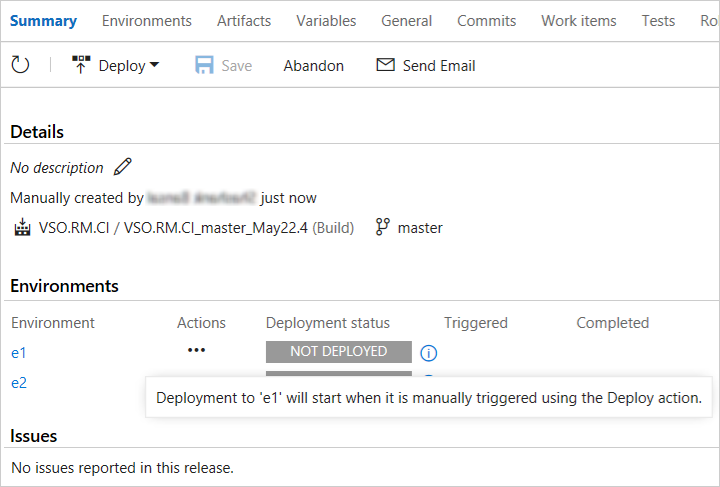
In addition, the Release Summary page (Figure 88) now contains a pop-up tip that indicates the reason for all "not started" deployments to be in that state, and suggests how or when the deployment will start.
Release Triggers for Git repositories as an artifact source
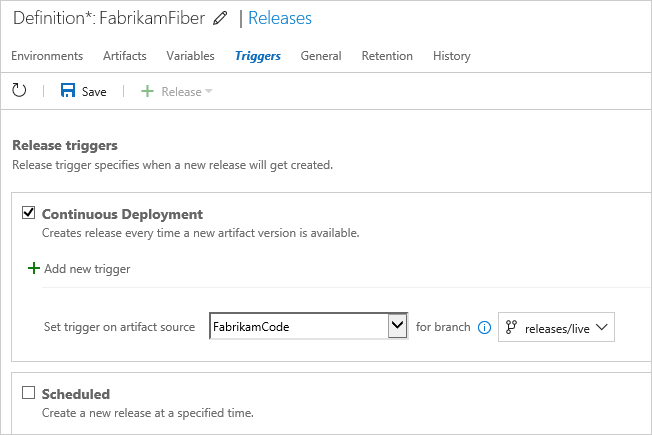
Release Management now supports configuring a continuous deployment trigger (Figure 89) for Git repositories linked to a release definition in any of the team projects in the same account. This lets you trigger a release automatically when you make a new commit to the repository. You can also specify a branch in the Git repository for which commits will trigger a release.
Release Triggers: Continuous deployment for changes pushed to a Git repository
Release Management has always provided the capability to configure continuous deployment when a build completes. However, now you can also configure continuous deployment on Git Push. This means that you can link GitHub and Team Foundation Git repositories as artifact sources to a release definition, and then trigger releases automatically for applications such as Node.JS and PHP that are not generated from a build and so do not need a build action for continuous deployment.
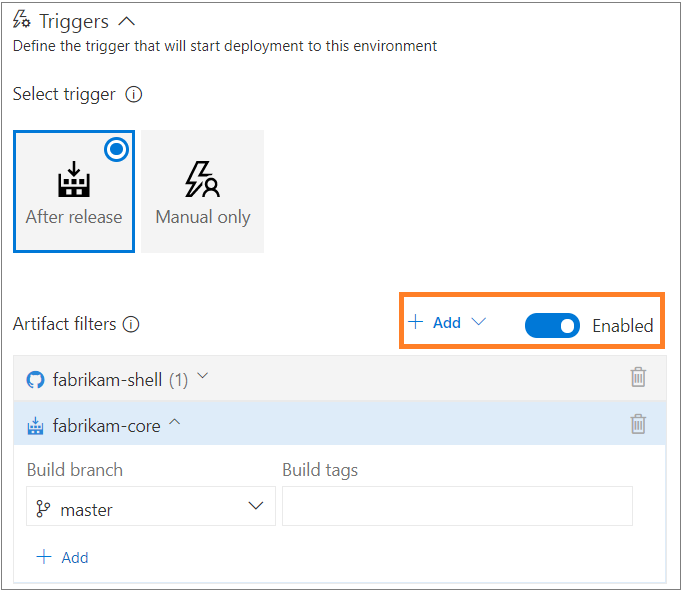
Branch filters in environment triggers
In the new release definition editor you can now specify artifact conditions for a particular environment. Using these artifact conditions, you will have more granular control on which artifacts should be deployed to a specific environment. For example, for a production environment you may want to make sure that builds generated only from the main branch are deployed. This filter needs to be set for all artifacts that you think should meet this criterion.
You can also add multiple filters for each artifact that is linked to the release definition (Figure 90). Deployment is triggered to this environment only if all the artifact conditions are successfully met.
Enhancements to server-side tasks
We have made two enhancements to server-side tasks (tasks that run within a server phase).
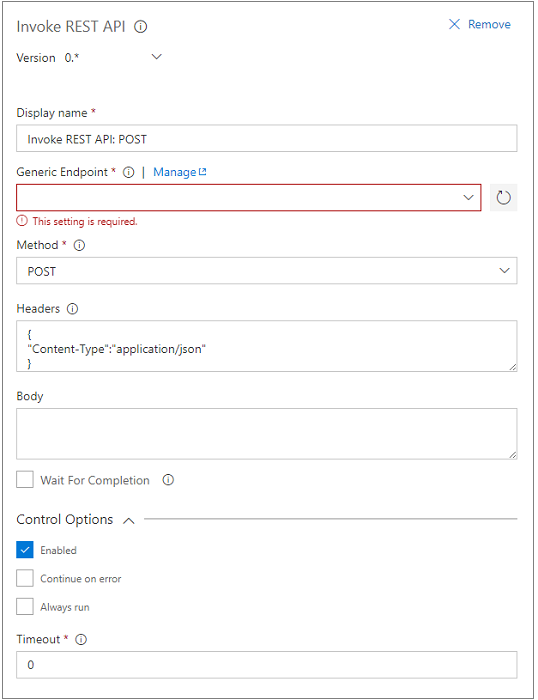
We have added a new task that invokes any generic HTTP REST API (Figure 91) as part of the automated pipeline. For example, it can be used to invoke specific processing with an Azure function, and wait for it to be completed.
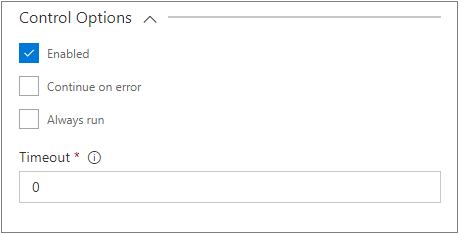
We have also added a Control options (Figure 92) section to all server-side tasks. Task behavior now includes setting the Enabled, Continue on error, Always run, and Timeout options.
Release status badge in Code hub
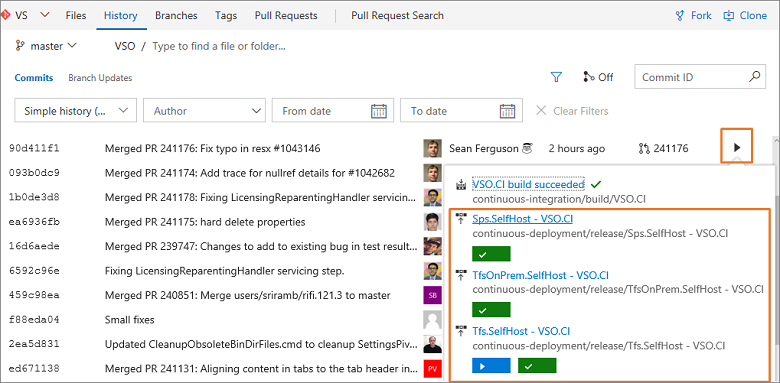
Today, if you want to know whether a commit is deployed to your customer production environment, you first identify which build consumes the commit and then check all the release environments where this build is deployed. Now this experience is much easier with the integration of the deployment status in the Code hub status badge to show the list of environments that your code is deployed to. For every deployment, status is posted to the latest commit that was part of the deployment. If a commit is deployed to multiple release definitions (with multiple environments) then each has an entry in the badge, with status shown for each environment (Figure 93). This improves the traceability of code commit to deployments.
By default, when you create a release definition, deployment status is posted for all environments. However, you can selectively choose the environments whose deployment status should be displayed in the status badge (e.g. only show production environments) (Figure 94).
Enhancements to Build definition menu when adding artifacts
When adding build artifacts to a release definition, you can now view the definitions with their folder organization information and simplify choosing the desired definition (Figure 95). This makes it easy to differentiate the same build definition name but in different folders.

The list of definitions is filtered based on those that contain the filter term.
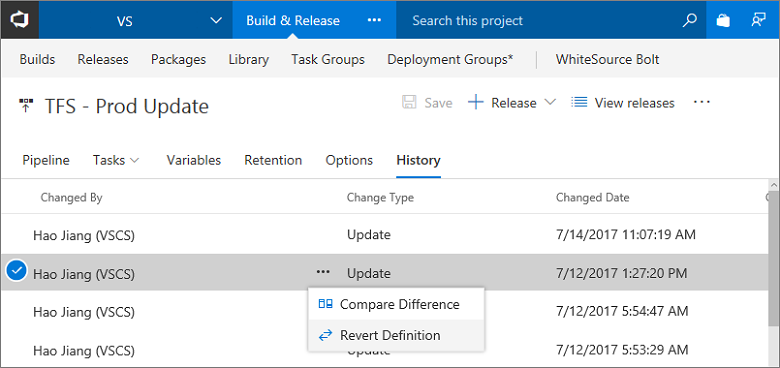
Revert your release definition to older version
Today, if a release definition is updated, you cannot directly revert to a previous version. The only way is to look into the release definition history to find the diff of the changes, and then manually edit the release definition. Now, using the Revert Definition feature (Figure 96), you can choose, and revert back to any older version of a release definition from the release definition History tab.
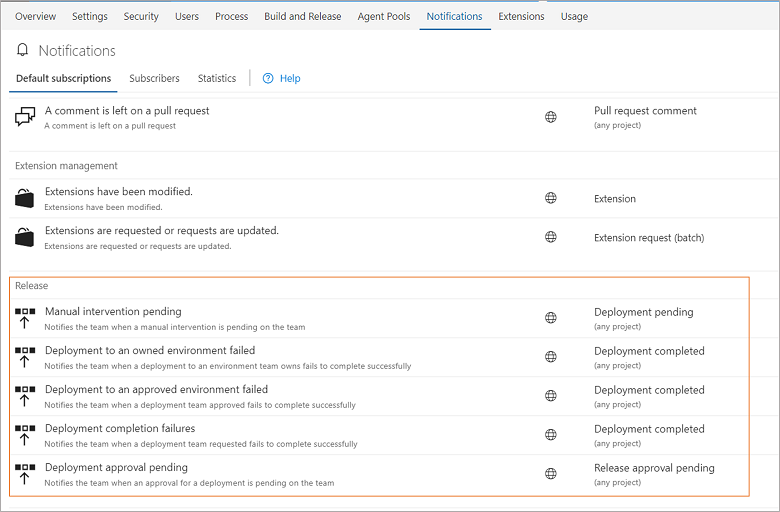
Personalized notifications for releases
Release notifications are now integrated with the VSTS notification settings experience. Those managing releases are now automatically notified of pending actions (approvals or manual interventions) and important deployment failures. You can turn off these notifications by navigating to the Notification settings under the profile menu and switching off Release Subscriptions. You can also subscribe to additional notifications by creating custom subscriptions. Admins can control subscriptions for teams and groups from the Notification settings under Team and Account settings.
Release definition authors no longer need to manually send emails for approvals and deployment completions.
This is especially useful for large accounts that have multiple stakeholders for releases, and for those other than the approver, release creator, and environment owner that might want to be notified (Figure 97).
Tip
See the post for managing release notifications for more information.
Testing
Removing support for Lab Center and automated testing flows in Microsoft Test Manager
With the evolution of Build and Release Management, XAML builds are no longer supported in TFS 2018 and consequently we are updating support for using Microsoft Test Manager (MTM) with TFS. Using Test Center/Lab Center in MTM for automated testing is no longer supported by TFS, starting with TFS 2018. If you are not ready to migrate away from XAML builds and Lab Center, you should not upgrade to TFS 2018.
Please see the impact of upgrading to TFS 2018 below:
Lab Center:
- No longer supported:
- Test Controllers cannot be registered with TFS for creating and managing Lab environments.
- Any existing Test Controllers registered with TFS will go offline and existing Lab environments will appear as 'Not Ready'.
- Recommended alternative:
- You can connect to your SCVMM server using SCVMM TFS Extension, create and manage virtual machines and run your workflows on it. For more details see How to perform Lab management operations in Build and Release.
Automated Testing:
- No longer supported:
- Automated testing workflows that rely on Test controller and Lab environments such as XAML Build-Deploy-Test workflow or running automated tests from a test plan using MTM are no longer supported.
- Recommended alternatives:
Manual Testing:
- All manual testing scenarios continue to be fully supported. While manual tests can be run using MTM with TFS 2018, Lab Environments cannot be used to run manual tests.
- For all manual testing scenarios, we strongly recommend using the Test hub in TFS web access.
Exploratory testing traceability improvements for work item links, iterations, and area paths
Based on the feedback we received from teams doing exploratory testing, we are improving traceability links while filing bugs, tasks, or test cases from the Test & Feedback extension. Bugs and tasks created while exploring requirements are now created with the same area path and iteration as that of the requirement instead of team defaults. Test cases created while exploring requirements will now be linked with a Tests <-> Tested By link instead of the Parent <-> Child link so that the test cases you create are automatically added to requirement based test suites. Finally, work items created while not specifically exploring any requirement are filed in the team's default iteration instead of the current iteration so that no new work items come into the current iteration after the sprint planning is complete.
Filters for Test Case work items in Test Plans and Suites in Test Hub
In addition to the filters on Test fields like Outcome, Configuration, and Tester, you can now filter on Test Case work item fields like Title, State, and Assigned To (Figure 98).

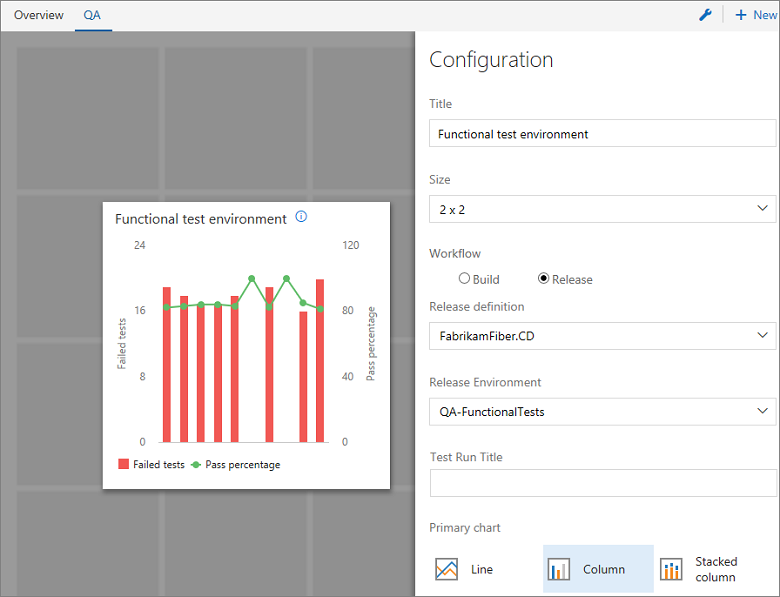
Test trend charts for Release Environments and Test Runs
We are adding support for Release Environments in the Test Result Trend widget (Figure 99) so that you can track status of test environments on VSTS dashboards. Like the way you to do for test results in Build, you can now create trend charts showing test pass rate, count of total, passed or failed tests, and test duration for Release Environments. You can also filter the charts to a specific test run within an environment with the Test Run title filter.
Markdown formatting support for Test Run and Test Result comments
We are adding support for formatting Test Run and Test Result comments with markdown syntax. You can use this feature to create formatted text or quick links to URLs in your comments. You can update Test Result comments in the Result Summary page with Update analysis and Test Run comments in the Run Summary page with Update comments in Test hub.
Add link to existing bug for a failing test
While analyzing the test result in the Build or Release summary page or in the Test hub, you can now associate an existing bug to a failed test. This is helpful when a test is failing for a known reason that has a bug already filed.
Upload attachments to test runs and test results
You can now attach files such as screenshots and log files to test runs or test results as additional information. Up to this point, this capability was only available through the Microsoft Test Manager (MTM) client, forcing you to switch context between the Test hub in VSTS/TFS and the MTM client.
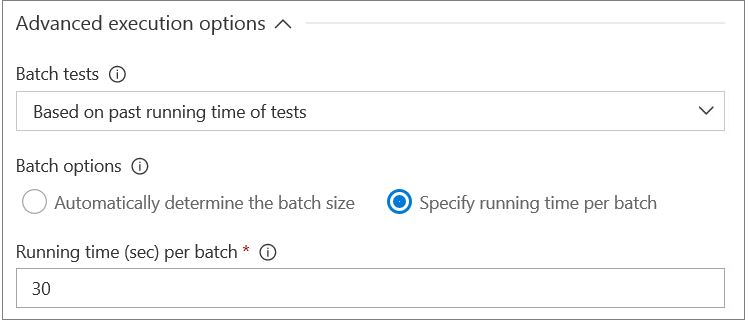
Test batching
In the Visual Studio test task in Build/Release management, options are available to control how tests should be grouped (batched) for efficient execution. Tests can be grouped in two ways:
- Based on the number of tests and agents participating in the run, which simply groups tests into a number of batches of a specified size.
- Based on past running time of tests, which considers past running time to create batches of tests such that each batch has approximately equal running time (Figure 100). Quick running tests are batched together while longer running tests may belong to a separate batch. This option can be combined with the multi-agent phase setting to reduce the total test time to a minimum.
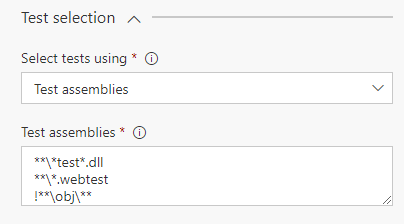
Run webtests using the VSTest task
Using the Visual Studio test task, webtests, also known as web performance tests, can now be run in the CI/CD pipeline. Webtests can be run by specifying the tests to run in the task assembly input. Any test case work item that has an “associated automation” linked to a webtest, can also be run by selecting the test plan/test suite in the task (Figure 101).
Webtest results are available as an attachment to the test result (Figure 102). This can be downloaded for offline analysis in Visual Studio.

This capability is dependent on changes in the Visual Studio test platform and requires that Visual Studio 2017 Update 4 is installed on the build/release agent. Webtests cannot be run using prior versions of Visual Studio.
Similarly, webtests can be run using the Run Functional Test task. This capability is dependent on changes in the Test Agent, that will be available with the Visual Studio 2017 Update 5.
Tip
See the Load test your app in the cloud using Visual Studio and VSTS quickstart as an example of how you can use this together with load testing.
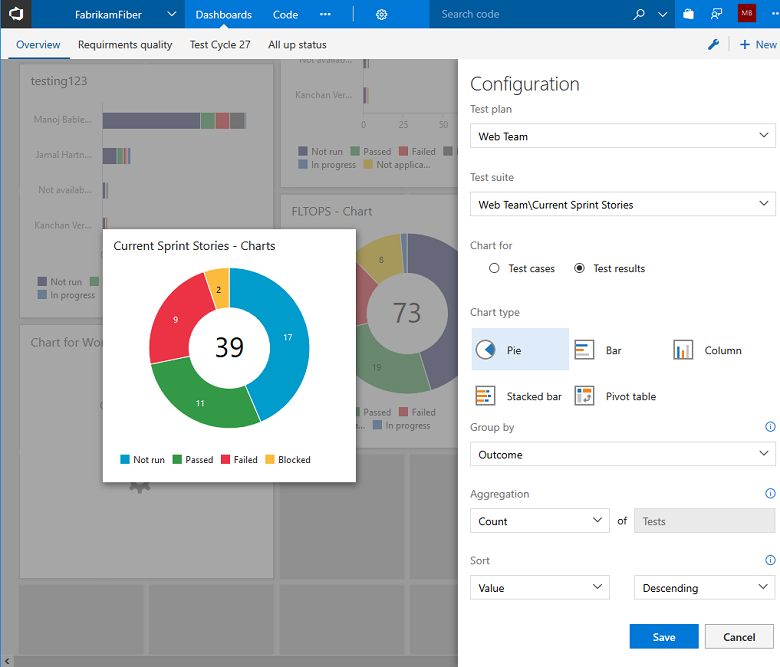
Chart widget for test plans and test suites
Previously, you could create charts for test plans and suites in Test hub and pin them to dashboard. We have now added a widget that enables creating charts for test plans and suites from the widget catalog on the dashboard. You can create charts for test authoring status or test execution status. Moreover, adding charts from the widget allows you to create larger charts when you have more data to be shown on a chart (Figure 103).
Screenshot and annotation support for desktop apps with Chrome browser for manual tests
We are adding support for one of the top suggestions from manual testing - capturing screenshots of desktop applications from the Web Test Runner in Test hub. Until now, you had to use Test Runner in Microsoft Test Manager to capture screenshots of desktop apps. You need to install the Test & Feedback extension to use this functionality. We are rolling out support for the Chrome browser, and Firefox will follow shortly thereafter.
Discontinuing TFS Extension for SharePoint
TFS 2018 and later versions will no longer support the TFS Extension for SharePoint. Additionally, the screens used to configure integration between a TFS Server and a SharePoint server have been removed from the Team Foundation Administration Console.
Note
If you are upgrading to TFS 2018 from a previous version configured to integrate with SharePoint, you will need to disable the SharePoint integration after upgrade, or your TFS SharePoint sites will fail to load.
We have created a solution that allows you to disable integration on the SharePoint server. For more information, please see the post on the future of our TFS/SharePoint Integration.
Discontinuing Team Rooms
Modern development teams heavily depend on collaboration. People want (and need) a place to monitor activity (notifications) and talk about it (chat). A few years back, we recognized this trend and set out to build the Team Room to support these scenarios. Since that time, we have seen more solutions to collaborate emerge in the market. Most notably, the rise of Slack. And more recently, the announcement of Microsoft Teams.
With so many good solutions available that integrate well with TFS and Visual Studio Team Services, we announced in January the plans to remove our Team Room feature from both TFS 2018 and Visual Studio Team Services.
How are we doing?
We would love to hear from you! You can report a problem and track it through Developer Community and get advice on Stack Overflow.