Team Foundation Server 2018 Update 2 Release Notes
Developer Community | System Requirements and Compatibility | License Terms | TFS DevOps Blog | SHA-1 Hashes | | Latest Visual Studio 2019 Releases Notes
Note
If you are accessing this page from a non-English language version, and want to see the most up-to-date content, please visit this Release Notes page in English. You can change the language of this page by clicking the globe icon in the page footer and selecting your desired language.
In this article, you will find information regarding the newest release for Team Foundation Server 2018. Click the button to download.

To learn more about Team Foundation Server 2018, see the Team Foundation Server Requirements and Compatibility page. Visit the visualstudio.com/downloads page to download other TFS 2018 products.
Direct upgrade to Team Foundation Server 2018 Update 2 is supported from TFS 2012 and newer. If your TFS deployment is on TFS 2010 or earlier, you need to perform some interim steps before upgrading to TFS 2018 Update 2. Please see the chart below and the TFS Install page for more information.

Important
You do not need to upgrade to TFS 2018 RTM before upgrading to TFS 2018 Update 2.
 Release Date: May 7, 2018
You can now upgrade to TFS 2018 Update 2 and continue to connect your XAML controllers and run XAML builds. When we removed support for XAML build in TFS 2018 RTW and Update 1, some of you could not upgrade due to having legacy XAML builds, and we want to unblock you. Although TFS 2018 Update 2 supports XAML builds for your legacy builds, XAML build is deprecated and there will be no further investment, so we highly recommend converting to a newer build definition format.
Summary of What's New in TFS 2018 Update 2
We have added a lot of new value to Team Foundation Server 2018 Update 2. Some of the highlights include:
- View pull request merge commit
- Help reviewers using pull request labels
- Mention a pull request
- Pull request comment notifications include the thread context
- Pull request status extensibility
- Custom fields and tags filter in work item tracking notifications
- Modernized column options
- Added support for Not In query operator
- Query for @MyRecentActivity and @RecentMentions
- Filtering on plans
- Release gates
- Build with continuous integration from GitHub Enterprise
- Enhancements to multi-phase builds
- Skip scheduled builds if nothing has changed in the repo
- Seamlessly use public packages using upstream sources
- Retention policies in TFS feeds
- Filtering in package management
- Wiki search
- Reference work items in Wiki
- Preview content as you edit Wiki pages
- Paste rich Wiki content as HTML
- Profile cards
- Circle avatars
Details of What's New in TFS 2018 Update 2
You can find details about features in each area:
Code
Get a permanent link to code
When viewing a file, you usually see the version at the tip of the selected branch. The version of a file at the tip may change with new commits. If you copy a link from this view, your links can become stale because the URL only includes the branch name, not the commit SHA. You can now easily switch the Files view to update the URL to refer to the commit rather than the branch. If you press the "y" key, your view switches to the tip commit of the current branch. You can then copy permanent links.
Recover a recently-deleted repository through API
Sometimes mistakes can be made when cleaning up old repositories in source control. If a Git repository is deleted within the last 30 days, it can be recovered through the REST API. See the documentation for the list and recover operations for more information.
SSH: Support additional ciphers/keys and deprecate outdated ciphers
To improve security and compatibility, we have updated the list of ciphers supported for SSH. We have added two new ciphers and deprecated three, matching OpenSSH's direction. The deprecated ciphers continue to work in this release. They will be removed in the future as usage falls off.
Added:
- AES128 CTR
- AES256 CTR
Deprecated:
- AES128
- AES192
- AES256
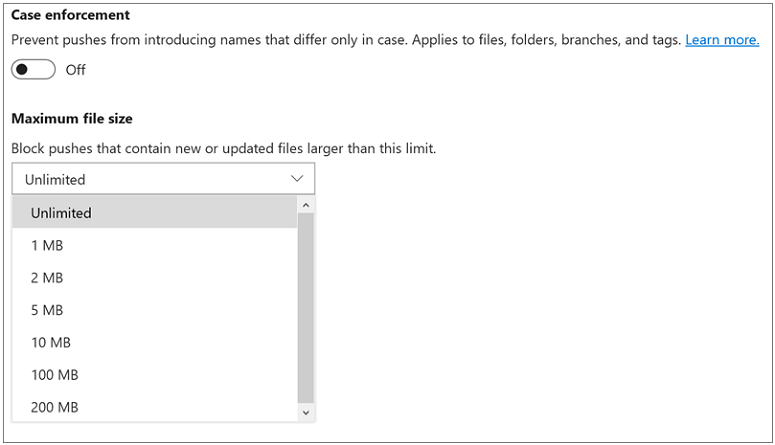
Avoid overwrites and protect performance using repository settings
In this Update, you will find two new repository settings to help keep Git running smoothly.
Case enforcement switches the server from its default case-sensitive mode, where "File.txt" and "file.txt" refer to the same file, to a Windows and macOS-friendly mode where "File.txt" and "file.txt" are the same file. This setting affects files, folders, branches, and tags. It also prevents contributors from accidentally introducing case-only differences. Enabling case enforcement is recommended when most of your contributors are running Windows or macOS.
Limit file sizes allows you to prevent new or updated files from exceeding a size limit you set. The greater number of large files that exist in a Git repository's history, the worse clone and fetch operation performance becomes. This setting prevents accidental introduction of these files.
Enhanced filter capability for commits with more than 1000 files changed
Searching for a file in commits or pull requests that have modified more than 1000 files was inefficient; you would need to click on Load more link several times to find the file that you were interested in. Now, when you filter content in the tree view, the search for that file is done across all files in the commit instead of just looking at the top 1000 files loaded. The performance of the commit details page is also improved when there are more than 1000 files modified.
Find lost commits due to a Force Push
You can perform a Git force push and update a remote ref even if it is not an ancestor of the local ref. This may cause others to lose commits and it can be very hard to identify the root cause. In the new pushes view, we have made force pushes noticeable in order to help troubleshoot issues related to missing commits.
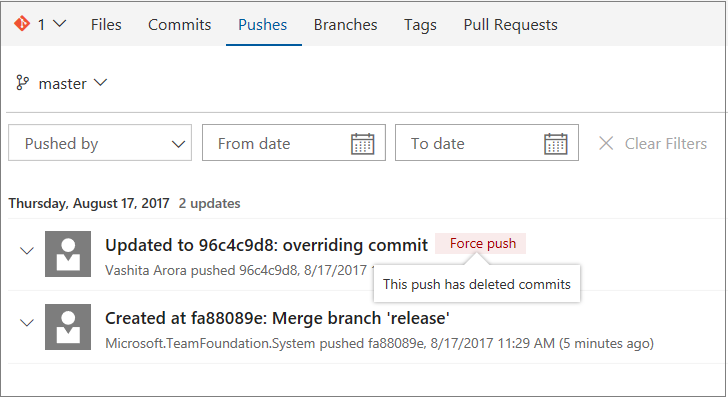
Clicking on the force push tag takes you to the removed commit.

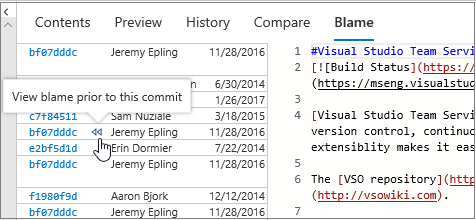
Blame now has history
The Blame view is great for identifying the last person to change a line of code. However, sometimes you need to know who made the previous change to a line of code. The newest improvement in blame can help - View blame prior to this commit. As the name suggests, this feature allows you to jump back in time to the version of the file prior to the version that changed a particular line, and view the blame info for that version. You can continue to drill back in time looking at each version of the file that changed the selected line of code.
Toggle word wrap and white space in diff views
Two new features are available in the file diff viewer: Toggle Word Wrap and Toggle White Space. The first allows the word wrap setting to be applied while in a diff view. This is particularly useful for reviewing PRs that contain files without frequent line breaks - markdown files are a good example. The option to toggle white space is helpful when only whitespace has changed in a line or file. Toggling this setting displays and highlights the whitespace characters (dots for spaces, arrows for tabs, etc.) in the diff.
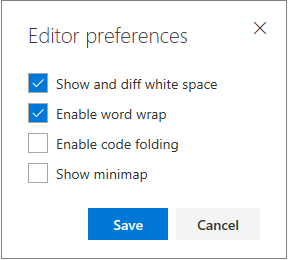
To manage these settings, click on the editor preferences gear in the pull request editor or diff view. In the Files view, select the User Preferences option on the right-click menu.
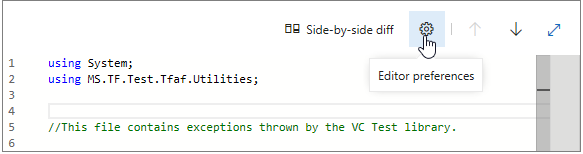
Select the various editor features including Show and diff white space, Enable word wrap, Enable code folding, and Show minimap.
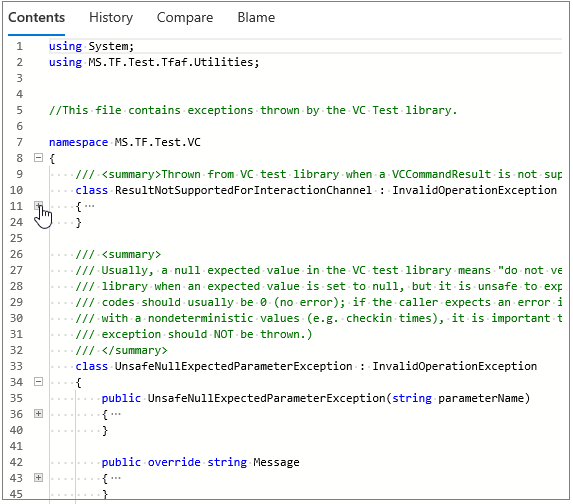
Code folding (called "outlining" in some editors) is also being enabled for the web view. When code folding is enabled, click on the minus signs to collapse sections of code -- click on plus signs to expand collapsed sections. The F1 command palette also exposes options for folding various indentation levels across an entire file, making it easier to read and review large files.
Track code pushes to a Git repo to builds and releases
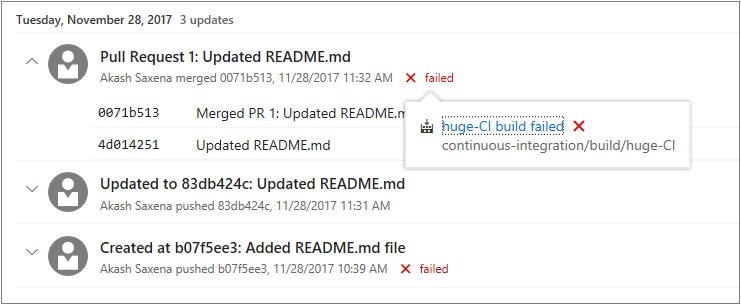
Now you can view the build and release status of merge commits in the Pushes page. By clicking the status next to the push, you will find the specific build or release that the push is included in so that you can verify success or investigate failure.
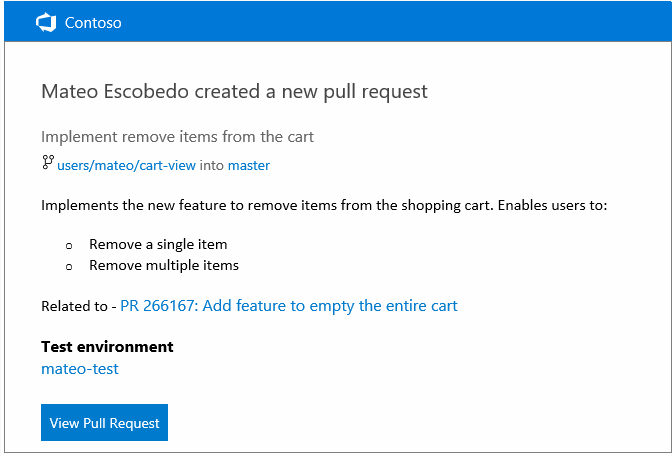
Rendered markdown in email notifications
Markdown is great for adding rich formatting, links, and images in pull request (PR) descriptions and comments. Email notifications for PRs now display the rendered markdown instead of the raw contents, which improves readability.
Inline images are not yet rendered inline (they are just shown as links), but we have that on our backlog to add in the future.
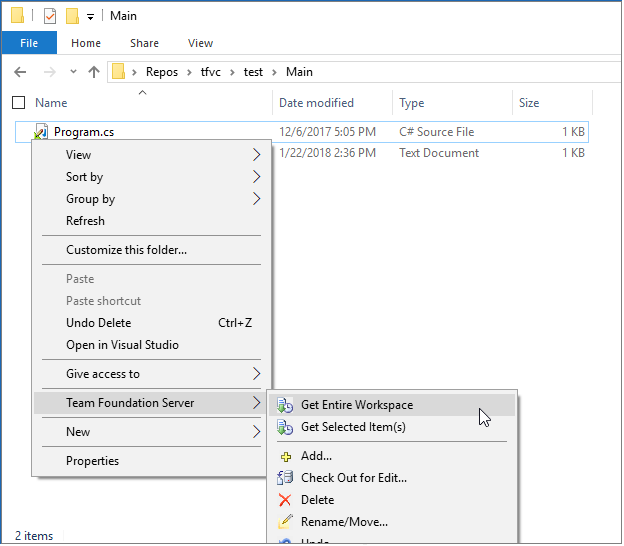
Perform TFVC commands right from Windows Explorer
The TFVC Windows Shell Extension, that gives a lightweight version control experience integrated into Windows File Explorer, now supports TFS 2018. This tool gives convenient access to many TFVC commands right in the Windows Explorer context menu.
Formerly part of the TFS Power tools, the tool has been released as a standalone tool on the Visual Studio Marketplace.
Control who can contribute to pull requests
Previously, anyone who could view a Git repository could work with its pull requests. We have added a new permission called Contribute to pull requests that controls access to creating and commenting on pull requests. All users and groups that previously held the Read permission are also granted this new permission by default. The introduction of this new permission gives administrators additional flexibility and control. If you require your Readers group to be truly read-only, you can deny the Contribute to pull requests permission.
See the quickstart documentation for setting repository permissions for more information.
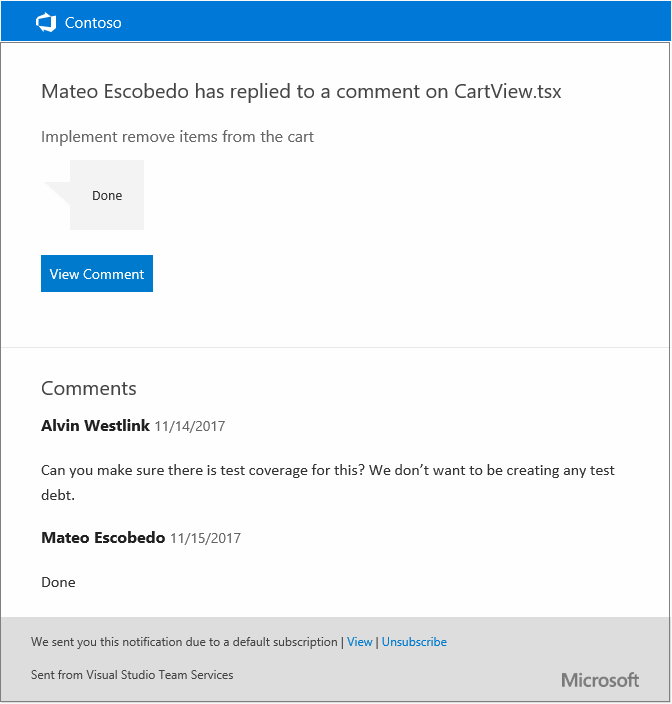
Pull request comment notifications include the thread context
Many times, replies to pull request (PR) comments are pretty brief, acknowledging that a change will be or has been made. This is not a problem when viewing these comments in the web view, but if you are reading a comment in an email notification, the context of the original comment is lost. A simple "I'll fix it" has no meaning.
Now, whenever a reply is made to a PR comment, the comment emails include the prior replies in the body of the email message. This allows the thread participants to see the full context of the comment right from their inbox - no need to open the web view.
Complete work items settings
The feature to complete work items when completing pull requests now has a new repository setting to control the default behavior. The new setting to Remember user preferences for completing work items with pull requests is enabled by default, and honors the user's last state when completing future pull requests in the repo. If the new setting is disabled, then the Complete linked work items after merging option defaults to disabled for all pull requests in the repository. Users can still choose to transition linked work items when completing PRs, but they will need to opt-in each time.
Pull request status extensibility
Using branch policies can be a great way to increase the quality of your code. However, those policies have been limited to only the integrations provided natively by TFS. Using the new pull request Status API and the corresponding branch policy, third party services can participate in the pull request workflow just like native TFS features.
When a service posts to the Status API for a pull request, it immediately appears in the PR details view in a new Status section. The status section shows the description and creates a link to the URL provided by the service. Status entries also support an action menu (...) that is extensible for new actions added by web extensions.
Status alone does not block completion of a PR - that is where the policy comes in. Once PR status has been posted, a policy can then be configured. From the branch policies experience, a new policy is available to Require approval from external services. Select + Add service to begin the process.
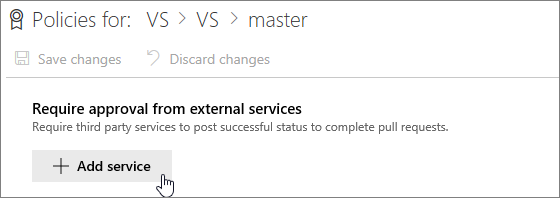
In the dialog, select the service that is posting the status from the list and select the desired policy options.
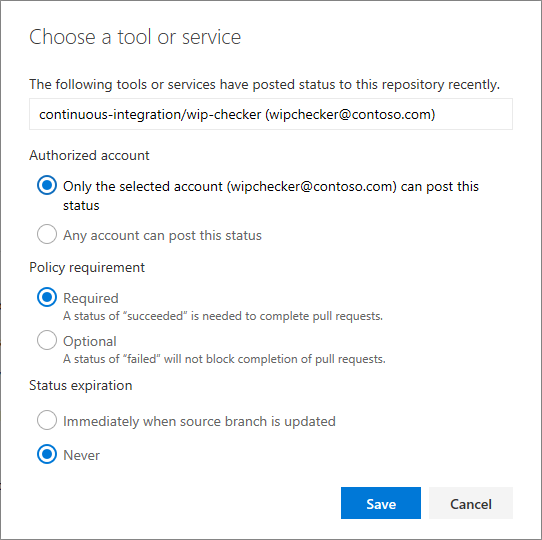
Once the policy is active, the status is shown in the Policies section, under Required or Optional as appropriate, and the PR completion is enforced as appropriate.
To learn more about the status API, and to try it out for yourself, check out the documentation and samples.
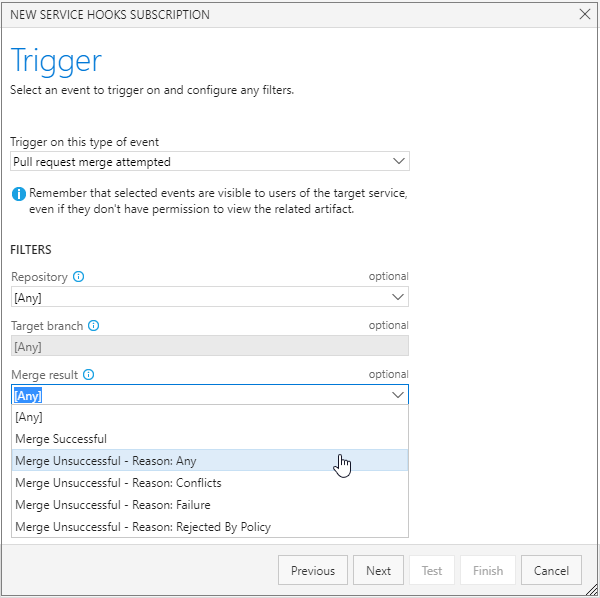
Pull request service hooks merge events
Extensions using pull request service hooks now have more details and filtering options for merge events. Any time a merge is attempted, the event is fired regardless of the success or failure of the merge. When a merge attempt results in a failure, details about the reason for the failure is included.
Improved error messages for work items completing with a pull request
When attempting to complete work items with a pull request, it is possible that the associated work item cannot be transitioned to the completed state. For example, a specific field might be required and needs user input before the state can transition. We have improved the experience to inform you when something is blocking the work item transition, enabling you to take action to make the necessary changes.

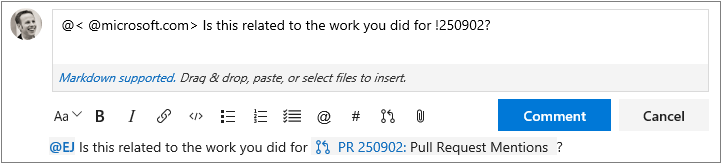
Mention a pull request
You can now mention pull requests in PR comments and work item discussions. The experience for mentioning a PR is similar to that of a work item, but uses an exclamation point ! instead of a hash mark #.
Whenever you want to mention a PR, enter a !, and you will see an interactive experience for picking a PR from your list of recent PRs. Enter keywords to filter the list of suggestions, or enter the ID of the PR you want to mention. Once a PR is mentioned, it is rendered inline with the ID and the full title, and it will link to the PR details page.
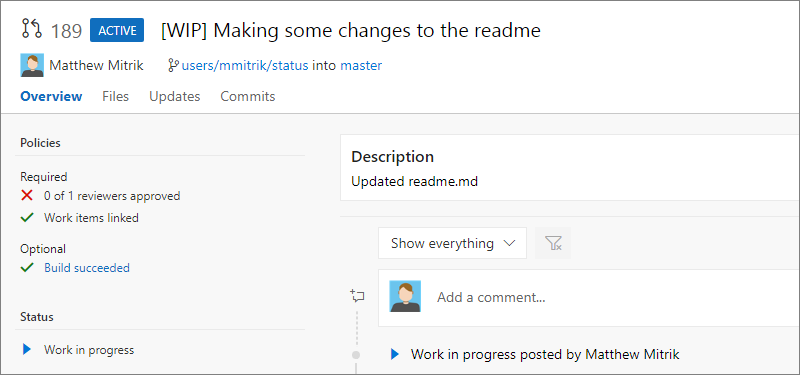
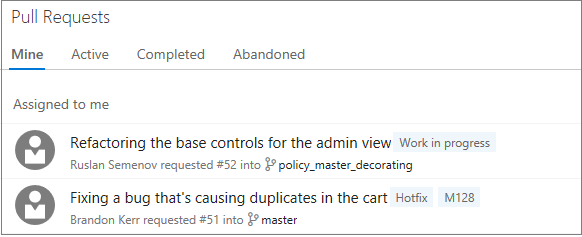
Help reviewers using pull request labels
Sometimes it is important to communicate extra information about a pull request to the reviewers. Maybe the pull request is still a work in progress, or it is a hotfix for an upcoming release - so you append some extra text in the title, perhaps a "[WIP]" prefix or "DO NOT MERGE". Labels now provide a way to tag pull requests with extra information that can be used to communicate important details and help organize pull requests.
Pull request comments follow renamed files
Sometimes files are renamed or moved while a pull request is active. Previously, if there were comments on those renamed files, the latest view of the code would not display the comments. We have now improved comment tracking to follow the renames, displaying comments on the latest version of renamed or moved files.
View pull request merge commit
Pull request diff views are great at highlighting the changes introduced in the source branch. However, changes to the target branch may cause the diff view to look different than expected. A new command is now available to view the diff of the "preview" merge commit for the pull request - View merge commit. This merge commit is created to check for merge conflicts and to use with a pull request build, and it reflects what the merge commit will look like when the pull request is eventually completed. When the target branch has changes not reflected in the diff, the merge commit diff can be useful for seeing the latest changes in both the source and target branches.
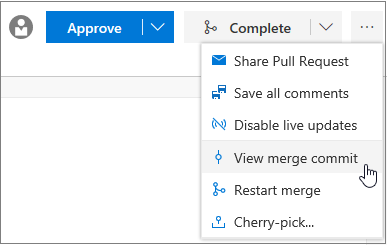
Another command that is useful in conjunction with the View merge commit command is Restart merge (available on the same command menu). If the target branch has changed since the pull request was initially created, running this command creates a new preview merge commit, updating the merge commit diff view.
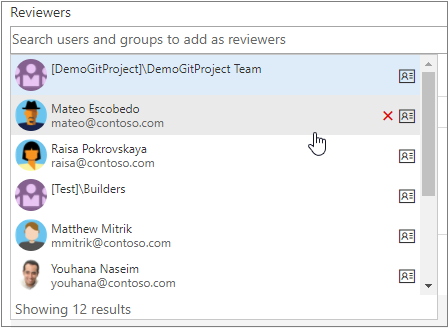
Recently used reviewers
If you frequently have your code reviewed by the same individuals, you will find it easier than ever to add reviewers. When adding reviewers to your pull requests, a list of your recently added reviewers is automatically displayed when you put focus into the reviewers input box -- no need to search by name. Select them as you would any reviewer.
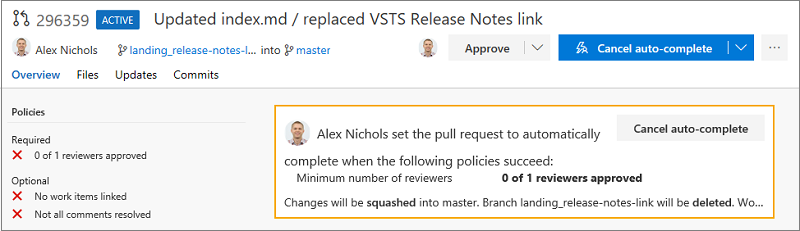
View remaining policy criteria for pull request auto-complete
Auto-complete is a useful feature for teams using branch policies, but when using optional policies, it can be unclear exactly what is blocking a pull request from being completed. Now, when setting auto-complete for a pull request, the exact list of policy criteria that are holding up completion are clearly listed in the callout box. As each requirement is met, items are removed from the list until there are no remaining requirements and the pull request is merged.
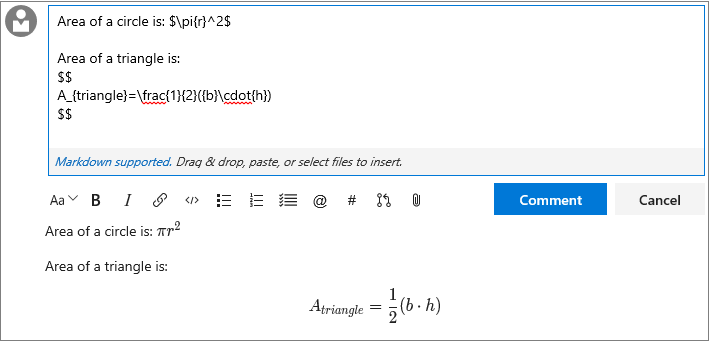
Discuss math in pull requests
Need to include an equation or mathematical expression in your pull request comments? You can now include KaTeX functions in your comments, using both inline and block commenting. See the list of supported functions for more information.
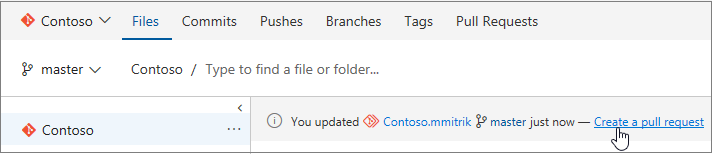
Pull request suggestions for forks
Whenever a topic branch is updated in a repository, a "suggestion" to create a new pull request (PR) for the topic branch is shown. This is very useful for creating new PRs, and we have enabled it for those working in a forked repo, too. If you update a branch in a fork, the next time you visit the Code hub for either the fork or the upstream repo, you will see the suggestion to create a pull request. If you select the "Create a pull request" link, you will be directed to the create PR experience, with the source and target branches and repos pre-selected.
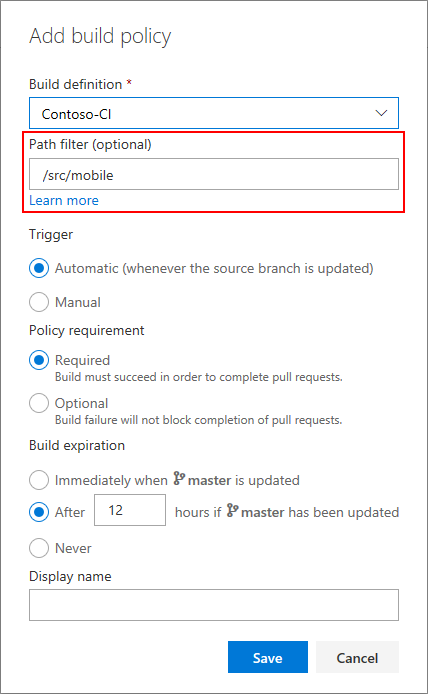
Path filters for pull request policies
Many times, a single repository contains code that is built by multiple continuous integration (CI) pipelines to validate the build and run tests. The integrated build policy now supports a path filtering option that makes it easy to configure multiple PR builds that can be required and automatically triggered for each PR. Just specify a path for each build to require, and set, the trigger and requirement options as desired.
In addition to build, status policies also have the path filtering option available. This allows any custom or third party policies to configure policy enforcement for specific paths.
Work
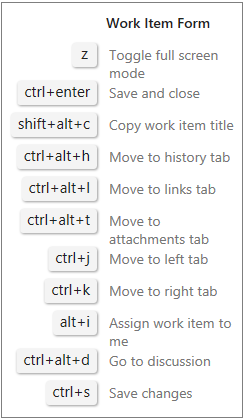
Keyboard shortcuts in the work item form
Assign a work item to yourself (Alt + i), jump to discussion (Ctrl + Alt + d), and copy a quick link to the work item (Shift + Alt + c) using keyboard shortcuts. For the full list of new shortcuts, type "?" with a work item form open or see the table below.
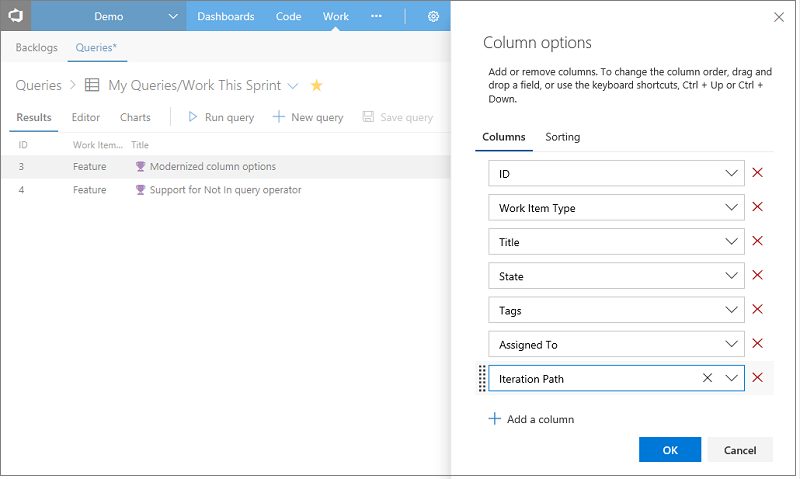
Modernized column options
The Column options dialog used to configure the columns of the work item grid in the Backlog, Queries, and Test hubs has been updated to use a new panel design. Search to find a field, drag and drop to reorder columns, or remove existing columns you no longer want.
Query last run by information
As your project's Shared Queries tree grows, it can be difficult to determine if a query is no longer used and can be deleted. To help you manage your Shared Queries, we have added two new pieces of metadata to our query REST APIs, last executed by and last executed date, so that you can write clean-up scripts to delete stale queries.
HTML tags stripped in work item grids
Based on customer feedback, we have updated the behavior of multi-line text fields in work item query results views in the web, Excel, and Visual Studio IDE to remove HTML formatting. When added as a column to the query, multi-line text fields now display as plain text. Here is an example of a feature with HTML in the description.
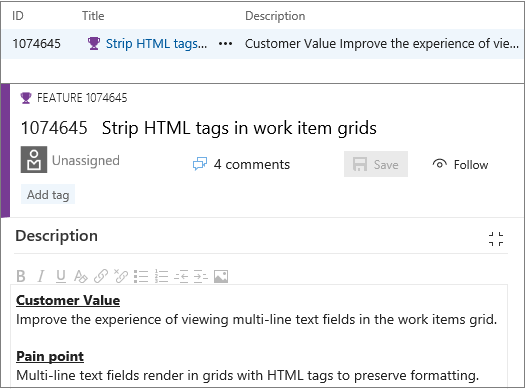
In the past, the query results would have rendered something like <div><b><u>Customer Value</u>...
Added support for Not In query operator
Fields that support the "In" query operator now support "Not In". Write queries for work items "Not In" a list of IDs, "Not In" a list of states, and much more, all without having to create many nested "Or" clauses.

Query for @MyRecentActivity and @RecentMentions
We have introduced two new query macros for the ID field to help you find work items that may be important to you. See what items you were mentioned in over the last 30 days using @RecentMentions or take a look at work items you have recently viewed or edited using @MyRecentActivity.
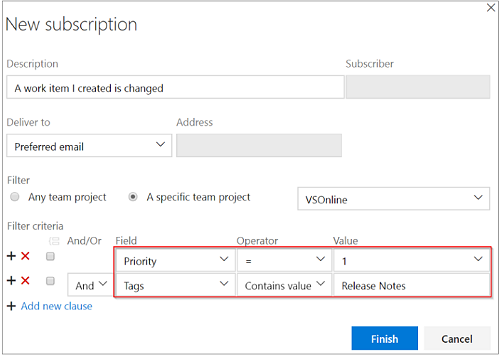
Custom fields and tags filter in work item tracking notifications
Notifications can now be defined using conditions on custom fields and tags; not only when they change but when certain values are met, and allows for a more robust set of notifications that can be set for work items.
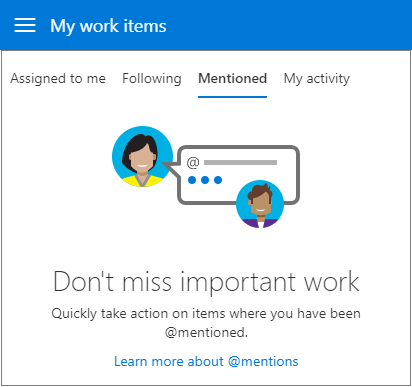
Mentioned support for the My work items page
We have added a new Mentioned pivot under the My work items page. Inside this pivot, you can review the work items where you have been mentioned in the last 30 days. With this new view, you can quickly take action on items that require your input and stay up to date on conversations that are relevant to you.
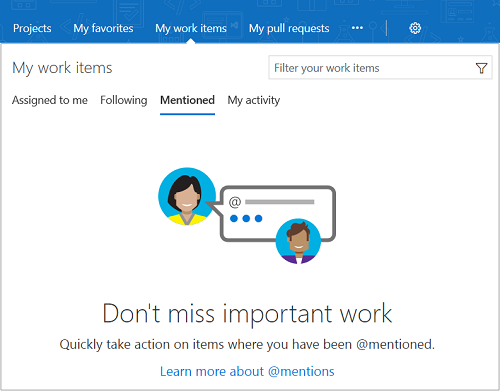
This same pivot is also available through our mobile experience, bringing consistency between both mobile and desktop.
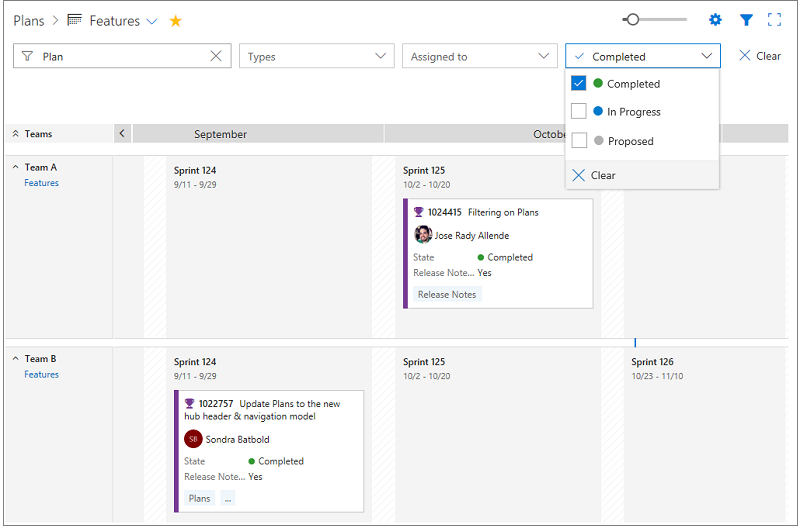
Filtering on plans
The Delivery Plans extension now makes use of our common filtering component, and is consistent with our grid filtering experiences for work items and Boards. This filtering control brings improved usability and a consistent interface to all members of your team.
Updated plans navigation
Many of you care about a specific plan or set of plans and use favorites for quick access to the content. First, we have updated the Plans hub to navigate to your most recently visited plan instead of the directory page. Second, once there, you can use the favorites picker to quickly switch to another plan or use the breadcrumb to navigate back to the directory page.

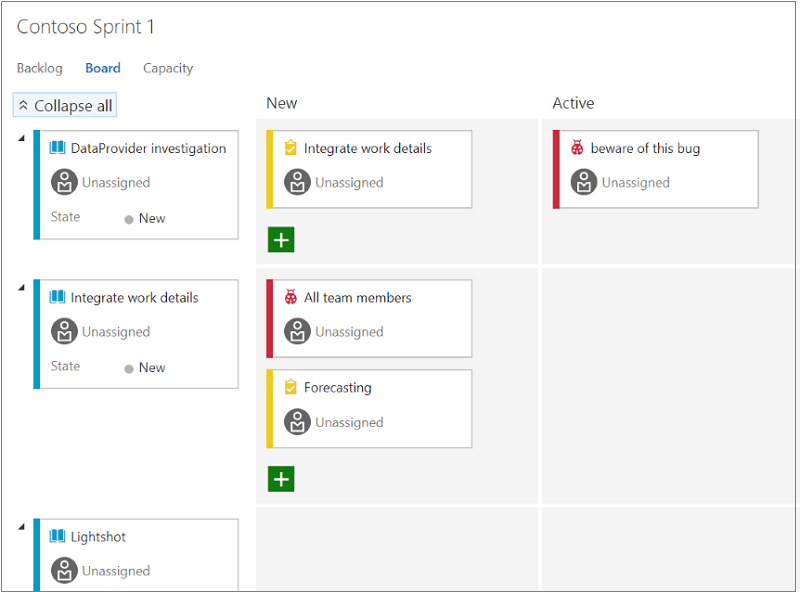
Expand/collapse requirements/people on the task board
You can now expand or collapse all the items on the sprint Task board with just a single click.
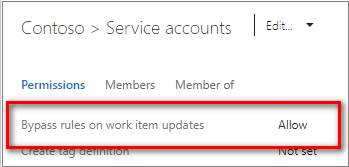
Grant the bypassrule permission to specific users
Often, when migrating work items from another source, organizations want to retain all the original properties of the work item. For example, you may want to create a bug that retains the original created date and created by values from the system where it originated.
The API to update a work item has a bypassrule flag to enable that scenario. Previously, the identity who made that API request had to be a member of the Project Collection Administrators group. We have added a permission at the project level to execute the API with the bypassrule flag.
Build and Release
XAML builds
In TFS 2015, we introduced a web-based, cross-platform build system. XAML builds are not supported in TFS 2018 RTW or Update 1, but we have re-enabled XAML builds in TFS 2018 Update 2. We encourage you to migrate your XAML builds.
When you upgrade to TFS 2018 Update 2:
If you have any XAML build data in your team project collection, you will get a warning about the deprecation of XAML build features.
You will need to use VS or Team Explorer 2017 to edit XAML build definitions or to queue new XAML builds.
If you need to create new XAML build agents, you will need to install them using the TFS 2015 build agent installer.
For an explanation of our XAML build deprecation plan, see the Evolving TFS/Team Services build automation capabilities blog post.
Enhancements to multi-phase builds
You have been able to use phases to organize your build steps and to target different agents using different demands for each phase. We have added several capabilities to build phases so that you can now:
Specify a different agent queue for each phase. This means you can, for example:
- Run one phase of a build on a macOS agent and another phase on a Windows agent. To see a cool example of how useful this can be, see this Connect(); 2017 video: CI/CD DevOps Pipeline for mobile apps and services.
- Run build steps on a build agent pool and test steps on a test agent pool.
Run tests faster by running them in parallel. Any phase that has parallelism configured as "Multi-agent" and contains a "VSTest" task now automatically parallelize test execution across the configured agent count.
Permit or deny scripts to access the OAuth token each phase. This means, for example, you can now allow scripts running in your build phase to communicate with VSTS over REST APIs, and in the same build definition block the scripts running in your test phase.
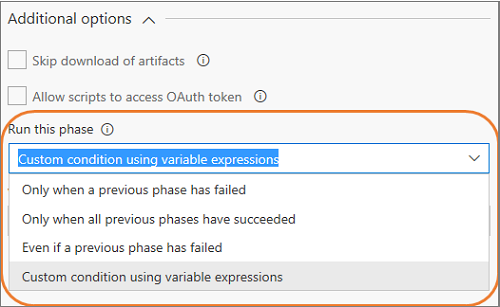
Run a phase only under specific conditions. For example, you can configure a phase to run only when previous phases succeed, or only when you are building code in the main branch.
To learn more, see Phases in Build and Release Management.
Skip scheduled builds if nothing has changed in the repo
By popular request, you can now specify that a scheduled build not run when nothing has changed in your code. You can control this behavior using an option on the schedule. By default, we will not schedule a new build if your last scheduled build (from the same schedule) has passed and no further changes have been checked in to your repo.
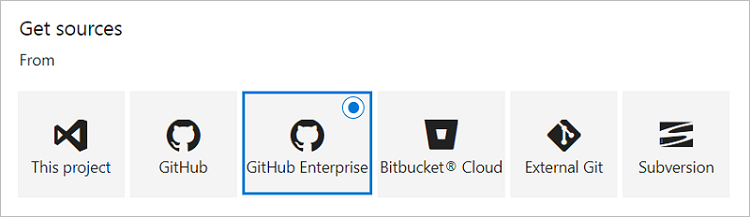
Build with continuous integration from GitHub Enterprise
You now have better integration for performing continuous integration (CI) builds if you use GitHub Enterprise for version control. Previously, you were limited to polling for code changes using the External Git connector, which may have increased the load on your servers and caused delays before builds were triggered. Now, with official GitHub Enterprise support, team CI builds are immediately triggered. In addition, the connection can be configured using various authentication methods, such as LDAP or built-in accounts.
Secure files can be downloaded to agents during build or release
The new Download Secure File task supports downloading (to agent machines) encrypted files from the VSTS Secure Files library. As the file is downloaded, it is decrypted and stored on the agent's disk. When the build or release completes, the file is deleted from the agent. This allows your build or release to use sensitive files, such as certificates or private keys that are otherwise securely encrypted and stored in VSTS. For more information, see Secure files documentation.
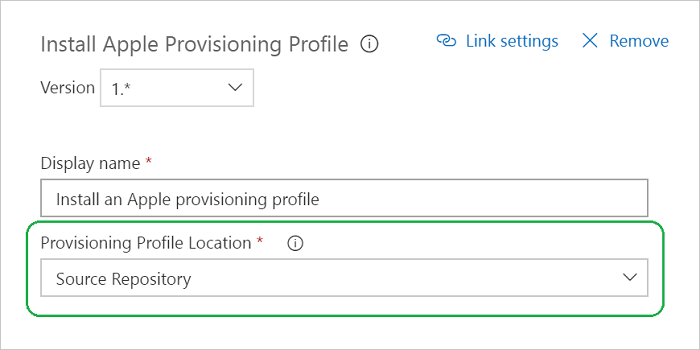
Apple provisioning profiles can be installed from source repositories
The Install Apple Provisioning Profile task already supports installing (on agent machines) provisioning profiles that are stored in the VSTS Secure Files library. Provisioning profiles are used by Xcode to sign and package Apple apps, such as for iOS, macOS, tvOS, and watchOS. Now, provisioning profiles can be installed from source code repositories. Though use of the Secure Files library is recommended for greater security of these files, this improvement addresses provisioning profiles already stored in source control.
Trace GitHub sources to builds using build tags
Builds from GitHub or GitHub Enterprise already link to the relevant commit. It is equally important to be able to trace a commit to the builds that built it. That is now possible by enabling source tagging in TFS. While choosing your GitHub repository in a build definition, select the types of builds you want to tag, along with the tag format.
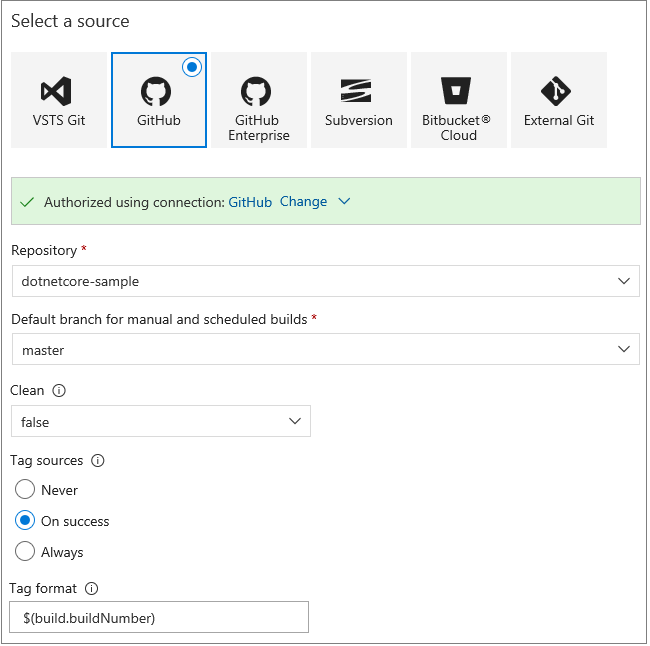
Then watch build tags appear on your GitHub or GitHub Enterprise repository.
Specific Java Development Kits (JDKs) can be installed during builds and releases
For building certain Java projects, specific JDKs may be required but unavailable on agent machines. For example, projects may require older or different versions of IBM, Oracle, or open-source JDKs. The Java Tool Installer task downloads and installs the JDK needed by your project during a build or release. The JAVA_HOME environment variable is set accordingly for the duration of the build or release. Specific JDKs are available to the Java Tool Installer using a file share, a source code repository, or Azure Blob Storage.
Improved Xcode build configuration
The Xcode task has been updated with a new major version (4.*) that improves configuration of Xcode building, testing, and packaging. If your Xcode project has a single, shared scheme, it is automatically used. Additional inline help was added. Deprecated features, such as xcrun packaging, were removed from the Xcode task's properties. Existing build and release definitions must be modified to use this latest 4.* version of the Xcode task. For new definitions, if you need a previous Xcode task version's deprecated capabilities, you can select that version in your definition.
Release gates
Continuous monitoring is an integral part of DevOps pipelines. Ensuring the app in a release is healthy after deployment is as critical as the success of the deployment process. Enterprises have adopted various tools for automatic detection of app health in production and for keeping track of customer reported incidents. Until now, approvers had to manually monitor the health of the apps from all the systems before promoting the release. However, Release Management now supports integrating continuous monitoring into release pipelines. Use this to ensure the system repeatedly queries all the health signals for the app until all of them are successful at the same time, before continuing the release.
You start by defining pre-deployment or post-deployment gates in the release definition. Each gate can monitor one or more health signals corresponding to a monitoring system of the app. Built-in gates are available for "Azure monitor (application insight) alerts" and "Work items". You can integrate with other systems using the flexibility offered through Azure functions.
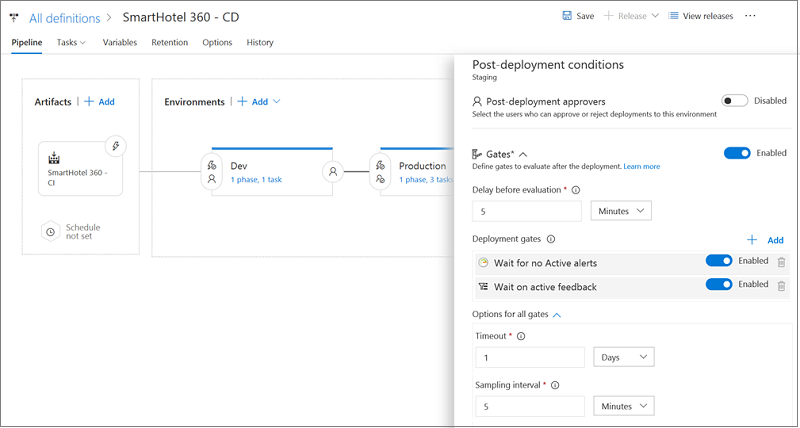
At the time of execution, the Release starts to sample all the gates and collect health signals from each of them. It repeats the sampling at each interval until signals collected from all the gates in the same interval are successful.

Initial samples from the monitoring systems may not be accurate, as not enough information may be available for the new deployment. The "Delay before evaluation" option ensures the Release does not progress during this period, even if all samples are successful.
No agents or pipelines are consumed during sampling of gates. See the documentation for release gates for more information.
Deploy selectively based on the artifact triggering a release
Multiple artifact sources can be added to a release definition and configured to trigger a release. A new release is created when a new build is available for either of the sources. The same deployment process is executed regardless of what source triggered the release. You can now customize the deployment process based on the triggering source. For auto-triggered releases, the release variable Release.TriggeringArtifact.Alias is now populated to identify the artifact source that triggered the release. This can be used in task conditions, phase conditions, and task parameters to dynamically adjust the process. For example, if you only need to deploy the artifacts that changed through environments.
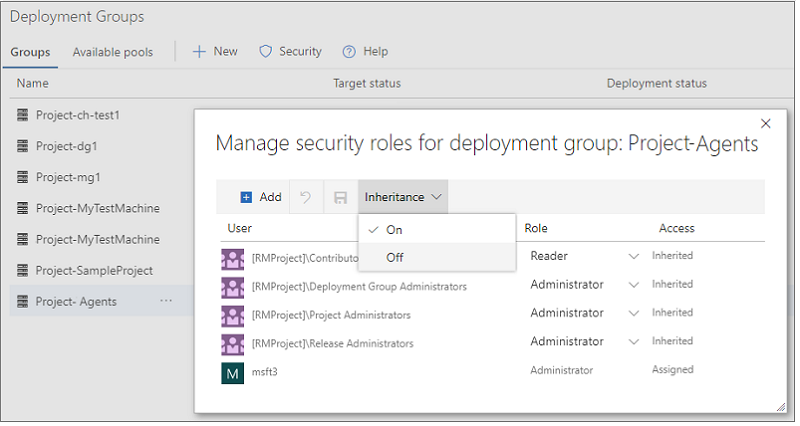
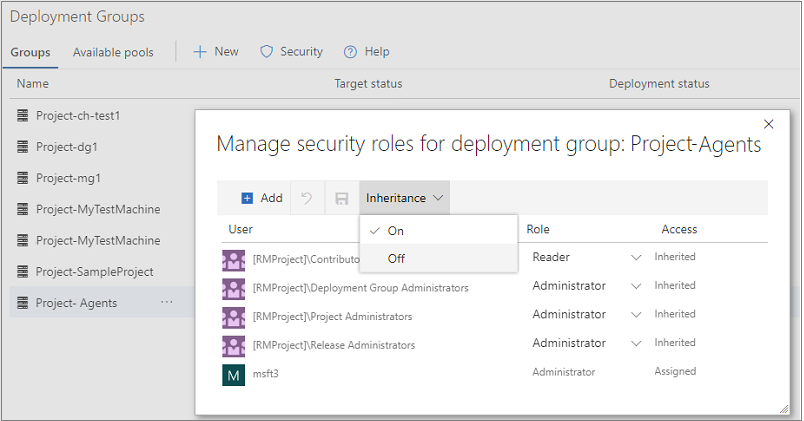
Manage entity-specific security
Previously in role based security, when the security access roles were set, they were set for a user or group at hub level for Deployment groups, Variable groups, Agent queues, and Service endpoints. Now you can turn on and off inheritance for a particular entity so you can configure security just the way you want to.
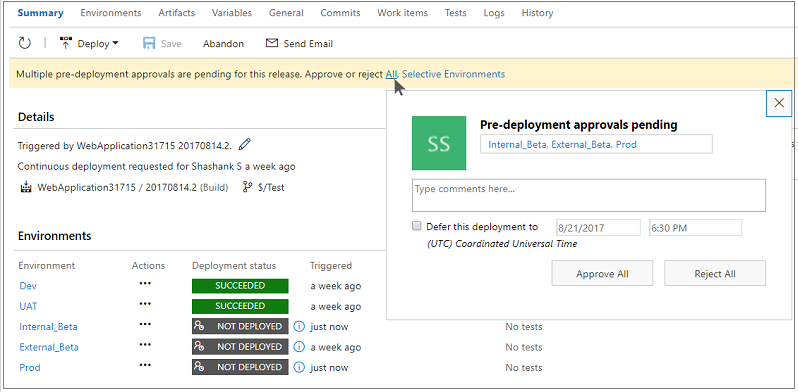
Approve multiple environments
Managing approvals with releases is now simpler. For pipelines having the same approver for multiple environments that deploy in parallel, the approver currently needs to act on each of the approvals separately. With this feature, you can now complete multiple pending approvals at the same time.
Release template extensibility
Release templates let you create a baseline for you to get started when defining a release process. Previously, you could upload new ones to your account, but now authors can include release templates in their extensions. You can find an example on the GitHub repo.
Conditional release tasks and phases
Similar to conditional build tasks, you can now run a task or phase only if specific conditions are met. This will help you in modeling rollback scenarios.
If the built-in conditions do not meet your needs, or if you need more fine-grained control over when the task or phase runs, you can specify custom conditions. Express the condition as a nested set of functions. The agent evaluates the innermost function and works its way outward. The final result is a Boolean value that determines if the task is to be run.
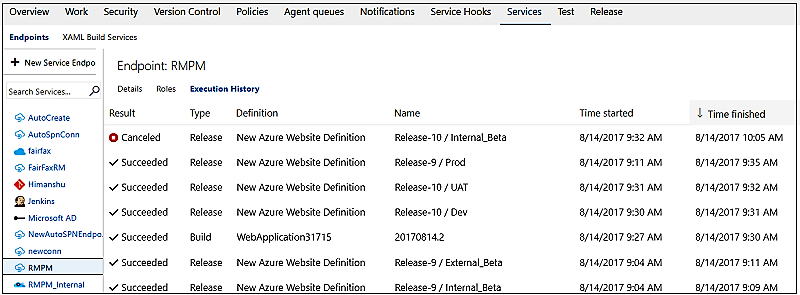
Requests history for service endpoints
Service endpoints enable connection to external and remote services to execute tasks for a build or deployment. The endpoints are configured in project scope and shared between multiple build and release definitions. Service endpoint owners can now get a consolidated view of builds and deployments using an endpoint, that can help to improve auditing and governance.
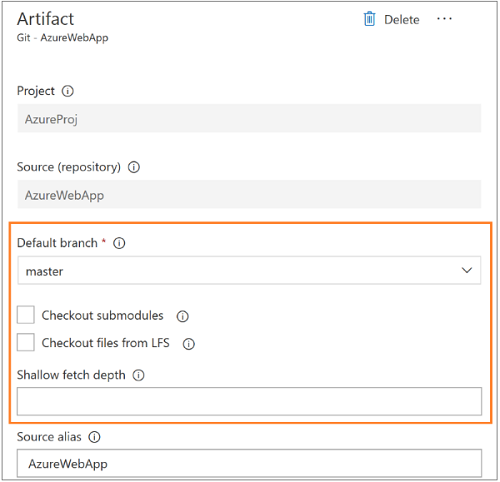
Default properties for Git and GitHub artifact types are now editable
You can now edit the default properties of Git and GitHub artifact types even after the artifact has been linked. This is particularly useful in scenarios where the branch for the stable version of the artifact has changed, and future continuous delivery releases should use this branch to obtain newer versions of the artifact.
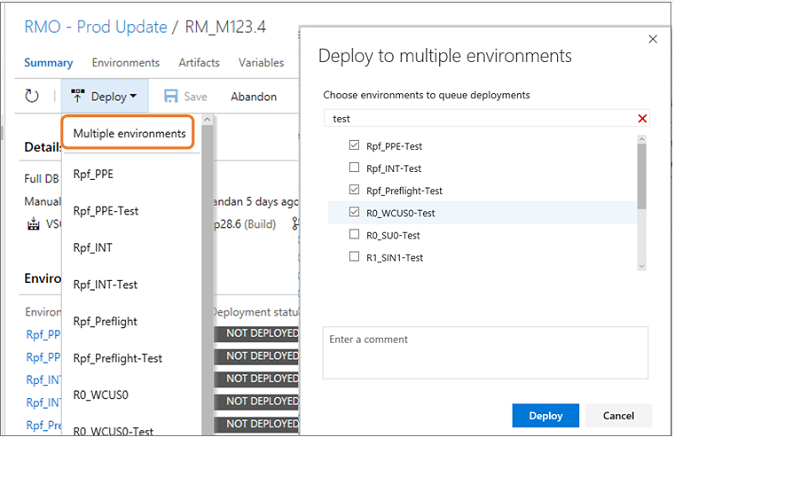
Bulk deploy environments manually from release view
You can now manually trigger a Deploy action to multiple environments of a release at the same time. This allows you to select multiple environments in a release with failed configurations or deployments, and re-deploy to all of the environments in one operation.
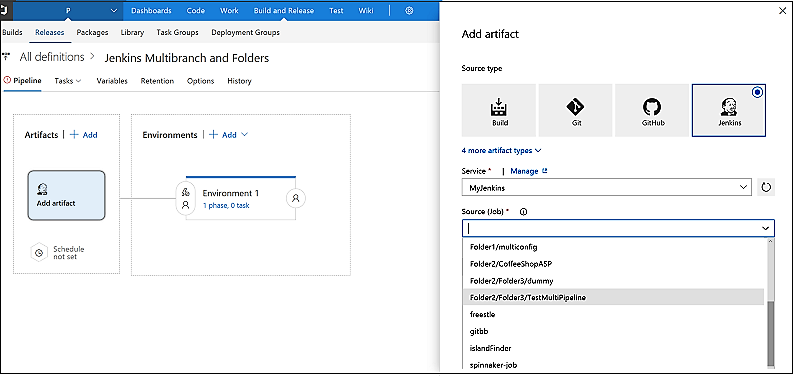
Jenkins multi-branch pipeline support and link jobs organized in folders
Consuming projects from Jenkins just got even better.
First, you can now consume Jenkins multi-branch pipeline projects as artifact sources in a release definition.
Second, while previously you could link Jenkins projects as artifacts only from the root folder of a Jenkins server, now Jenkins projects can be consumed when organized at folder level. You see the list of Jenkins projects, along with folder paths, in the list of sources from which you select the project to be consumed as artifact source.
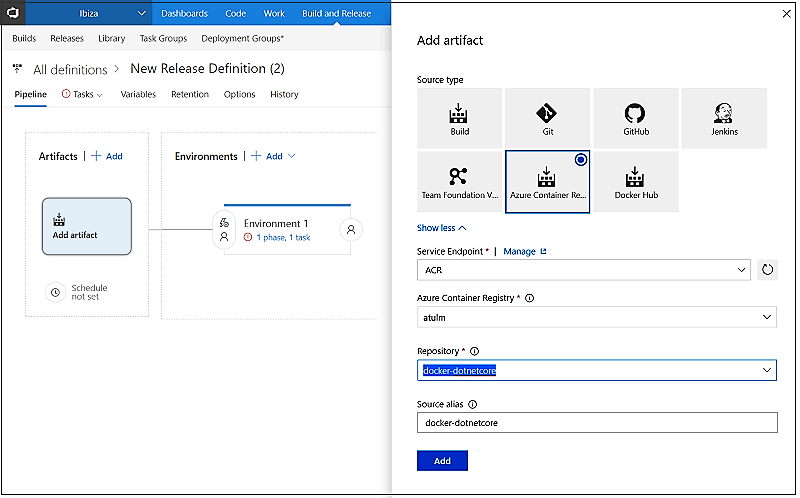
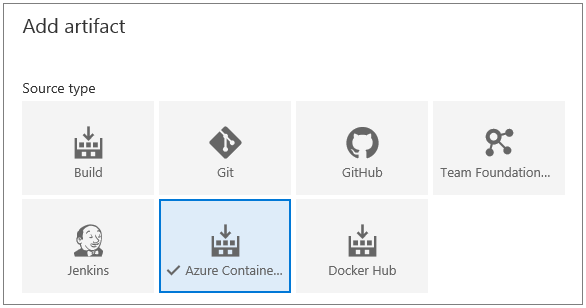
Docker Hub or Azure Container Registry as an artifact source
This feature enables releases to use images stored in a Docker Hub registry or an Azure Container Registry (ACR). This is a first step towards supporting scenarios such as rolling out new changes region-by-region by using the geo-replication feature of ACR or deploying to an environment (such as production) from a container registry that has images for only the production environment.
You can now configure Docker Hub or ACR as a first-class artifact in the + Add artifact experience of a release definition. For now the release has to be triggered manually or by another artifact but we look forward to adding a trigger based on the push of a new image to the registry soon.
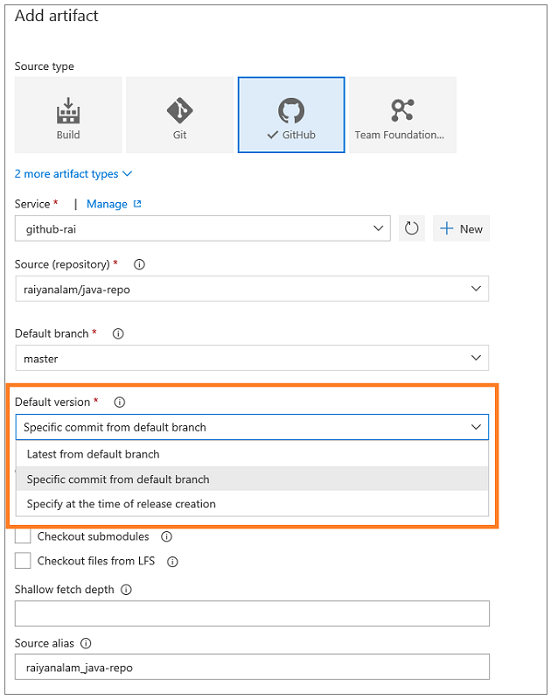
Default artifact versions
There are now several default version options when linking version control artifacts to a release definition. You can configure a specific commit/changeset or simply configure the latest version to be picked from the default branch. Normally you configure it to pick up the latest version, but this is especially useful in some environments where a golden artifact version needs to be specified for all future continuous deployments.
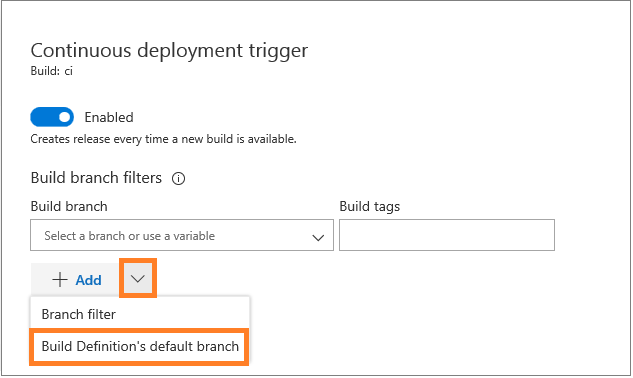
Release triggers branch enhancements
You can now configure a release trigger filter based on the default branch specified in the build definition. This is particularly helpful if your default build branch changes every sprint and the release trigger filters needs to be updated across all the release definitions. Now you just need to change the default branch in the build definition and all the release definitions automatically use this branch. For example, if your team is creating release branches for each sprint release payload, you update it in the build definition to point to a new sprint release branch and the release picks this up automatically.
Release trigger for a package management artifact
Now you can set a trigger on a Package Management artifact in a Release definition so that a new release is automatically created when a new version of the package has been published. See the documentation for triggers in Release Management for more information.
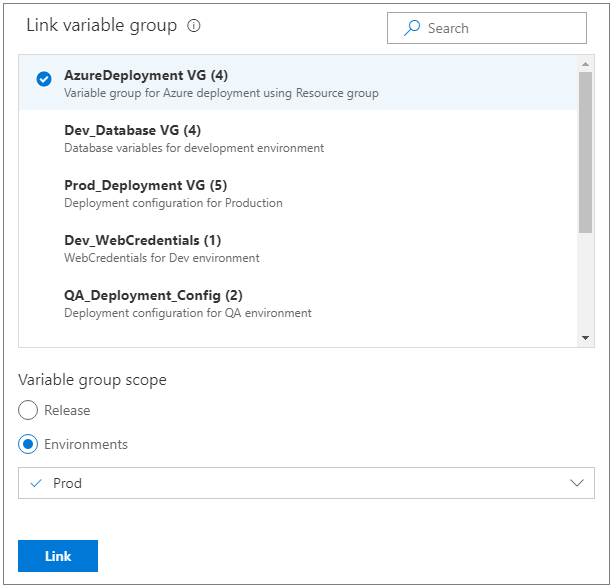
Scope a variable group to specific environments
Previously, when a variable group was added to a release definition, the variables it contained were available to all the environments in the release. Now, you have the flexibility to scope the variable groups to specific environment(s) instead. This makes them available to one environment but not other environments of the same release. This is great when you have an external service, such as an SMTP email service, which is different between environments.
Release automatically from Azure Container Registry and Docker Hub
When deploying containerized apps, the container image is first pushed to a container registry. After the push is complete, the container image can be deployed to a Web App for Containers or a Kubernetes cluster. You can now enable automatic creation of releases on updates to the images stored in Docker Hub or Azure Container Registry by adding them as an artifact source.
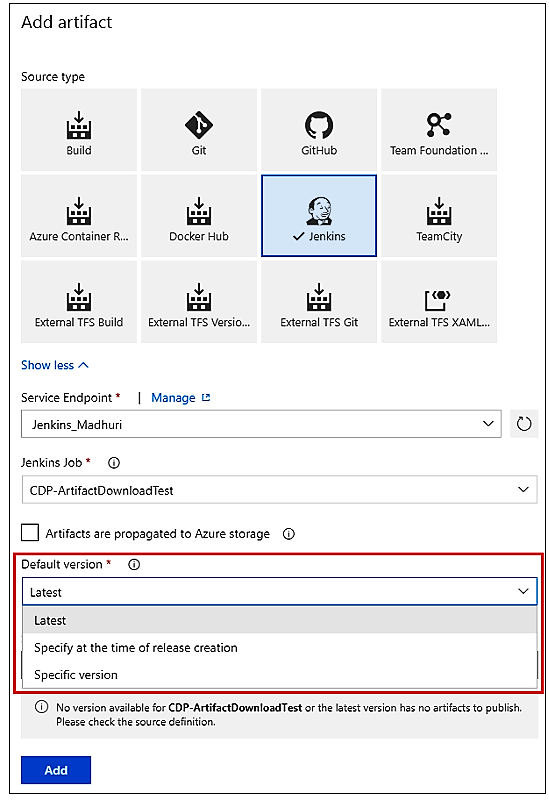
Specify a default version for Jenkins artifacts
When a release with multiple artifacts is auto-triggered, default versions saved in the release definition are picked up for all artifacts. Previously, Jenkins artifacts did not have a default version setting, and so you couldn't set a continuous deployment trigger on a release using Jenkins as the secondary artifact.
Now, you can specify a default version for Jenkins artifacts, with the options you are familiar with:
- Latest
- Specify at the time of release creation
- Specific version
Contribute release gates from extensions
Release gates enable addition of information driven approvals to the release pipelines. A set of health signals are collected repeatedly prior to or post deployment, to determine whether the release should be promoted to the next stage or not. A set of built-in gates are provided, and "Invoke Azure function" has so far been recommended as a means to integrate with other services. We now simplify the route to integrate with other services and add gates through marketplace extensions. You can now contribute custom gate tasks and provide release definition authors an enhanced experience to configure the gate.
Learn more about authoring gate tasks.
Scale deployments to Virtual Machines using Deployment Groups
Deployment Groups, that gives robust, out-of-the-box multi-machine deployment, is now generally available. With Deployment Groups, you can orchestrate deployments across multiple servers and perform rolling updates, while ensuring high availability of your application throughout. You can also deploy to servers on-premises or virtual machines on Azure or any cloud and have end-to-end traceability of deployed artifact versions down to the server level.
The agent-based deployment capability relies on the same build and deployment agents that are already available. You can use the full task catalog on your target machines in the Deployment Group phase. From an extensibility perspective, you can also use the REST APIs for deployment groups and targets for programmatic access.
Package
Seamlessly use public packages using upstream sources
Upstream sources for nuget.org and npmjs.com are now available. Benefits include the ability to manage (unlist, deprecate, unpublish, delete, etc.) packages saved from upstream sources as well as guaranteed saving of every upstream package you use.
Retention policies in TFS feeds
Until now, TFS package feeds have not provided any way to automatically clean up older, unused package versions. For frequent package publishers, this could result in slower feed queries in the NuGet Package Manager and other clients until some versions were manually deleted.
We have now enabled retention policies on TFS feeds. Retention policies automatically delete the oldest version of a package once the retention threshold is met. Packages promoted to views are retained indefinitely, giving you the ability to protect versions that are used in production or used widely across your organization.
To enable retention policies, edit your feed and enter a value in the Maximum number of versions per package in the Retention policies section.

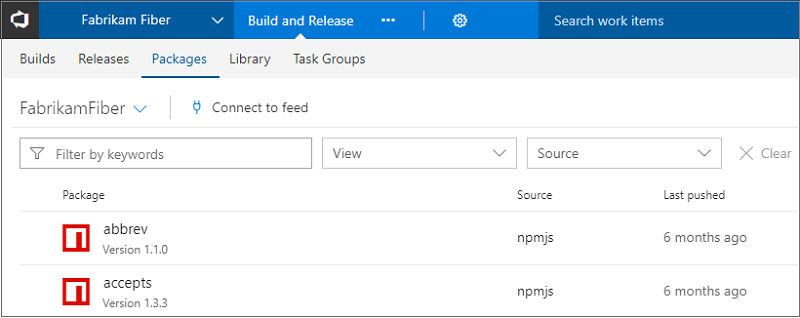
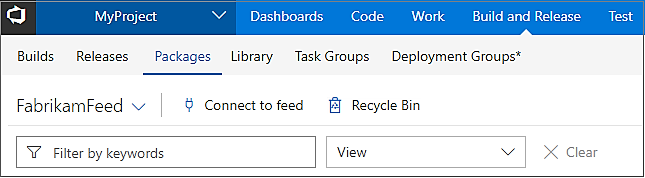
Filtering in package management
The Packages page has been updated to use our standard page layout, command bar control, and the new standard filter bar.
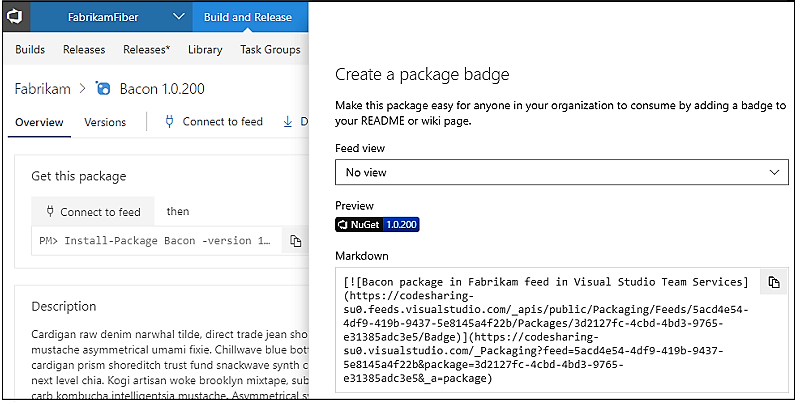
Share your packages using a badge
In the open source community, it is common to use a badge that links to the latest version of your package in your repository's README. You can now create badges for packages in your feeds. Just check the Enable package badges option in feed settings, select a package and then click Create badge. You can copy the badge URL directly or copy pre-generated Markdown that links the badge back to your package's details page.
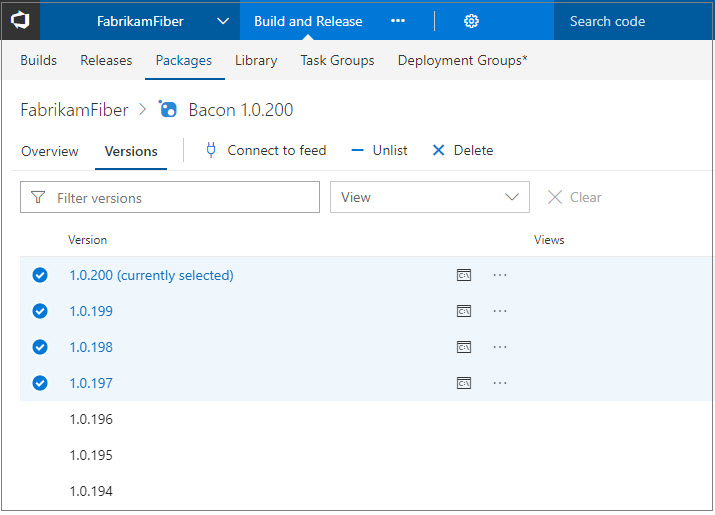
Previous package versions are now a full-page list
We received a lot of feedback on the updated Package Management experience, where we moved the list of previous package versions into a breadcrumb picker on the package details page. We have added a new Versions pivot that brings more information about prior versions and makes it easier to copy the version number or get a link to an old version.
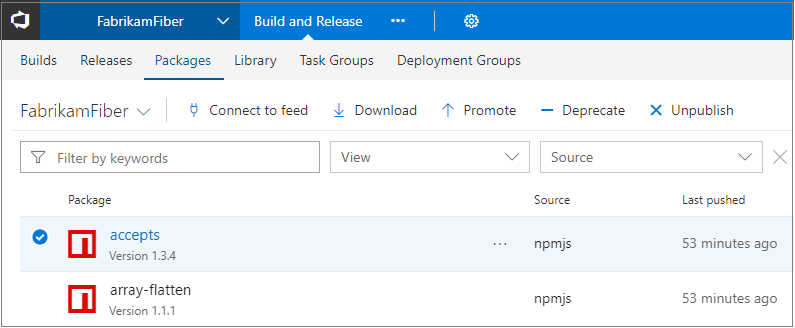
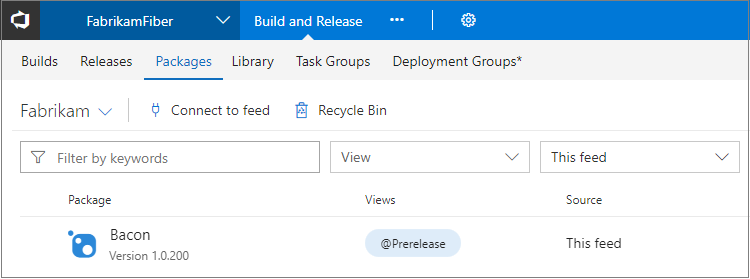
View quality of a package version in the package list
On the package list, you can now see the view(s) of each package version to quickly determine their quality. See the release views documentation for more information. ) documentation for more information.
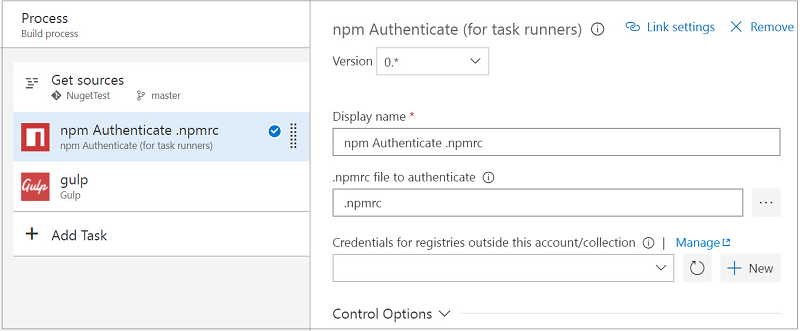
Gulp, Yarn, and more authenticated feed support
The npm task today works seamlessly with authenticated npm feeds (in Package Management or external registries like npm Enterprise and Artifactory), but until now it has been challenging to use a task runner like Gulp or an alternate npm client like Yarn unless that task also supported authenticated feeds. We have added a new npm Authenticate build task that adds credentials to your .npmrc so that subsequent tasks can use authenticated feeds successfully.
Package feed default permissions now include Project Administrators
In the past, creating a feed sets the creating user as the only feed owner, which can cause administration challenges in large organizations if that user switches teams or leaves the organization. To remove this single point of failure, creating a feed now uses the user's current project context to get the Project Administrators group and make it an owner of the feed as well. As with any permission, you can remove this group and further customize feed permissions using the feed settings dialog.
Recycle and restore packages
Deleting unused packages can help keep the package list clean but sometimes it can be done by mistake. Now you can restore deleted packages from the Recycle Bin. Deleted packages are retained in the Recycle Bin for 30 days, giving you ample time to restore if you need to.
Link to packages from anywhere
Although you could share the URL to a package found in the Packages hub in the past, it was often difficult to use because you needed to include a project in the URL, that may or may not apply to those using the link. With this Update, you can now share packages using a URL that automatically select a project the recipient has access to.
The URL format is: `https://<TFSserverURL>/_packaging?feed=<feed>&package=<package>&version=<version>&protocolType=<NuGet|Npm|Maven>&_a=package`
All parameters except `<TFSserverURL>` are optional, but if you provide a package, you must provide the protocol type.Test
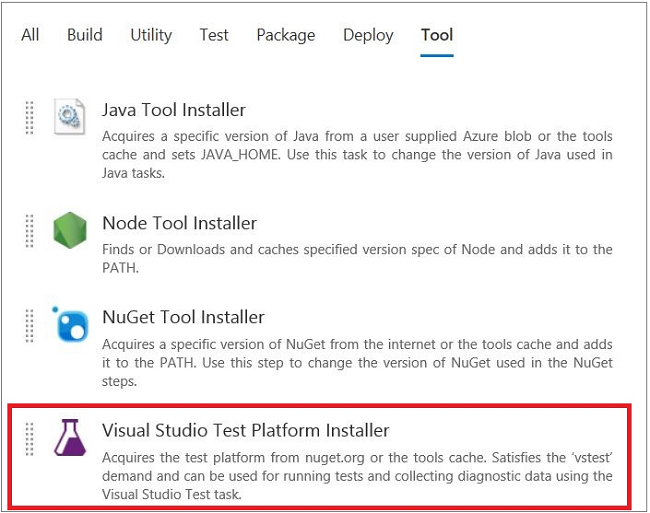
Visual Studio Test task does not need full Visual Studio
The Visual Studio Test task in build/release requires Visual Studio on the agent to run tests. Rather than installing Visual Studio to run tests in production environments or for merely distributing tests over multiple agents, use the new Visual Studio Test Platform Installer task. This task acquires the test platform from nuget.org and adds it to the tools cache. The installer task satisfies the vstest demand and a subsequent Visual Studio Test task in the definition can run without needing a full Visual Studio install on the agent.
From the task catalog, add the installer task in your definition.
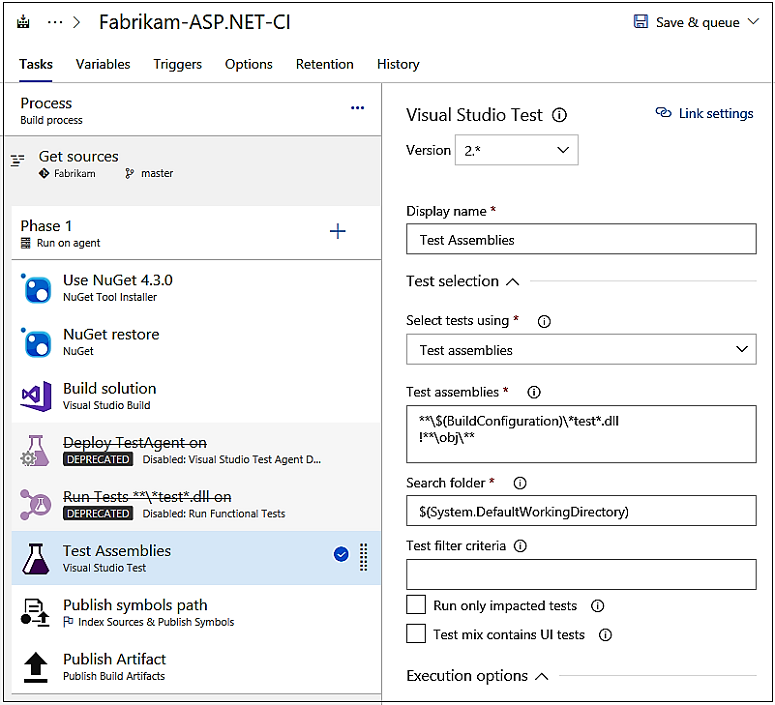
Configure the subsequent Visual Studio Test task to use the bits acquired through the installer.

Note
Limitations: The Test Platform package on NuGet currently does not support running Coded UI test. Enabling support for Coded UI test is on the backlog. The Test Platform package on NuGet is cross-platform, but VSTest task currently does not support running .NET core tests. To run .NET core tests, use the 'dot net' task.
Run Functional Tests and Deploy Test Agent tasks are now deprecated
Last year, we started on the journey to unify agents across build, release, and test. This was intended to address various pain points associated with using WinRM based Deploy Test Agent and Run Functional Tests tasks. It also enables you to use the Visual Studio Test (VSTest) task for all your testing needs, including:
- Unit tests
- Functional (UI/non-UI) tests
- MSTest based tests
- Third party framework-based tests
- Assembly-based test specification or running tests with Test Plan/Test Suite
- Single agent test execution as well as distributing tests over multiple agents
The unified agents approach also allows administrators to manage all machines that are used for CI/CD in a uniform manner.
We have delivered several crucial pieces to enable this capability, including:
- Agents can be configured for UI testing
- Visual Studio Test Platform Installer allows VSTest task to run without needing Visual Studio pre-installed
- Both Build and Release definitions can be created with multiple phases and have the ability to use different agent queues for each phase
- Automated test cases can be run from the Test hub using the VSTest task
With all the above now in place, we are ready to deprecate these two tasks. While existing definitions that use the deprecated tasks will continue to work, we encourage you to move to using VSTest to take advantage of continued enhancement over time.
Filter large test results
Over time test assets accrue, and large applications can easily grow to thousands of tests. Teams are looking for better ways to navigate through large sets of test results to be productive while identifying test failures, associated root cause, or ownership of issues. To enable this, we have added three new filters under Tests Tab in Build and Release as Test Name, Container (DLLs) and Owner (Container Owner).
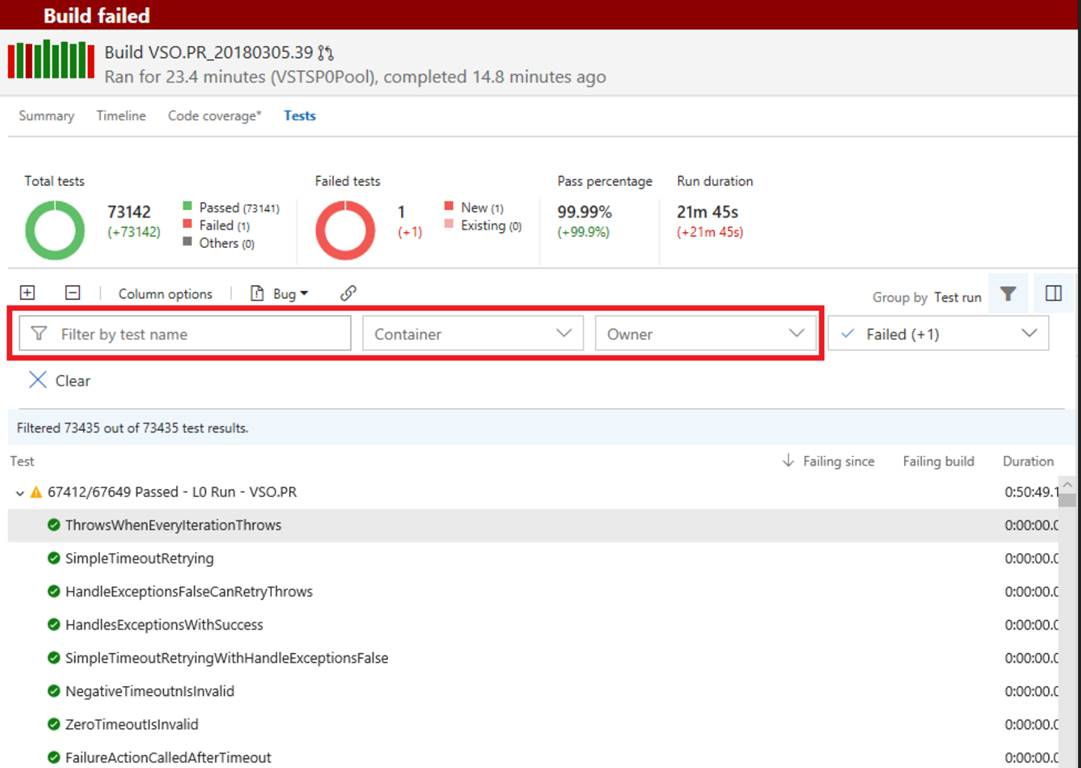
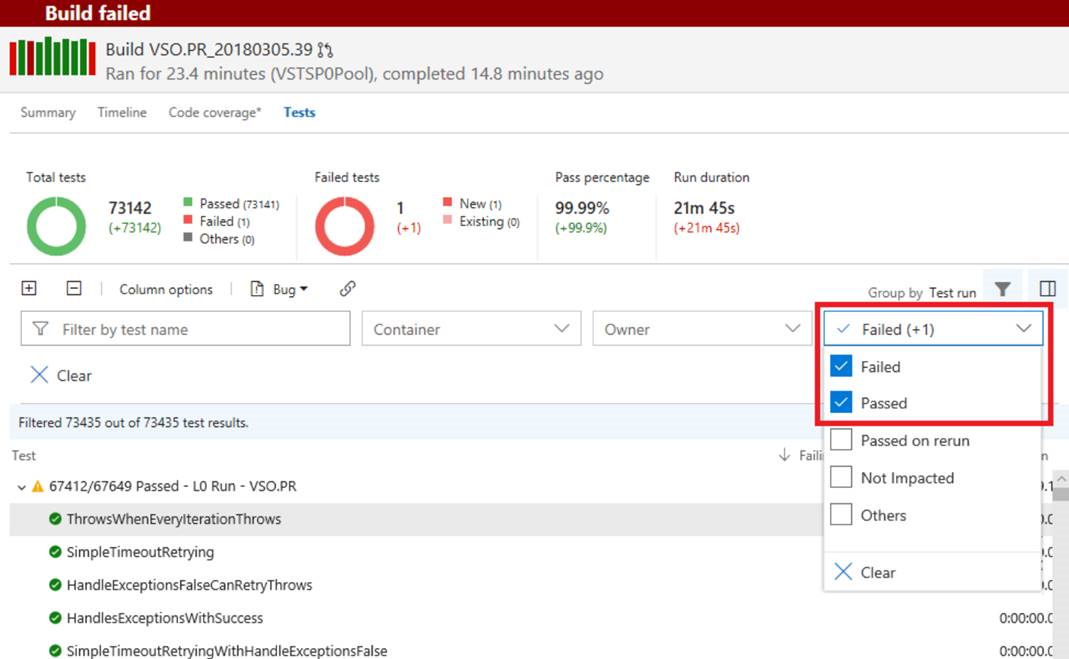
Additionally, the existing Outcome filter now provides the ability to filter for multiple outcomes. The various filter criterion are cumulative in nature. As a user, when I want to see the outcome of my tests for a change I just committed, I can filter on the Container (DLL name), Owner (DLL owner), Test Name, or all of them, to get to the results relevant to me.
Identify flaky tests
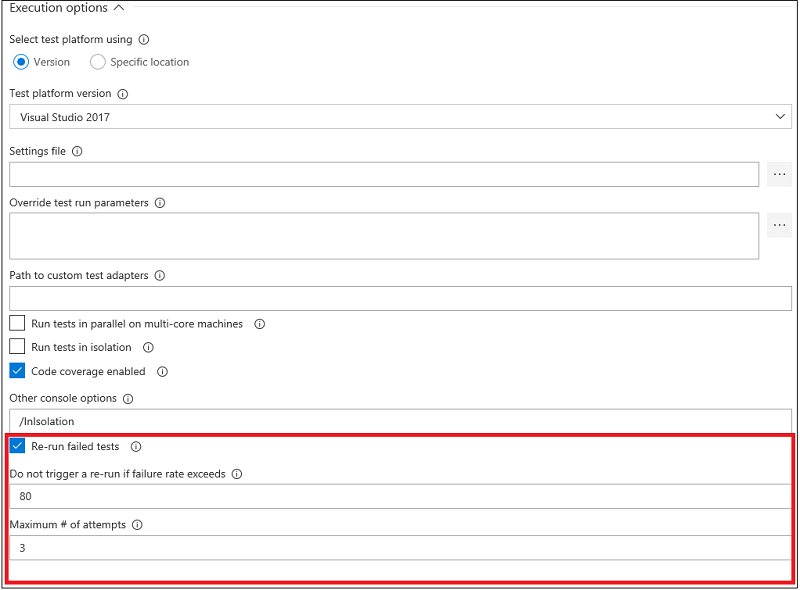
Sometimes tests are flaky - they fail on one run and pass on another without any changes. Flaky tests can be frustrating and undermines confidence in test effectiveness - causing failures to be ignored and bugs to slip through. With this Update, we have deployed the first piece of a solution to help tackle the problem of flaky tests. You can now configure the Visual Studio Test task to re-run failed tests. The test results then indicate which tests initially failed and then passed on re-run. Support for re-run of data driven and ordered tests are coming later.
The Visual Studio Test task can be configured to control the maximum number of attempts to re-run failed tests and a threshold percentage for failures (e.g. only re-run tests if less than 20% of all tests failed) to avoid re-running tests in event of wide spread failures.
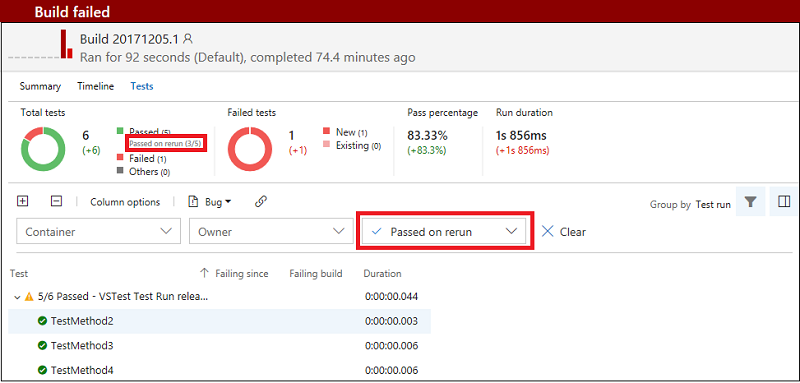
In the Tests tab under Build and Release, you can filter the test results with Outcome as "Passed on rerun" to identify the tests that had an unreliable behavior during the run. This currently shows the last attempt for each test that passed on re-run. The Summary view is also modified to show "Passed on rerun (n/m)" under Total tests, where n is the count of tests passed on re-run and m is total passed tests. A hierarchical view of all attempts is coming in next few sprints.
Preview improvements and support for different log types generated by Visual Studio Test task
We enhanced the VSTest task to publish logs generated by different kind of logging statements corresponding to standard output and standard error for failed tests. We have also improved the preview experience to support viewing text and log file formats, with capability to search in the log files.
Wiki
Wiki search
You can search for your favorite Wiki pages by title or content right alongside code and work items. You can read more about Wiki search in the Microsoft DevOps Blog.
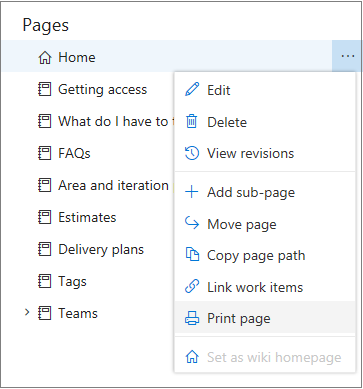
Print Wiki pages
Wiki can be used for a variety of content. Sometimes it can be useful to print content from Wiki to read in your spare time, add comments using pen and paper, or even share an offline PDF copy with those outside of your VSTS project. Now, simply click on the context menu of a page and select Print page.
Note
Currently this feature is not supported on Firefox.
Contribute to Wiki pages with ease using keyboard shortcuts
You can now use shortcuts to perform common edit and view actions in Wiki even faster using only your keyboard.
While viewing a page, you can add, edit, or create a subpage, for example:
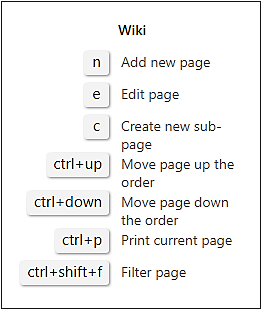
While editing a page, you can quickly save, save and close, or just close.
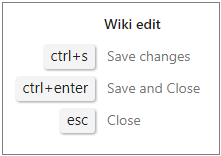
These are in addition to standard editing shortcuts such as Ctrl+B for bold, Ctrl+I for italics, Ctrl+K for linking etc. See the full list of keyboard shortcuts for more information.
Rich markdown rendering in code repo markdown
You can now create rich README.MD files in the code repositories. The markdown rendering of the MD files in code repositories now supports HTML tags, Block quotes, Emojis, image resizing, and mathematical formulas. There is parity in markdown rendering in Wiki and MD files in code.
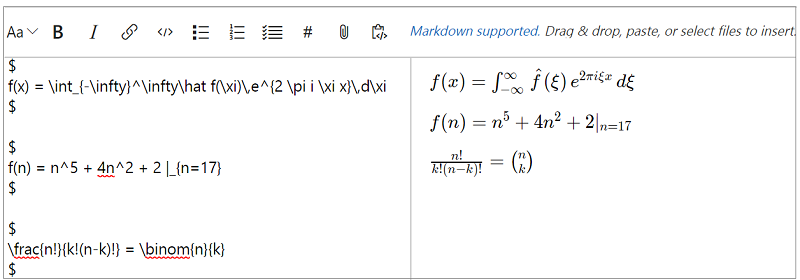
Wiki supports mathematical formulas
If your application deals with mathematical formulas and equations, you can now put them in Wiki using the LaTeX format.
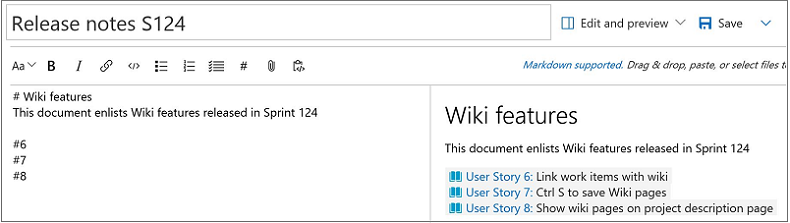
Reference work items in Wiki
Now you can reference work items in Wiki pages by pressing the '#' key to get a list of the most recently accessed work items and selecting the work item of interest. This is particularly useful while writing release notes, epics, specs, or other pages that require referring to a work item.
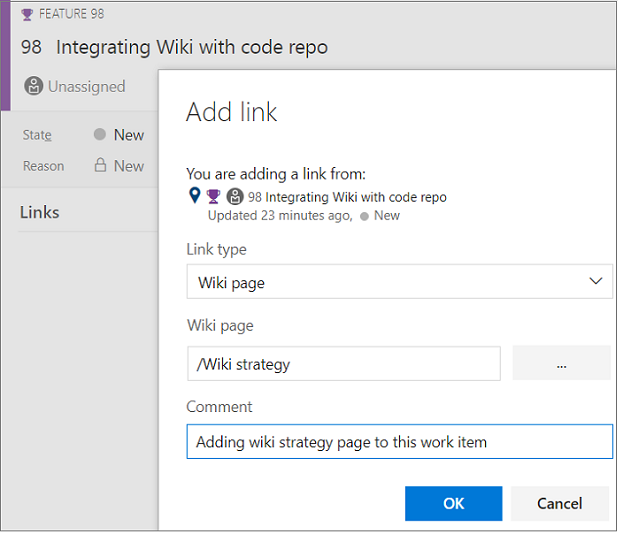
Link work items and Wiki pages
Now you can link a work item to a Wiki and vice versa. You can link work items to Wiki to create epic pages, release notes, and planning content that helps you track the work items associated with a Wiki page and validate what percentage of your epic page is complete.

Linked work items then show up on the Wiki page.
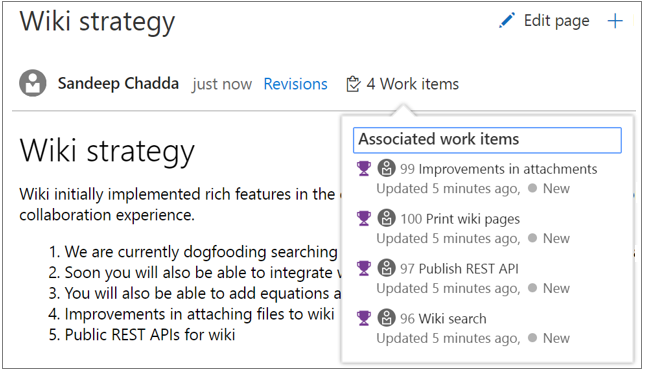
Add a link to a Wiki page from a work item through the new "Wiki page" link type.
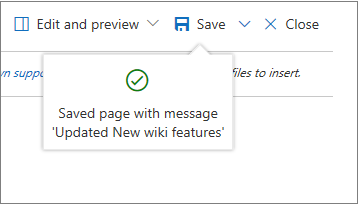
Ctrl+S to save Wiki page
We heard you wanted a quicker and easier way to save a Wiki page. Now you can simply use Ctrl+S keyboard shortcut to save a page with a default revision message and continue editing. If you would like to add a custom revision message just click on the chevron next to the save button.
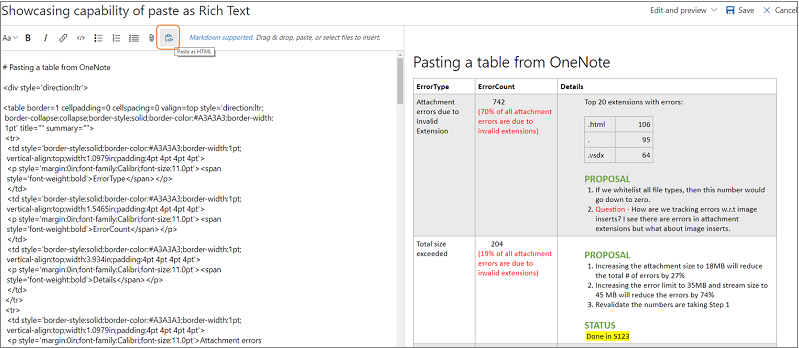
Paste rich Wiki content as HTML
You can now paste rich text in the markdown editor of Wiki from any browser-based applications such as Confluence, OneNote, SharePoint, and MediaWiki. This is particularly useful for those who have created rich content such as complex tables and want to show it in Wiki. Simply copy content and paste it as HTML.
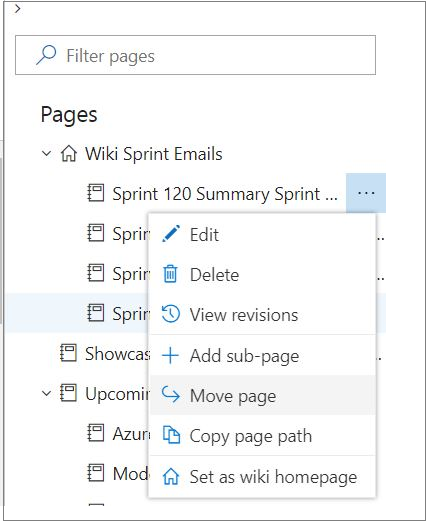
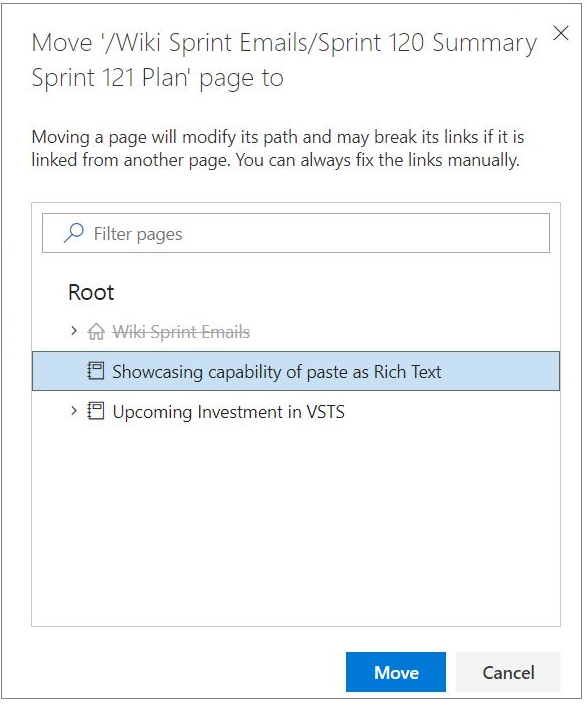
Move page in Wiki using keyboard
Earlier in Wiki, users could not reorder or re-parent pages using keyboard and this would impact users who prefer with keyboard operations. Now you can reorder pages by using Ctrl + Up or Ctrl + Down commands. You can also re-parent pages by clicking Move page in the context menu of a page and select the new parent page to move.
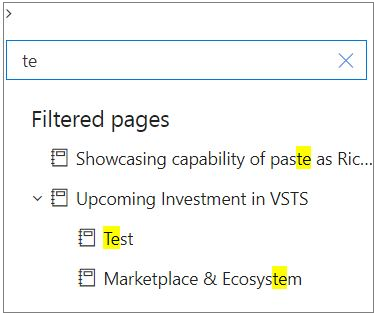
Filter text highlighting
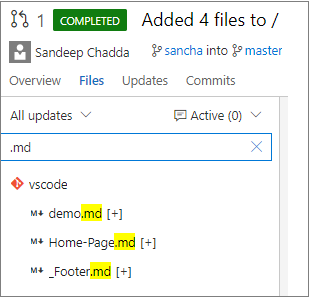
Filtering the navigation pane in Wiki shows the entire page hierarchy. For example, if you filter a page titled "foobar" the filtered navigation pane would show all parent pages as well. This can cause confusion as to why pages not titled "foobar" are showing up in filtered sets of results. Now, filtering content in Wiki highlights the text being searched to give a clear picture of the titles that are filtered and those that are not.
You will observe similar behavior in all code navigation panes as well. For example, the file navigation pane in pull requests, commits, changesets, and shelvesets.
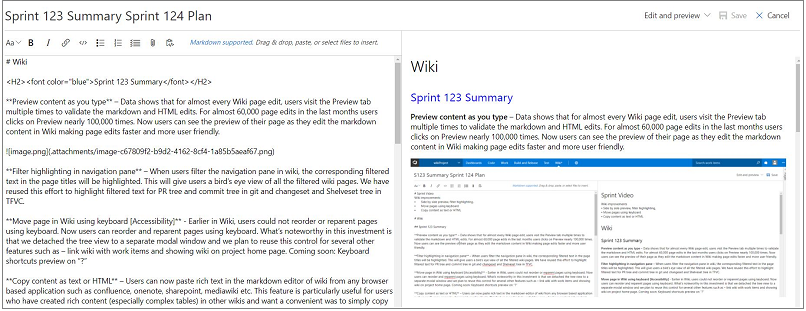
Preview content as you edit Wiki pages
Data shows that users almost always Preview a Wiki page multiple times while editing content. For each page edit, users click on Preview 1-2 times on average. This results in a slow and sub-optimal edit experience and can be particularly time consuming for those new to markdown. Now you can see the preview of your page while editing.
General
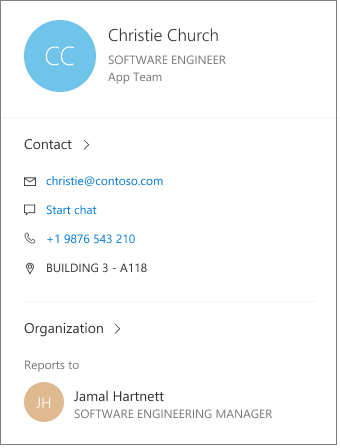
Profile Cards
There are multiple areas in TFS where information associated to a particular individual is shown, such as, but not limited to: pull requests created by an individual, and work items assigned to an individual. However, there is limited information about the individual itself for you to gain complete context. The new Profile Card replaces the existing profile card in TFS. The updated profile card allows you to interact with and learn more about users within your TFS account. Through integrations with your default email and IM client, Active Directory (AD) users can send emails and start chats directly from the profile card. AD users can also see the organizational hierarchy within the profile card. Profile cards can be activated within project home page - team members section, version control, work items and Wiki sections by clicking on the contact card icon, profile picture, or users name within comments.
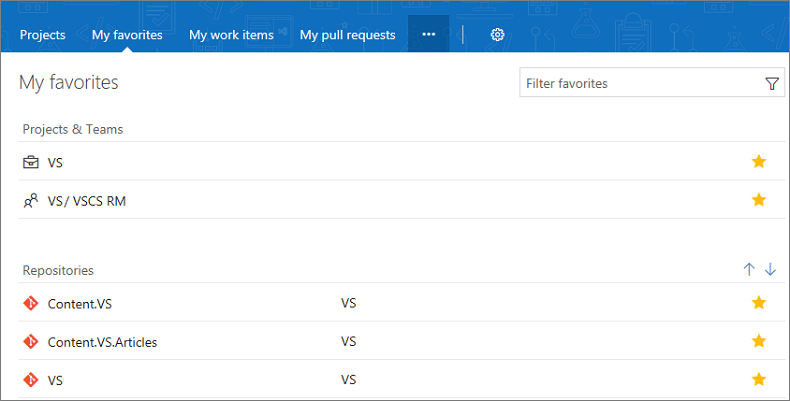
Circle avatars
Circle avatars are here! All profile pictures in the service now displays in a circle shape, rather than a square. As an example, here is the actual pull request for this change (note the circular, non-square avatars).

Project tags
You can now adorn projects with important keywords (tags). Tags are easily added and deleted directly from the project home page (by administrators) allowing users to quickly understand more about the purpose and scope of the project. We have more planned for how project tags can be leveraged, so stay tuned for more news here.

Re-order favorite groups
You can now re-order the groups on the account My favorites page using the up and down arrows in each group header.
Feedback & Suggestions
We would love to hear from you! You can report a problem and track it through Developer Community and get advice on Stack Overflow.